Affiliate Disclaimer: This post may contain affiliate links. As an affiliate, I may earn a commission if you purchase through my links, at no extra cost to you. Please read our full disclosure for more info.
If you’ve mastered static pins and you’re ready to unlock your next traffic boost, video pins are your fastest shortcut.
The best part? You don’t need to film anything — AI and Canva can create your first video pins in under 10 minutes.
When most beginners hear the word “video,” they panic. They imagine expensive cameras, complicated editing software, and the pressure of showing their face on screen.
I understand that fear deeply because I’ve lived through the consequences of over‑investing too early.
Back in 2019, my partner and I attempted a YouTube cooking project. We went all‑in on gear — cameras, tripods, lighting, storage, editing tools — the whole setup.
It was exciting at first, but the production workload drained our energy, and we eventually had to shelve the entire project.
It was a substantial financial loss and a powerful reminder that beginners should never burn cash on heavy production before they’ve validated their strategy.
Pinterest video pins don’t require any of that.
You don’t need a studio, a camera, or a filming setup. Pinterest users aren’t looking for polished vlogs or performance‑style videos — they want simple, helpful ideas they can Save and act on later.
That’s why you can create high‑converting video pins using nothing more than free B‑roll and clean text overlays.
What You’ll Learn
By the end of this guide, you’ll know exactly how to create high‑converting Pinterest video pins without filming anything. You’ll learn:
- Why video pins boost your reach — and how Pinterest’s algorithm distributes them differently from static pins
- The ideal video pin format — including the correct size, length, and text placement for mobile viewers
- How to brainstorm video ideas quickly using your existing blog posts
- How to use AI to write video hooks that trigger Save psychology
- How to create a video pin in Canva step‑by‑step using free B‑roll and simple animations
- How to optimize your video pin for Pinterest search with the right title, description, and cover image
- The common video pin mistakes to avoid so your content gets maximum distribution
Why video pins are your fastest shortcut to Pinterest traffic
Pinterest’s algorithm is designed to keep users engaged on the platform.
Because video naturally captures attention in a static feed, Pinterest often gives video pins higher distribution, meaning your content reaches more home feeds and search results faster.
But impressions alone don’t build a sustainable blog.
The real power of a video pin is its ability to build quick trust.
A moving background catches the eye, but the text overlay delivers the value.
When you combine calming motion with a clear solution to your reader’s problem, you trigger immediate Save psychology.
Static pins vs. video pins (and why you need both)
You shouldn’t abandon static pins just because video is popular.
Instead, use a mixed strategy to maximize your Pinterest visibility.
- Static pins: Best for quick scannability and high click‑through rates to your blog.
- Video pins: Excellent for building brand trust, getting massive impressions, and accumulating Saves.
Note: Video pins are excellent for impressions and Saves, but static pins still drive the highest outbound clicks. This is why you need both formats in your strategy.
If you’ve already established a consistent routine based on our guide to The 1‑Hour Nightly Pinterest Schedule for Busy Beginners, adding just one or two video pins a week to your mix will significantly increase your overall pin reach.
The anatomy of a high‑converting video pin
Pinterest is primarily a mobile platform — over 80% of users browse on their phones. This means your videos must be optimized for a silent, vertical scroll.
Best dimensions and length for beginners
To ensure your video pins display correctly and capture attention, follow these proven standards:
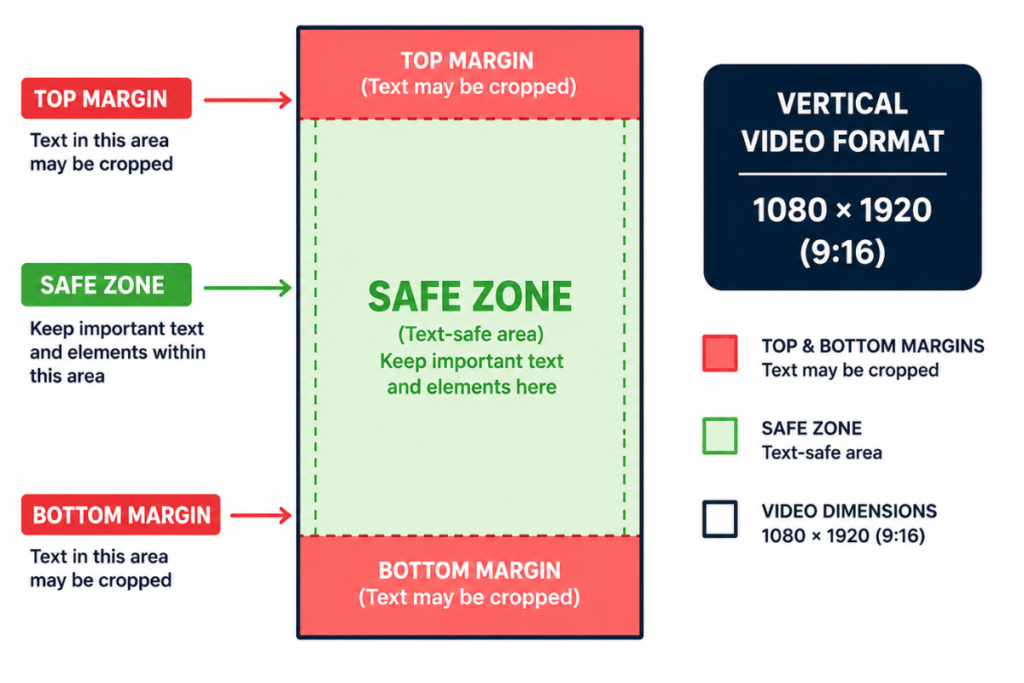
- Size: 1080 × 1920 pixels (9:16 vertical). This format prevents cropping and maximizes visibility in the feed.
- Length: 6 to 15 seconds. Pinterest loops videos automatically, so a short 6–10 second clip is enough to deliver your message.
- Text: Bold, centered text overlays are essential since most users watch with sound off.
- Audio: Optional. Prioritize a clear visual message first.
How to brainstorm video pin ideas without overthinking
The easiest way to start is by repurposing your existing blog posts.
Take a “How‑To” post and turn three key points into a quick text‑loop video.
For example, a wellness blog could show a calming nature clip with text revealing “3 Habits to Reduce Stress.”
🤖 AI Assistance: Let Google Gemini write your video hooks
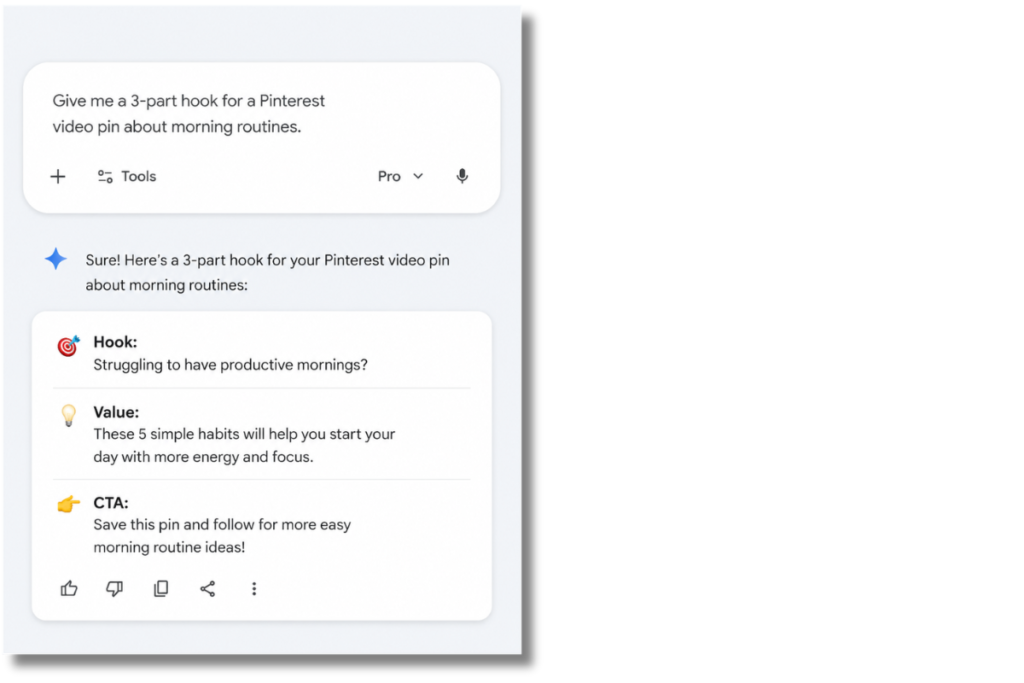
Writing punchy hooks is the hardest part of video creation. Google Gemini is my go‑to partner for this task because it excels at turning ideas into short, high‑impact text.
Copy‑paste this prompt into Google Gemini:
I am creating a Pinterest video pin for my [NICHE] blog post titled “[POST TITLE]”.
I need a 3‑part text overlay script for a 10‑second video:
Part 1 (Hook): A short attention‑grabber (2–4 words).
Part 2 (Value): The main benefit or tip (3–6 words).
Part 3 (CTA): A call to action to Save or read more (2–4 words).Please give me 5 different options optimized for Pinterest Save psychology.
Step-by-step: Creating your first video pin in Canva (for free)
We use Canva for all pin creation because it balances professional quality with beginner ease. While our Art Director uses Canva Pro, you can complete these steps entirely on the free version.
If you previously set up your workspace using our guide on Designing Your First Pins: A Beginner’s Guide to Using Canva for Free, this process will feel very familiar.
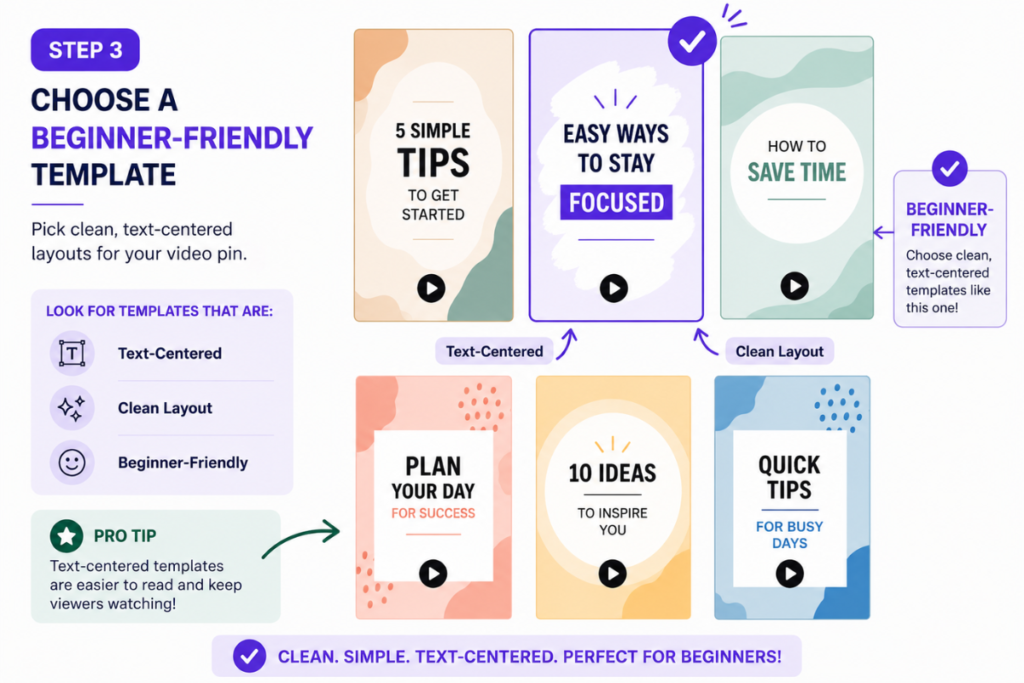
Step 1: Choosing a beginner-friendly template
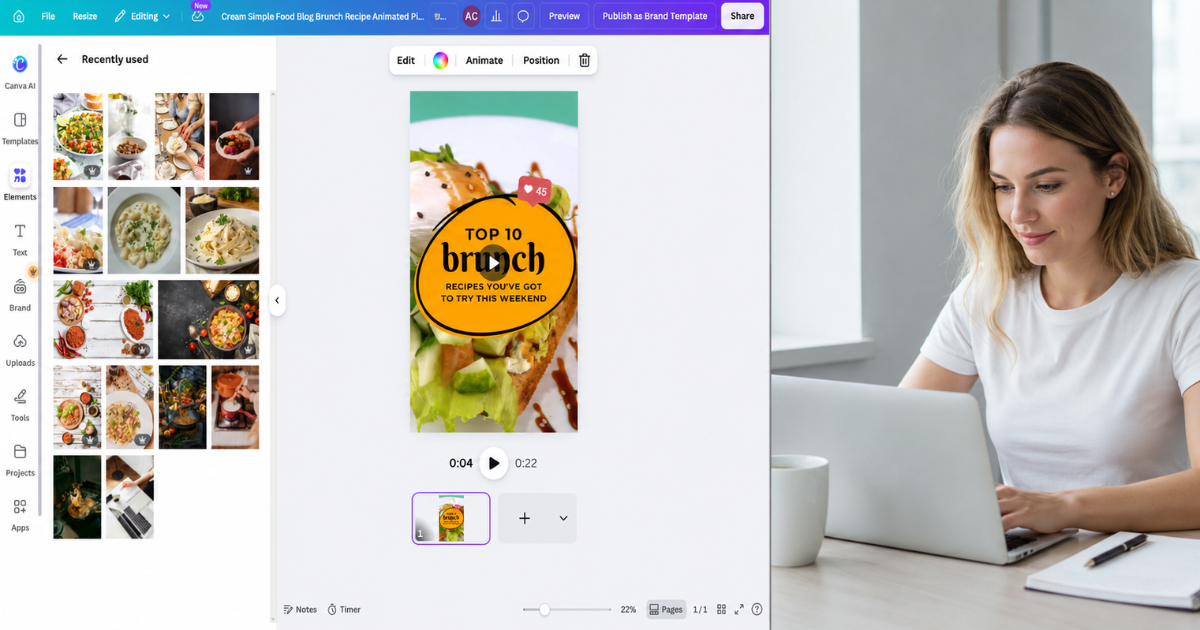
Open Canva, click Create a design, and select Custom size (1080 × 1920 px). In the Design tab, search for “video pin” to find clean, text‑centered layouts. Avoid templates with chaotic animations or neon colors that clash with your blog’s visual branding.
Step 2: Adding B‑roll stock video (zero filming required)
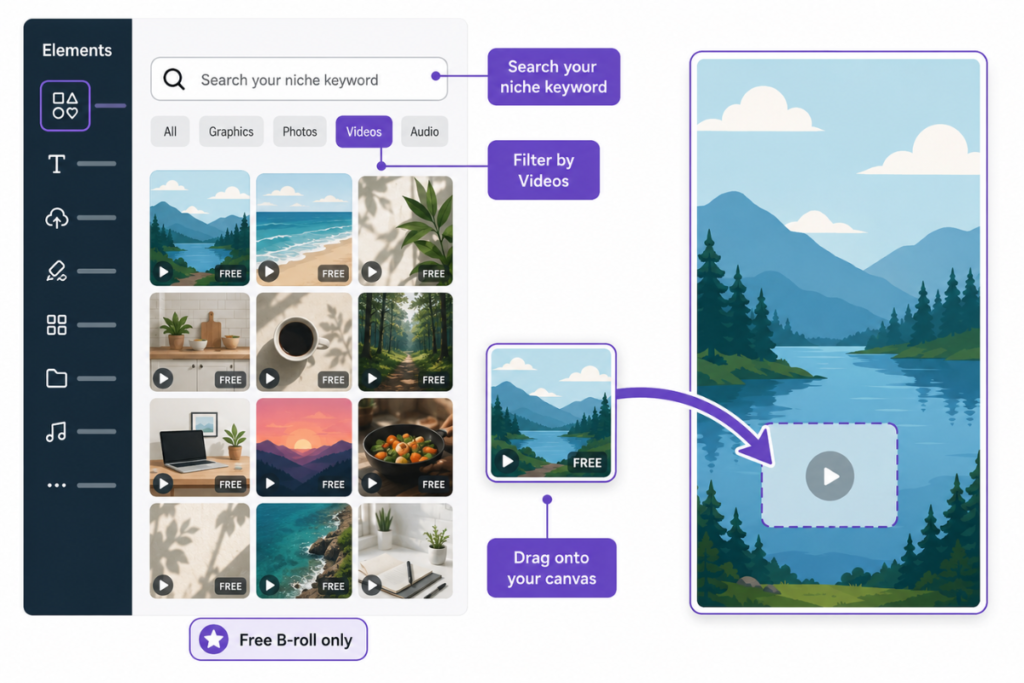
“B‑roll” is simply background footage that adds atmosphere without distracting from your text.
- Click Elements in the Canva sidebar.
- Type a niche keyword (e.g., “meal prep” or “budgeting”).
- Filter by Videos and drag a free clip onto your canvas.
Always use royalty‑free B‑roll from Canva’s free library. Avoid clips downloaded from TikTok, Instagram, or YouTube — Pinterest may suppress copyrighted or watermarked footage.
If the video makes your text hard to read, open the Transparency tool (checkerboard icon) and lower it to 60–70%, or place a dark‑tinted shape behind your text.
Step 3: Adding text overlays and animations
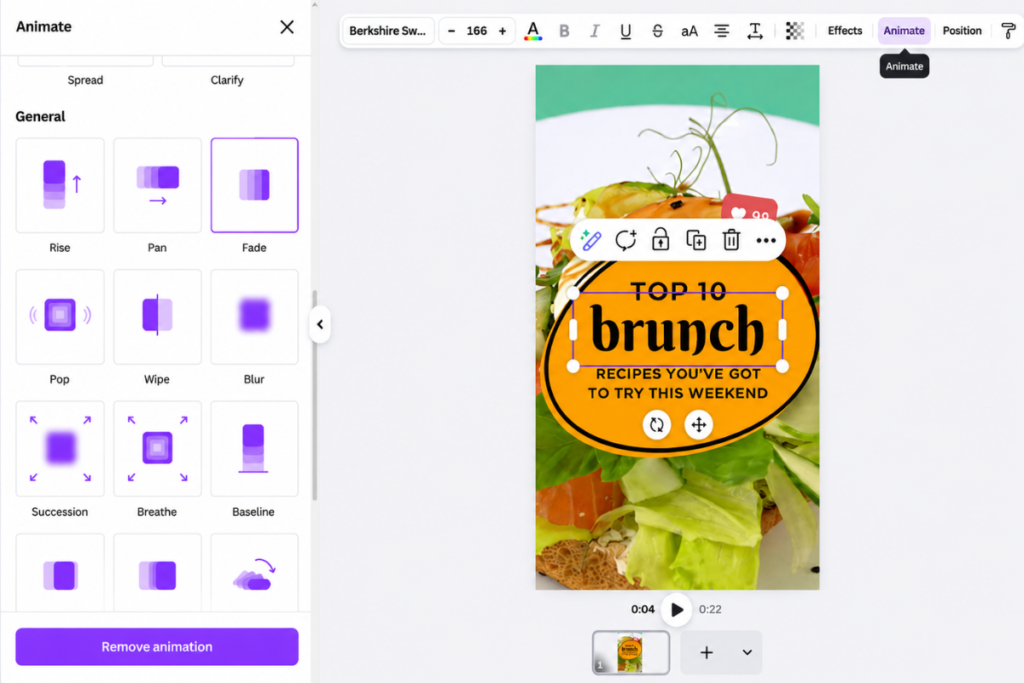
Paste your text hooks from Gemini into the template. To make the pin feel dynamic:
- Click on your text box.
- Click the Animate button in the top toolbar.
- Choose a simple animation like “Fade,” “Pan,” or “Pop.”
Always check your video pin in mobile preview — if the text doesn’t pop instantly, increase contrast or add a semi‑transparent overlay.
Keep the total length between 6 and 10 seconds by dragging the edge of the video timeline at the bottom of the screen. Then click Share → Download → MP4 Video.
How to upload and optimize your video pin for Pinterest search
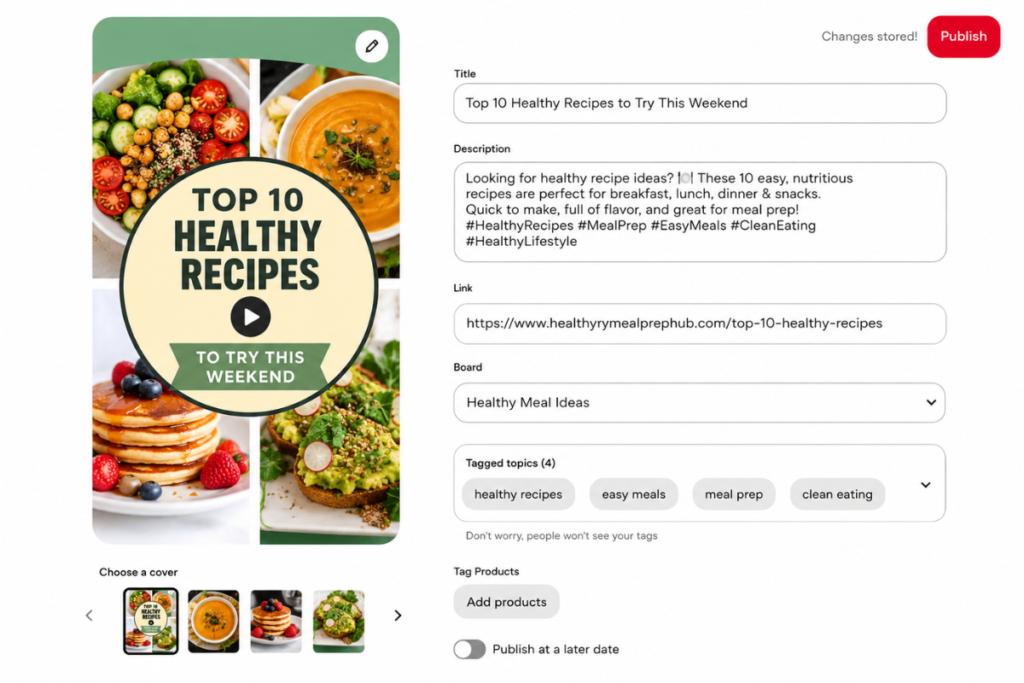
Uploading works the same way as a static pin, but video pins require one extra step: choosing a Cover Image.
Drag the selector to the frame that shows your main hook most clearly.
Your cover image acts like a thumbnail and heavily influences Saves, especially on slower connections.
Writing a pin description that drives Saves
Review our guide on Pinterest SEO Secrets: Writing Titles and Descriptions That Get Saves to ensure you’re using the right keywords for Pinterest search.
Your description should explain the benefit and include a clear next step.
Right:
“Looking for quick brunch ideas? These easy, flavor‑packed recipes help you save time and impress your guests. Save this to your brunch board and tap through for the full recipe list!”
Once your title and description are optimized, select the most relevant Pinterest board and click Publish.
Common video pin mistakes that cost you traffic
- Platform Watermarks: Never upload videos with TikTok or Instagram logos — Pinterest will suppress their reach.
- Too Much Text: Keep your on‑screen text short enough to read in under 3 seconds.
- No CTA: If you don’t tell viewers to “Read the full post,” they won’t click through.
What’s next?
You’ve now created a high‑impact video pin without expensive gear or complicated editing.
By combining simple B‑roll with strong AI‑generated hooks, you’re building a scalable traffic asset that grows with every pin you publish.
Once you have a mix of pins circulating, your next step is learning how to read the data.
In our next guide, we’ll break down your analytics so you can track your first 1,000 visitors and know exactly where to focus your energy next.
Read the next step: Understanding Pinterest Analytics: Tracking Your First 1,000 Visitors.
Ready to turn your setup into consistent results?
Anastasia Blogger’s Pinterest SEO Traffic Secrets reveals the exact tactics used by bloggers earning consistent six‑figure traffic.