This post may contain affiliate links. As an affiliate, I may earn a commission if you purchase through my links, at no extra cost to you.
Your blog logo is the face of your brand. It’s the first visual element readers see in your header, the image that appears in browser tabs, and the mark that makes your content instantly recognizable.
But here’s the problem: many beginner bloggers think they need expensive design software or a professional designer to create one.
They don’t.
With Canva, you can create a professional blog logo and upload it to WordPress in about 15-30 minutes (depending on how long it takes you to find the right template and elements—more on that in a moment).
This guide walks you through the exact process, with verified dimensions, format specifications, and honest tips about what works and what can be frustrating about the platform.
Why Your Blog Needs a Logo (Emotional Truth)
Before you create your logo, understand why it matters.
Your logo is a symbol of trust. When readers see it consistently across your blog header, social media, and email signatures, they begin to recognize your voice. Psychology research shows that readers are far more likely to Save content from creators with strong, consistent visual branding.
A professional logo signals that you’re serious about your blog. It separates you from generic, cookie-cutter sites. And most importantly—it makes you memorable. Readers will remember your logo before they remember your name.
That’s why starting with this one element, right after you’ve set up your WordPress theme, is one of the smartest decisions you can make.
What You’ll Learn in This Guide
By the end of this post, you’ll know how to:
- Click the Logo button to open a design canvas
- Find and click a logo template to load it
- Customize colors, fonts, and elements to match your brand
- Set up a custom 500 × 140 pixels canvas (in a new browser tab)
- Copy your customized design and paste it into your 500 × 140 pixels canvas
- Remove the background manually (Canva Free) or use transparent background (Canva Pro)
- Download your logo as PNG
- Upload your logo to WordPress and set it perfectly in your header
The Real Truth About Canva (Before You Start)
Canva is genuinely the best option for beginners. Full stop. It’s free, it’s accessible, and it gets the job done.
But let’s be honest about what you’re getting into.
Canva is convenient. Everything is in one window. You don’t need to learn Photoshop. You don’t need design knowledge. That’s the huge win.
However, Canva’s search and asset library can be a pain in the neck. With millions of elements, templates, images, and fonts available, finding exactly what you want often requires multiple search attempts, keyword brainstorming, and patience. You might search for “minimalist food logo” and get 500+ results of varying quality. Then you refine to “simple food brand logo” and get different results. Then “clean restaurant logo.” Each search yields different templates.
Realistic timeline: Most beginners spend 15-30 minutes (usually more) finding the right template and customizing it. This isn’t a flaw with Canva—it’s the reality of having too many options. More options = more browsing. If you know exactly what you want, you’ll find it fast. If you’re figuring it out as you go, expect to spend some time exploring.
Other real limitations you should know about:
- Canva’s free images are overused. Because thousands of bloggers use the same free stock images, your designs might inadvertently look similar to competitors’ designs. To access more unique graphics, you’d need to upgrade to Canva Pro.
- Performance can be slow. Especially during peak hours (Friday-Sunday), Canva can lag. Images sometimes disappear temporarily, effects don’t apply, or panels close unexpectedly. It usually resolves after a refresh, but it’s annoying when you’re trying to get work done.
- Limited export options. You can’t export in all professional formats (like PSD or AI). Once your logo is created in Canva, you’re limited to PNG, JPG, PDF, or SVG. For 99% of bloggers, this is fine. For designers moving to professional software, this is a limitation.
- No backup feature. Canva doesn’t have an obvious way to back up your projects. If something goes wrong, you can’t easily export everything. (Pro tip: Screenshot or export important designs regularly.)
Bottom line: Canva is still the best free option for beginners. Just go in with realistic expectations about search time and occasional frustrations.
First, Create Your Canva Free Account (If You Haven’t Already)
Time: 1-2 minutes
Go to canva.com
- Click “Sign up” and create a free account using:
- Your email address, OR
- Google account, OR
- Facebook account
- You now have access to Canva’s entire template library and free assets
- No credit card required
What Requires Canva Pro (Currently $12.99–$15/Month — Pricing May Change Over Time & By Region, So Please Verify on Canva):
- ⚠️ Automatic “Transparent Background” download option (free users remove background outside Canva—see Step 7)
- ⚠️ Resize button (this is why we use the copy-paste workflow instead)
- ⚠️ Premium templates and elements (marked with 👑 crown icon)
Good news: You can create a professional blog logo entirely on the free plan using the workflow in this guide.
The Free Account Workflow (Important for Free Users)
If you’re using Canva Free, here’s the exact workflow:
- Click Logo button → both the templates panel (left) and canvas (right) open at once
- Click a template thumbnail → loads into canvas (500 × 500px default)
- Customize your design (colors, fonts, elements)
- Open a new browser tab and create a blank 500 × 140 canvas in Canva (Custom size)
- Go back to your customized logo, press Ctrl + A then Ctrl + C to copy
- Switch to your 500 × 140 canvas, press Ctrl + V to paste (auto-scales to fit)
- Download as PNG, then use a free online tool (like remove.bg or PhotoScissors) to remove the background outside Canva
Why this workflow? Works on Free (no Resize feature), keeps correct size for WordPress, simple steps.
Step 1: Search for and Load a Logo Template
Time: 5-15 minutes (depending on browsing)
Now you’ll find and load a logo template directly into your canvas.
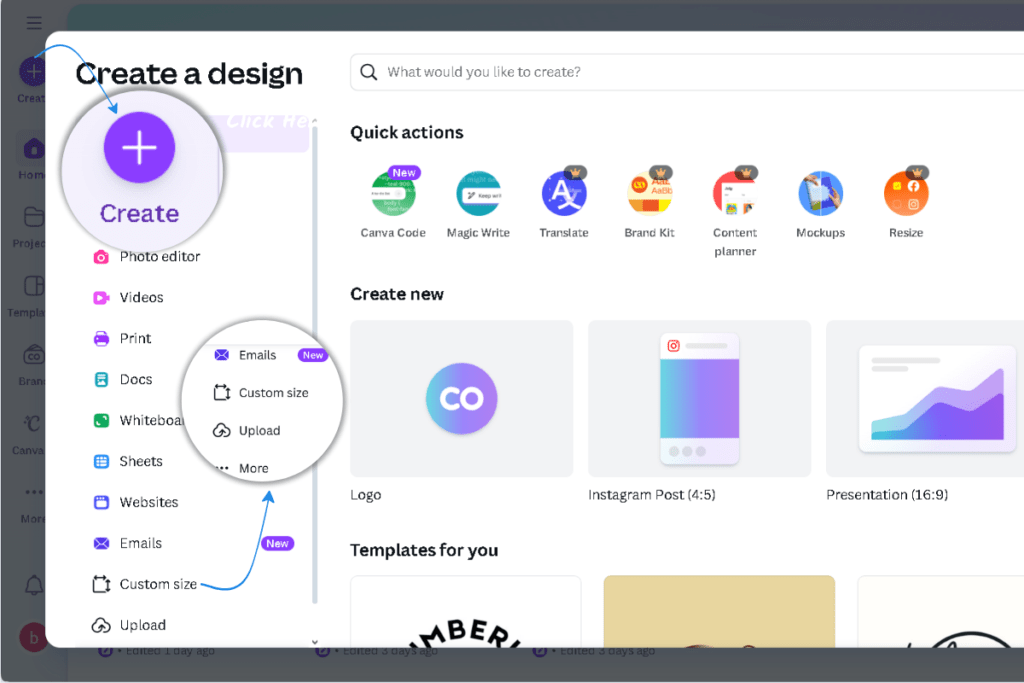
Click Create and Select Logo
Go to Canva home (canva.com)
- Click on the “Templates” tab at the top
- Click “Create” button on the left sidebar
A dialog opens showing design options
In the “Create new” section, click “Logo”
Canva opens a canvas with the Templates panel on the left showing logo designs
You’re now ready to browse and select a template
Step 2: Click a Template to Load It
The template panel on the left shows dozens of logo designs. You’ll scroll, search, and select the one that feels right for your brand. No pressure—you can try as many as you want.
Know your niche first. If you’re running a food blog, search “food logo” or “restaurant logo.” Lifestyle blogger? Search “modern lifestyle” or “fashion brand.” Wellness? Try “yoga logo” or “health brand.” Business? Look for “professional logo” or “corporate brand.”
You’ll get tons of results. That’s intentional. Canva gives you options so you can find something that truly resonates with your voice.
Want to get fancy? Click the Styles tab next to Templates. It shows pre-matched font and color combinations you can instantly apply to any design. This is your shortcut to looking polished without having to think about design theory.
The Action Steps
- Find a template you like in the left panel
- Click it once
- It loads instantly onto your canvas (right side)
- Start customizing
Important for Free Users: This canvas is 500 × 500px—you’ll copy your final customized design and paste it into your 500 × 140px canvas in the next step.
Customize Your Logo
Time: 5-15 minutes (depending on how much you want to change)
Now you’re in your 500 × 500 canvas with the template loaded. Customize it to match your brand
Edit the Blog Name Text
- Click on the main text (usually says “Your Business Name”)
- Delete the placeholder and type your blog name
- Adjust the font:
- Click “Font” in the top toolbar
- Choose a clean, readable font
- Adjust size if needed
Pro Tip: Avoid overly decorative fonts. Legibility > creativity for logos.
Add or Edit Your Tagline (Optional)
- Click the tagline text in the template
- Type your tagline (e.g., “Simple Tips for Busy Bloggers”)
- Keep it benefit-focused and emotionally resonant
Change Colors to Match Your Brand
- Click any element (text, icon, background)
- A color picker will appear in the top toolbar
- Click the color box and select your brand colors
- Limit to 2-3 colors maximum
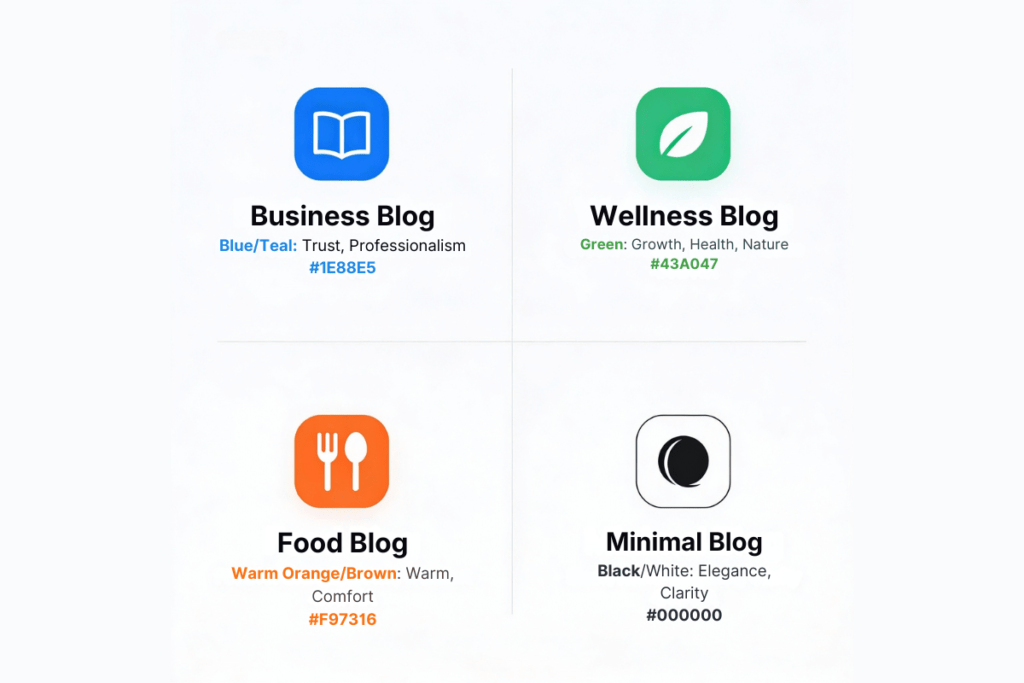
Color Psychology:
- Blue/teal: Trust, professionalism (business/finance blogs)
- Green: Growth, health, nature (wellness/gardening blogs)
- Warm oranges/browns: Warmth, comfort (lifestyle/food blogs)
- Black/white: Elegance, clarity
Replace or Adjust the Icon/Graphic
- Click the icon to select it
- Go to “Elements” in the left sidebar
- Search for a new icon (e.g., “leaf,” “fork,” “heart”)
- Browse results and drag your choice onto the canvas
- Resize and reposition as needed
Not feeling it? Select all (Ctrl+A on Windows, Cmd+A on Mac), press Delete, and try another one. There’s no penalty for exploring.
Once you’re happy with how it looks, you’re ready for the next step.
What’s Next: You’ll create a second, smaller canvas (500 × 140 pixels) where you’ll paste this customized design. This smaller size is what WordPress needs for your header logo.
Step 3: Create a Custom Blank 500 × 140 Pixel Canvas
1. On the Canva home screen, click “Create”
2. Select “Custom size” from the options
3. Enter these exact dimensions:
- Width: 500 pixels
- Height: 140 pixels
- Units: pixels (px)
4. Click “Create new design”
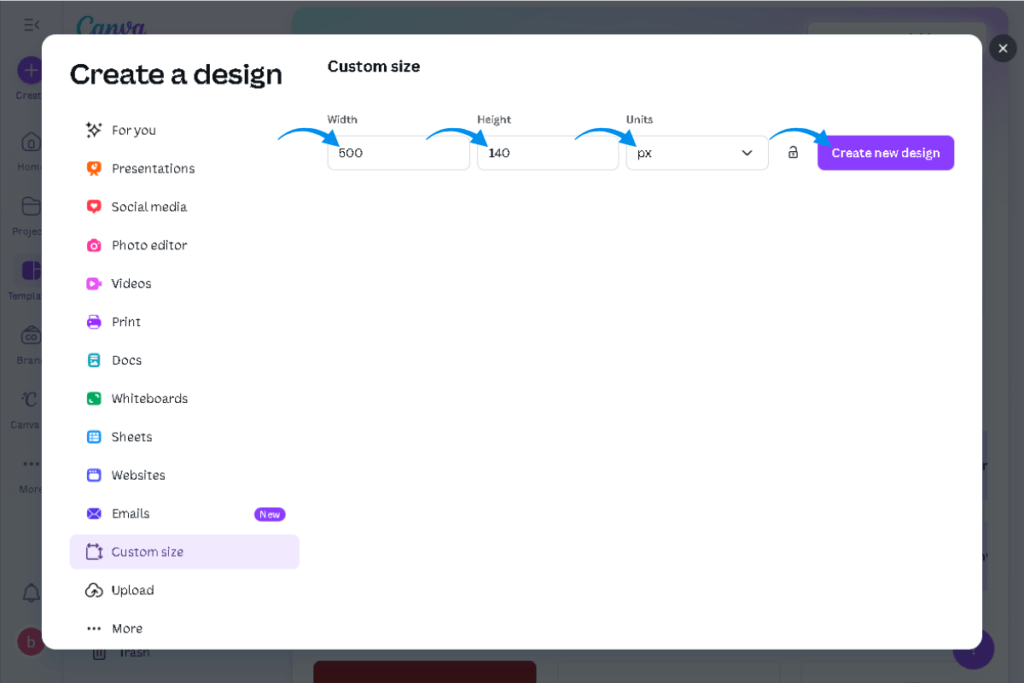
A blank 500 × 140 canvas will open. This is your working space.
⚠️ Important: Keep this canvas open in a browser tab. You’ll come back to it in Step 4 to paste your customized logo.
Step 4: Copy Your Customized Logo
Now you’ll copy everything from that 500px x 500px template canvas and paste it into your 500 px × 140px working canvas.
Select all elements: Press Ctrl+A (Windows) or Cmd+A (Mac). All elements in the template will be highlighted—you’ll see selection boxes around text, icons, and graphics.
Copy the elements: Press Ctrl+C (Windows) or Cmd+C (Mac). The design is now copied to your clipboard.
That’s it. You’ve extracted the design. Now you’ll go back to your 500px × 140px canvas and paste it.
Step 5: Paste into Your 500 × 140 Canvas
Switch to your 500px × 140px canvas by clicking on the browser tab where you left it open from Step 3.

Paste in the customized logo design: Press Ctrl+V (Windows) or Cmd+V (Mac). The customized logo design will paste into your 500 × 140 canvas and automatically fit your dimensions.
That’s the magic. When you paste into a smaller canvas, Canva scales the elements proportionally so everything fits.
Step 6: Download Your Logo as PNG
Time: 1-2 minutes
Why PNG Format?
PNG supports transparent backgrounds and maintains quality at any size. JPG does not support transparency. Always use PNG for logos.
Step 6a: Download Your Logo
- Click “Share” button in the top right (or “Download”)
- Select “Download”
- Choose “PNG” from the file type dropdown
- If you’re using Canva Pro, check the “Transparent background” checkbox
- Click “Download”
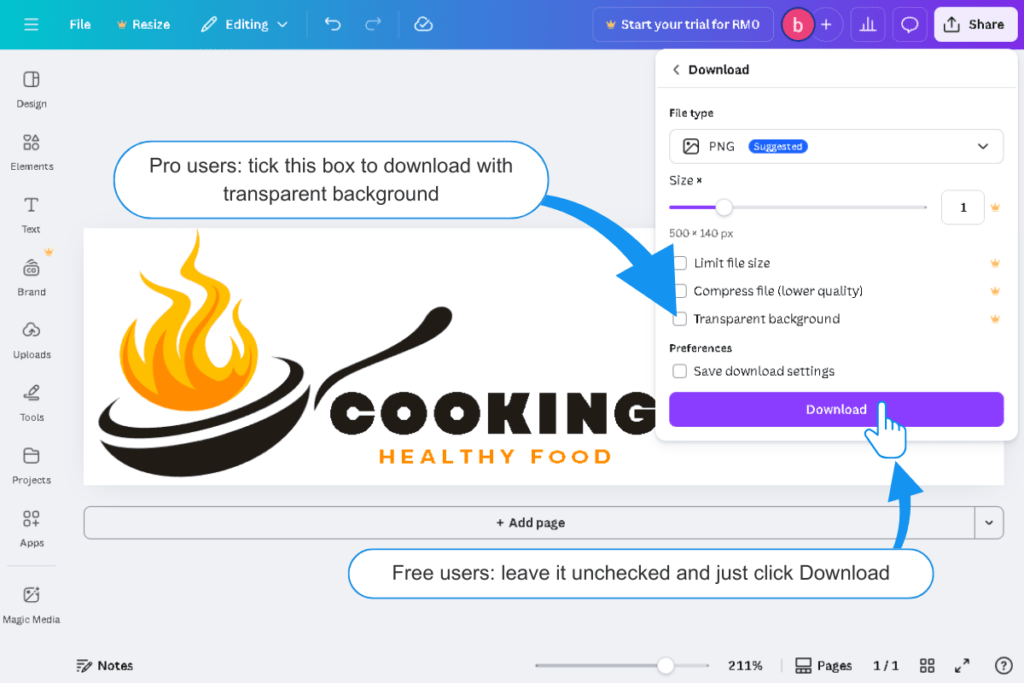
Your logo will download to your computer as a PNG file at 500 × 140 pixels.
Rename it immediately to something descriptive like myblog-logo.png or wellness-kitchen-logo.png. This makes it easier to find in WordPress later.
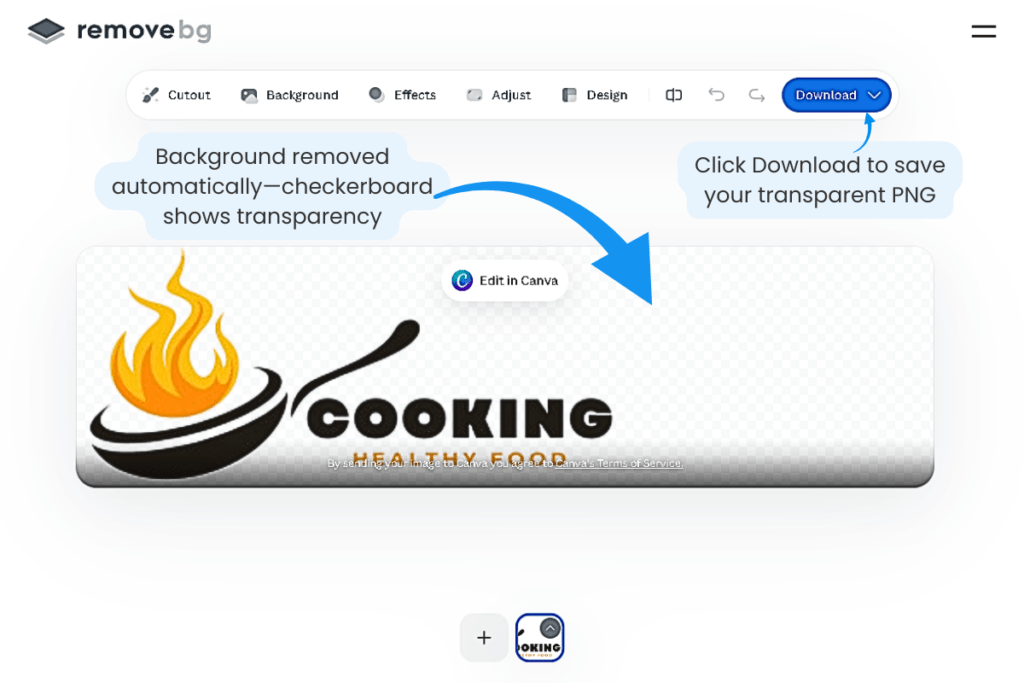
Important for Free Users: Remove Background After Download
If you’re using Canva Free, your downloaded PNG will have a white background. To make it transparent:
- Go to remove.bg (free online tools)
- Upload your PNG file
- The tool will automatically remove the background
- Download the transparent version
- Replace your original file with this transparent version
Pro Tip: Keep your logo file under 200KB for fast loading. PNG files at 500 × 140 pixels typically run 50-150KB—perfect for web use.
Step 7: Upload Your Logo to WordPress
Time: 2-3 minutes
Now get your logo onto your live WordPress site.
⚠️ IMPORTANT: Which WordPress Theme Are You Using?
This guide uses Blocksy theme for all WordPress instructions and screenshots. Blocksy is our #1 recommended theme for beginners because it’s:
✅ Free and beginner-friendly
✅ Fast-loading (great for SEO and Pinterest traffic)
✅ Built-in customization (no extra plugins needed)
✅ Clean header design (perfect for logo display)
Other beginner-friendly themes that work well:
- Astra – Lightweight and highly customizable
- Kadence – Modern design with excellent page builder integration
If you’re using Astra or Kadence, the logo upload process is nearly identical (Appearance → Customize → Site Identity or Header). Button names may vary slightly, but the workflow is the same.
If you haven’t chosen a theme yet: We strongly recommend Blocksy for beginners. It’s what we use throughout all our WordPress setup guides, so following along will be easier.
→ Need help choosing a theme? See our complete guide: Best Free WordPress Themes for Beginner Bloggers
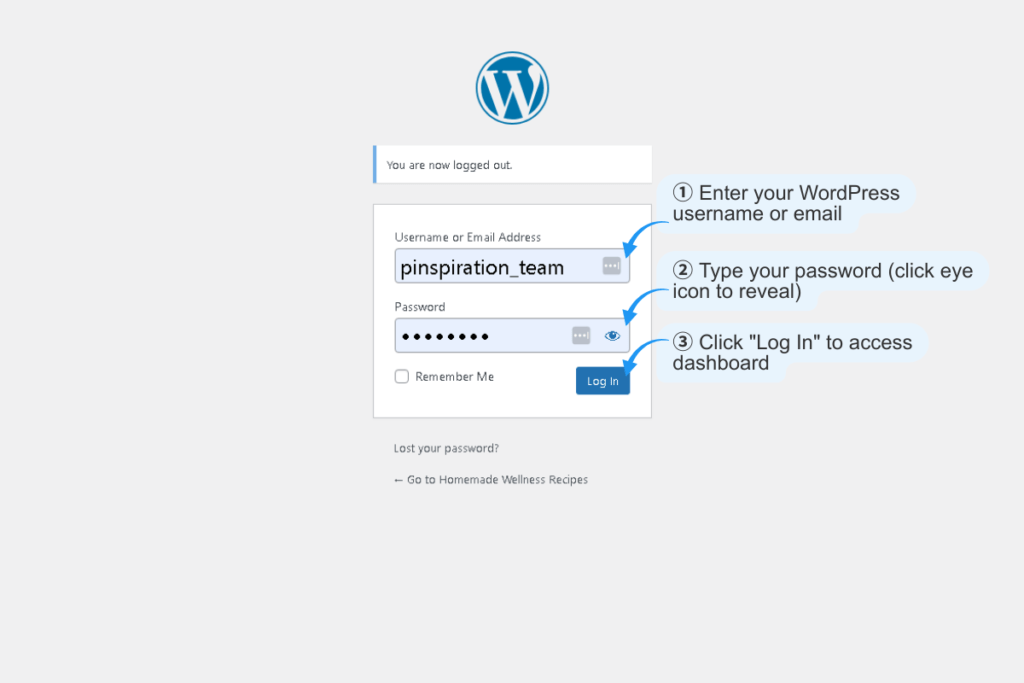
Step 7a: Log Into Your WordPress Dashboard
- Open your WordPress admin: yoursite.com/wp-admin
- Enter your username and password
- You’re now in the WordPress dashboard
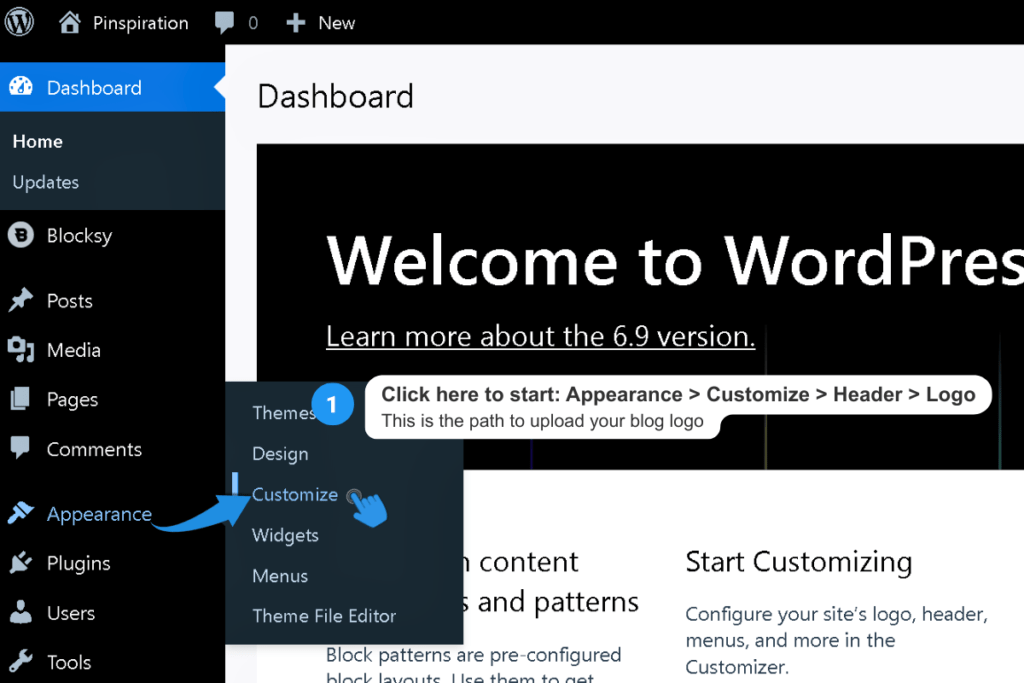
Step 7b: Navigate to Logo Settings (Blocksy Theme)
- In the left sidebar, click “Appearance”
- Click “Customize” (opens your site customizer with live preview on the right)
- Click “Header” in the customizer sidebar
- You’ll see “Customizing: Global Header” with tabs for “Elements” and “Headers”
- Under the Elements tab, click “Logo” (you’ll see it in the list with an arrow →)
- This opens the Logo settings panel with two tabs: “General” and “Design”
- Under the General tab, you’ll see your current logo and upload options
What you’ll see in the Logo settings (General tab):
- Logo: Upload area with desktop/tablet/mobile preview icons on the right
- Logo Height: Slider to adjust size (currently set to 72 px in the screenshot)
- Site Title: Toggle switch (currently ON – shown in black)
- Site Tagline: Toggle switch (currently ON – shown in black)
- Content Alignment: Three alignment options (left/center/right)
- CSS Class: Text field for custom styling classes
- Custom Aria Label: Text field for accessibility attributes
Important: Once you upload your logo, make sure to toggle both Site Title and Site Tagline OFF. Otherwise, they’ll appear alongside your logo and look cluttered.
Step 7c: Upload Your Logo File
- Click the “Select logo” button (shown in the Logo upload area)
- A popup window opens with two tabs: “Upload files” and “Media Library”
- Click “Select Files” button (or drag and drop your logo file into the upload area)
- Your computer’s file browser will open
- Navigate to your transparent PNG logo file
- Select it and click “Open”
- WordPress uploads your file and displays it in the Media Library with a blue checkmark
- Click the “Select” button (bottom right) to confirm your choice
WordPress will now display your logo in the header preview on the right side of the screen. You’ll see it appear at the top left corner of your site.
Step 7d: Adjust Logo Height (Optional)
Most WordPress themes include a “Logo Height” slider:
- Drag the slider to adjust size
- Recommended height: 60-70 pixels for optimal display
- Your theme will automatically maintain aspect ratio (no stretching)
Pro Tip: Make sure logo height doesn’t exceed header height. If header is 80px tall, a 70px logo is ideal.
Step 7e: Save Your Changes
- Click “Publish” at the top of customizer
- Your logo is now live on your WordPress site!
Verification: Your Logo is Live
Go to your blog homepage (yoursite.com) in a new browser tab and look at the top left corner of your header. Your new logo should be displaying right now, perfectly sized and looking professional.
If it’s not showing or looks wrong:
- Did you export as PNG (not JPG)?
- Is the file size reasonable (under 200KB)?
- Did you remove the background using remove.bg (Free users) or enable Transparent background in Canva download settings (Pro users)?
- Did you toggle Site Title and Site Tagline OFF in Step 7b?
- Did you click “Publish” to save your changes in Step 7e?
- Try clearing your browser cache or open your site in an incognito/private window to see if the logo displays correctly
- Clear WordPress cache: Install the WP-Optimize plugin (free), go to WP-Optimize in your WordPress dashboard, and click “Clear cache”
- After clearing cache, open your site in an incognito/private window to see if the logo displays correctly
Pro Tip: If your logo still has a white background showing, go back to remove.bg and process your PNG file again, then re-upload it to WordPress following Step 7c.
⚙️Troubleshooting Common Logo Issues
“My logo looks pixelated or blurry”
→ This is prevented by creating your logo at the full 500×140px size from the start. When you download at this size and upload to WordPress, the platform automatically scales it down while maintaining crystal-clear quality on all devices, including Retina screens.
Always download as PNG (never JPG), which supports transparency and maintains quality. JPG format degrades quality and doesn’t support transparency—always use PNG for logos.
“My logo is stretched or distorted”
→ This happens when your template wasn’t properly pasted into your 500×140 canvas, OR if you accidentally dragged one side of the logo instead of resizing proportionally.
In Canva, always resize from the corner handles (the circles at the corners) while holding Shift—this maintains proportions.
If your logo still looks stretched, go back to Step 3-5: copy the template again (Ctrl+A, Ctrl+C), make sure you’re pasting into your 500×140 canvas (not a default-sized canvas), paste (Ctrl+V), and check that Canva automatically scaled everything to fit.
“My logo disappeared after I uploaded it”
→ Some WordPress themes require you to click “Save” or “Publish” twice—once in the customizer panel and again in the top bar.
Check the top area of the customizer for a save/publish button you might have missed. Also check if you accidentally deleted the logo from your Media Library—if the image file was deleted, WordPress can’t display it. Re-upload if needed.
If the logo still doesn’t appear, install WP-Optimize, clear your WordPress cache, then check your site in an incognito/private browser window.
“My logo has a white background instead of being transparent”
→ This is the most common issue. Here’s what’s happening:
You likely:
- Downloaded JPG instead of PNG (JPG doesn’t support transparency and automatically adds a white background), OR
- Skipped the background removal step
For Canva Free users: You cannot use the “Transparent Background” checkbox when downloading—that’s a Canva Pro feature. Instead, you must use remove.bg (free online tool) AFTER downloading your PNG to remove the background.
For Canva Pro users: Make sure you checked the “Transparent background” checkbox in the download settings before clicking Download.
To fix it:
- If you’re a Free user: Go to remove.bg, upload your downloaded PNG, let it remove the background automatically, then download the transparent version and re-upload to WordPress
- If you’re a Pro user: Go back to Canva, download again with “Transparent background” checked, then re-upload to WordPress
“Canva is running slow and things are lagging”
→ Canva can be slow during peak usage hours (typically 7PM-10PM local time, and weekends, especially Friday-Sunday evenings). This is due to server load when many users are online simultaneously.
If you’re experiencing lag:
- Try refreshing the page
- Clear your browser cache and cookies
- Close other browser tabs and programs
- Try a different browser (Chrome works best)
- Turn off VPN if you’re using one
- Come back during off-peak hours (early morning or weekday afternoons)
If elements disappear temporarily or effects don’t apply, refresh the page—they usually reappear. This is a known limitation of Canva’s free infrastructure.
Pro Tips: Make Your Logo Even Better
Create Multiple Logo Versions
Create these additional versions of your logo in Canva to maximize your platform presence and build visual consistency that makes your brand instantly recognizable everywhere your readers discover you.
Create these versions in Canva:
1. Horizontal (500 × 140px) – Your main WordPress header logo (already created above)
2. Pinterest Profile Photo (165 × 165px) – Displays as a circle on Pinterest. This is the first visual element readers see when they visit your profile.
3. Pinterest Cover Image (1920 × 1080px) – The backdrop behind your profile photo. Use your brand colors or a lifestyle image that reflects your niche.
4. Square Social Media (500 × 500px) – Perfect for Instagram profile, Facebook profile, LinkedIn profile, and other social platforms.
5. Favicon (512 × 512px) – The tiny icon that appears in browser tabs. WordPress will automatically generate smaller versions (16×16, 32×32, 48×48) from your 512×512 file.
Why This Matters: Consistency across all platforms means readers recognize you instantly—on your blog header, in Pinterest feeds, in Instagram profiles, in browser tabs.
This visual consistency builds trust and makes your brand memorable. When your logo appears everywhere your readers go, they’re more likely to save your content and remember who you are.
Once you create these versions, you’re done—you won’t need to redesign your logo again across all these platforms.
Key Takeaway
You’ve now created a professional blog logo and built a complete visual identity system that works across your entire platform ecosystem. This consistent branding establishes visual recognition, builds reader trust, and makes your content more shareable and memorable wherever it appears.
The Real Timeline: What to Expect
Canva makes design accessible, but “15 minutes” depends on how fast you find what you want.
- If you know exactly what you want: 10-15 minutes total
- If you’re browsing and experimenting: 25-40 minutes total (and that’s normal)
- If you get stuck on search: 45-60 minutes total or more
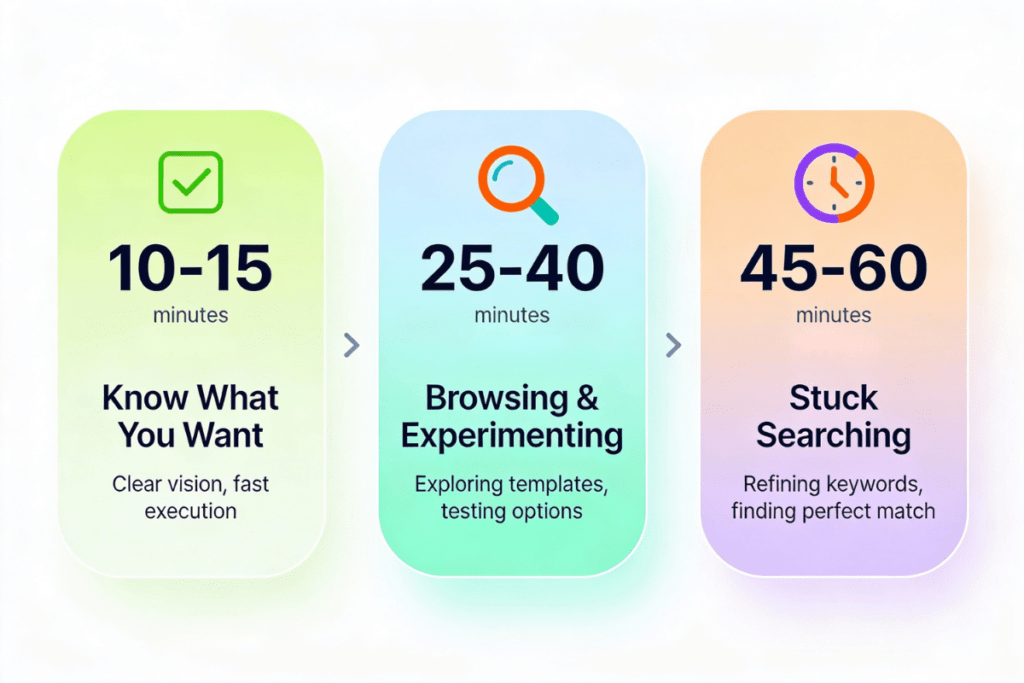
Expect to spend 5-15 minutes just browsing templates and keywords. This isn’t inefficiency—this is the reality of having millions of options. The more specific your vision, the faster you’ll find it.
📝 TLDR: Complete Logo Creation Workflow (8 Steps)
Step 1: Sign Up for Canva (Free Account)
- Go to canva.com
- Click “Sign up”
- Create free account with email, Google, or Facebook
Step 2: Search for and Load a Logo Template (5-15 min)
- Click “Templates” tab
- Click “Create” → Click “Logo”
- Search by niche: “food logo,” “modern lifestyle,” “yoga logo,” etc.
- Click a template—it loads instantly
Step 3: Customize Your Logo (5-15 min)
- Click text → type your blog name
- Adjust font for readability
- Edit tagline (optional)
- Change colors (2-3 max)
- Replace icon if desired
Step 4: Create Custom 500 × 140 Blank Canvas
- Click “Create” → “Custom size”
- Enter: Width 500px, Height 140px
- Keep this tab open
Step 5: Copy Your Customized Logo
- Go back to template canvas
- Press Ctrl+A (select all)
- Press Ctrl+C (copy)
Step 6: Paste into 500 × 140 Canvas
- Switch to 500 × 140 tab
- Press Ctrl+V (paste)
- Canva auto-scales to fit
Step 7: Download as PNG
- Click “Share” → “Download”
- Choose “PNG”
- Click “Download”
- Rename:
myblog-logo.png - Free users: Use remove.bg for transparent background
Step 8: Upload to WordPress
- Log into wp-admin
- Appearance → Customize → Header → Logo
- Upload PNG file
- Toggle OFF Site Title & Site Tagline
- Adjust Logo Height to 60-70px
- Click “Publish”
Cost: $0 | Time: 15-60 minutes (Maybe more) | Experience: None
→ Full tutorial: See our complete logo creation guide above
FAQ: Logo & WordPress
Can I change my logo later?
Yes! Simply upload a new logo file in the same location (Appearance → Customize → Header → Logo). Your old logo will be replaced instantly.
Do I need a trademark for my blog logo?
Not unless you’re registering your blog as a legal business. For a personal blog, just having a custom logo is enough to establish your brand and build reader recognition.
Can I use a Canva template logo for my business?
Technically yes for your blog. However, you cannot trademark Canva template logos because the elements aren’t exclusive to you. If you plan to trademark your brand later, design a fully custom logo using only your own elements.
What’s the difference between PNG and JPG for logos?
| Format | Features | Best For |
|---|---|---|
| PNG | Supports transparent backgrounds, maintains quality at any size | WordPress logos (required) |
| JPG | Does not support transparency, degrades quality | Not recommended for logos |
Always use PNG for logos on WordPress.
Is the free Canva plan really enough?
Yes, for logo creation. You miss:
- “Magic Resize” feature (Canva Pro, 12.99–15/month)
- Automatic transparent background option
But the copy-paste workflow gets you the exact same result for free. When you paste a larger design into a smaller canvas, Canva automatically scales everything proportionally.
Upgrade to Pro only if you want to save browsing time or use premium templates.
Why do I need to use copy-paste instead of Resize?
Resize is a Canva Pro feature. The copy-paste method works just as well for free users: when you paste a larger design into a smaller canvas, Canva automatically scales everything proportionally.
This is a feature, not a limitation.
How do I make my logo high resolution?
Logos are scalable at any size in Canva. When downloading:
- Make sure you’re using PNG format (maintains quality)
- Download at the size you need (e.g., 500 × 140px for WordPress)
- If you need a very large version (for print), download at the largest available size—it will scale smoothly
Is Canva slow? Will I get frustrated?
Sometimes, yes. Canva can lag during peak hours (Friday–Sunday). Images occasionally disappear temporarily, or effects don’t apply correctly.
Fix: Refreshing the page usually resolves it. This is the trade-off for using free software.
If speed is critical: Canva Pro has slightly better performance, but it’s not necessary for logo creation.
What if my WordPress theme doesn’t have a logo upload option?
Some older themes don’t support custom logos natively. You have two options:
Option 1: Switch to a modern theme that supports logos:
Option 2: Use a plugin like “Simple Custom Logo” to add logo functionality.
We recommend Option 1 (switching to Blocksy) because it’s free, built-in, and requires no extra plugins.
What if my logo has a white background after uploading to WordPress?
Cause: You downloaded JPG instead of PNG, OR didn’t remove the background in Canva before downloading.
Fix:
- Go to remove.bg
- Upload your PNG file
- Download the transparent version
- Re-upload to WordPress (Appearance → Customize → Header → Logo)
Can I use the same logo on my other platforms (Pinterest, Instagram, email)?
Yes! Create multiple versions in Canva to maintain brand consistency across all your platforms:
Horizontal (500 × 140) – WordPress header (your main blog logo)
Square (165 × 165) – Pinterest profile photo (displays as circle)
Cover Image (1920 × 1080) – Pinterest profile cover photo
Square (500 × 500) – Instagram profile, Facebook profile, LinkedIn profile
Favicon (512 × 512) – Browser tab icon (WordPress can auto-generate from your main logo)
Email Signature (200 × 50) – Email footer branding
This consistency across all platforms builds brand recognition, helps readers instantly recognize your voice, and strengthens trust. When your logo appears in the same style everywhere—your blog header, Pinterest profile, email signature, social media—readers remember you better and are more likely to save your content.
Key Takeaways (Save-Worthy Summary)
Your blog logo is the visual anchor of your brand. When readers see it consistently across your header, social media, and email signatures, they begin to recognize your voice before they remember your name.
📌 The Free Workflow: Search logo template → Customize it → Create custom 500 × 140 canvas → Copy template (Ctrl+A, Ctrl+C) → Paste into your canvas (Ctrl+V) → Export as PNG with transparent background
📌 Your Logo Dimensions: 500 × 140 pixels (design size), 60–70 pixels (WordPress header display height)
📌 File Format & Size: PNG with transparent background (non-negotiable). Keep file under 200KB for fast loading.
📌 Realistic Timeline: 15–30 minutes including template browsing. First-time searchers may take 20–40 minutes; that’s normal.
📌 Cost: $0 (free Canva + free WordPress). No upgrades needed for professional results.
📌 Recommended Theme: Blocksy (used throughout this guide). Alternative options: Astra, Kadence.
📌 Level Up: Create additional versions for your entire platform presence. Design 165 × 165 px for your Pinterest profile photo (displays as circle). Design 1920 × 1080 px for your Pinterest profile cover. Both keep your brand consistent and instantly recognizable wherever readers discover you.