This post contains affiliate links. I may earn a commission at no extra cost to you. I only recommend tools I personally use, have researched thoroughly, or that trusted blogging experts rely on every day.
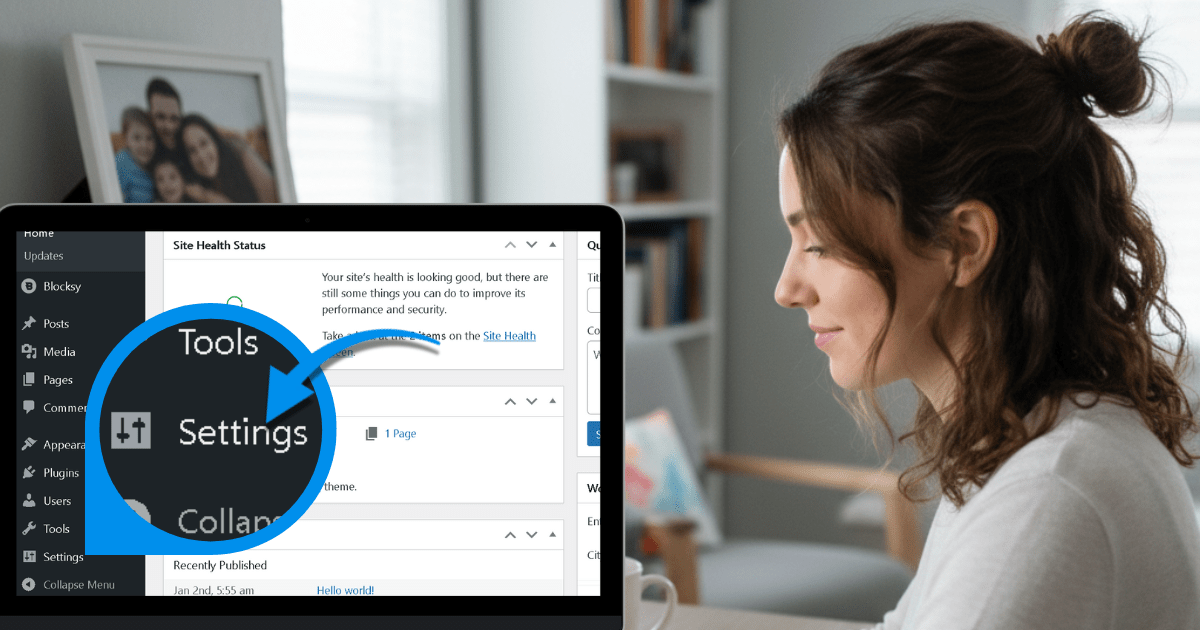
Now that you’ve installed your WordPress theme and your blog is starting to look like your blog, there’s one more critical step before you start writing: adjusting your WordPress settings.
Here’s the thing most beginners don’t realize: WordPress installs with default settings that work okay for most websites—but not great for bloggers who want to grow with Pinterest, schedule posts confidently, and avoid SEO disasters down the road.
Some of these settings—especially permalinks—can’t be changed later without breaking your entire site. Others, like site visibility, can accidentally block search engines from ever finding you (yes, it’s happened to more bloggers than you’d think).
The good news? Changing these settings takes about 15 minutes, and you only have to do it once.
In this guide, you’ll learn exactly which WordPress settings to change right after installing, why each one matters, and how to adjust them step-by-step—even if you’ve never touched a settings page before.
Let’s make sure your blog is set up correctly from day one.
Why WordPress settings matter more than you think
WordPress is powerful, flexible, and beginner-friendly—but its default settings are designed to work for everyone, not specifically for bloggers.
That means some settings are overly cautious (like discouraging search engines from indexing your site), while others are generic placeholders (like “Uncategorized” as your default blog category).
Changing these settings now ensures:
- Your URLs are clean and SEO-friendly (not filled with random numbers)
- Search engines can actually find your blog (no accidental “noindex” blocking)
- Scheduled posts publish at the right time (critical if you’re planning Pinterest pins in advance)
- Spam and clutter stay under control (no unnecessary pingbacks flooding your inbox)
- Your blog looks professional from the start (custom site title, tagline, and homepage layout)
Most importantly, fixing certain settings—especially permalinks—after your blog is live can break every link you’ve ever shared on Pinterest, in emails, or on other platforms.
Let’s make sure that doesn’t happen.
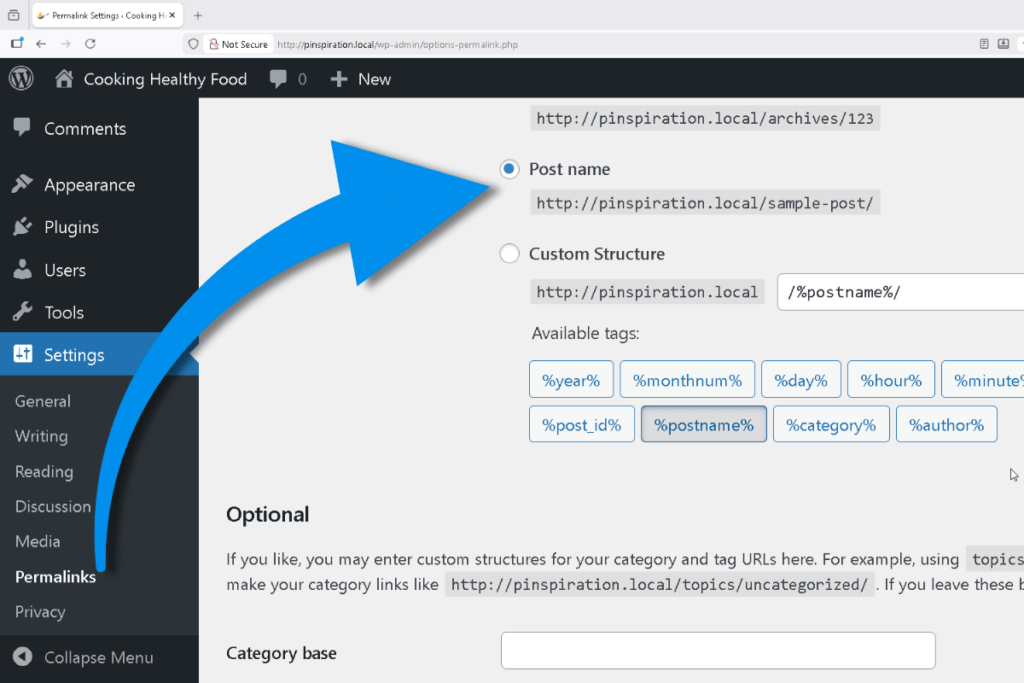
Setting #1: Permalinks (Change this FIRST—it’s critical)
What are permalinks?
Permalinks are the permanent URLs of your blog posts, pages, and categories. They’re what people see in the address bar when they visit your content.
By default, WordPress uses a “Plain” permalink structure that looks like this:
https://yoursite.com/?p=123
That’s not helpful for readers or search engines. It doesn’t tell anyone what the post is about, and it’s impossible to remember.
Why this matters
Clean, descriptive URLs help:
- Search engines understand your content (better SEO)
- Readers trust your links (they can see what they’re clicking on)
- Pinterest pins look professional (clear, readable URLs get more clicks)
More importantly, if you change your permalink structure after publishing posts, every existing link breaks. Pinterest pins stop working. Google search results lead to 404 errors. Email links die.
That’s why this setting must be changed first, before you publish anything.
How to change your permalink structure
- In your WordPress dashboard, go to Settings → Permalinks
- Select Post name
- Scroll to the bottom and click Save Changes
That’s it. Your URLs will now look like this:
https://yoursite.com/post-title/
Much better.
🤖 AI Assistance: Understanding Permalinks
If you’re still confused about permalinks or want to understand the other options, try this prompt in Google Gemini:
Prompt:
“Explain WordPress permalink structures in simple terms for a beginner blogger. Why is ‘Post name’ the best choice for a blog focused on Pinterest traffic? What are the downsides of other permalink options?”
Gemini will break it down in plain English and help you understand exactly why this setting is so important.
Setting #2: Site visibility (Make sure search engines can find you)
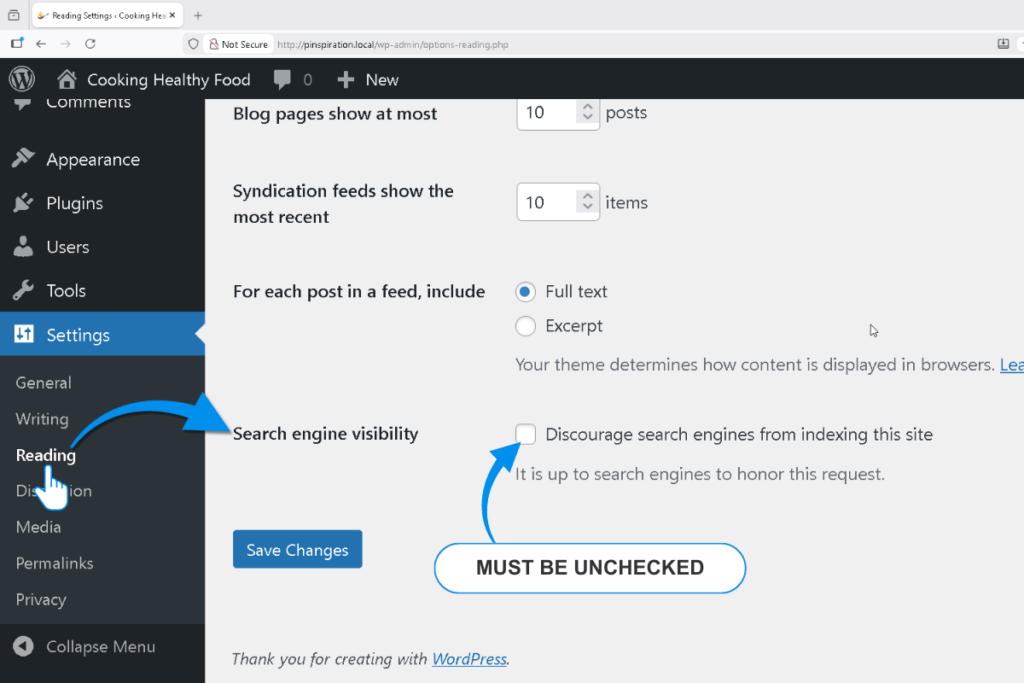
What is site visibility?
WordPress includes a checkbox that tells search engines, “Don’t index this site.”
It’s meant for staging sites, private blogs, or websites under construction—but sometimes it gets turned on by accident, and new bloggers don’t realize their blog is invisible to Google and Pinterest.
Why this matters
If this box is checked, search engines won’t index your content. That means:
- Zero organic traffic from Google
- Your blog won’t appear in search results
- Pinterest pins may not perform well (Pinterest relies on web crawlers to verify content)
This is one of the most common—and devastating—mistakes new bloggers make. You can publish 50 posts, promote them everywhere, and wonder why no one finds your blog… only to discover this box was checked the whole time.
How to check (and fix) your site visibility
- In your WordPress dashboard, go to Settings → Reading
- Scroll down to Search Engine Visibility
- Make sure the box next to “Discourage search engines from indexing this site” is UNCHECKED
- If it was checked, uncheck it and click Save Changes
If the box was already unchecked, you’re good to go. But it’s worth double-checking—just to be sure.
Real-world example: The recipe blog that disappeared
Imagine you’re running a recipe blog. You’ve published 20 meal prep posts, created beautiful pins, and shared them on Pinterest. But after two months, you’re getting zero traffic.
You check Pinterest Analytics. Your pins have impressions, but no clicks.
You check Google Search Console. Zero pages indexed.
Then you check Settings → Reading… and realize the “Discourage search engines” box was checked the entire time.
Two months of work, invisible to the world.
This happens more often than you’d think. That’s why this check is non-negotiable.
Setting #3: Timezone (Critical for scheduled posts and Pinterest)
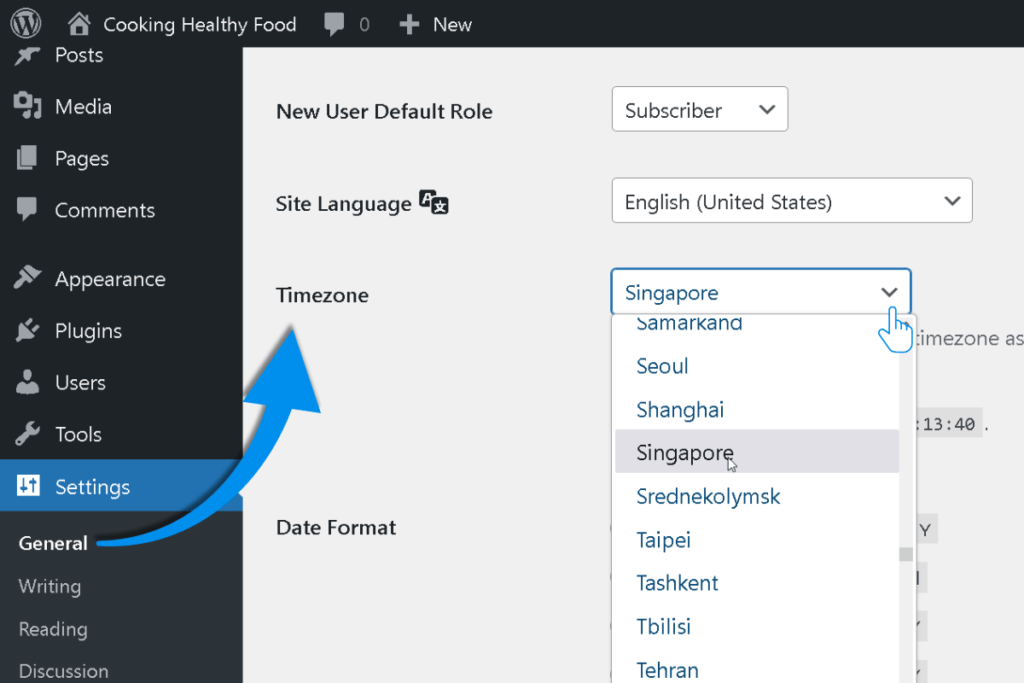
What is the timezone setting?
WordPress defaults to UTC +0 (Coordinated Universal Time), which means your site operates on a different clock than you do—unless you happen to live in London.
Why this matters
If your timezone is set wrong:
- Scheduled posts publish at the wrong time
- Pinterest pins scheduled for 9 AM publish at 3 AM instead
- Analytics data doesn’t match your actual activity
- Plugin timestamps (like comment notifications) appear off by hours
This is especially critical for Pinterest bloggers who schedule pins in advance. If your blog thinks it’s 6 hours ahead of you, your carefully planned 9 AM pin goes live at 3 AM—when no one’s awake to see it.
How to set your timezone
- In your WordPress dashboard, go to Settings → General
- Scroll down to Timezone
- Select your city from the dropdown (e.g., “Singapore” if you’re in Singapore, “New York” if you’re on the U.S. East Coast)
- Scroll to the bottom and click Save Changes
Pro tip: Choose a city in your timezone rather than a UTC offset (like “UTC +8”). This way, WordPress automatically adjusts for daylight saving time if applicable.
Real-world example: The wellness blog scheduling mistake
Let’s say you run a wellness blog about morning routines. You schedule a post titled “5-Minute Meditation for Busy Moms” to publish at 6 AM—perfect timing for your audience.
But your timezone is still set to UTC +0, and you’re actually in New York (UTC -5). That means your post goes live at 1 AM instead.
Your Pinterest pins, scheduled to match the post, also publish at 1 AM. Zero engagement. Your audience is asleep.
A simple timezone fix prevents this entirely.
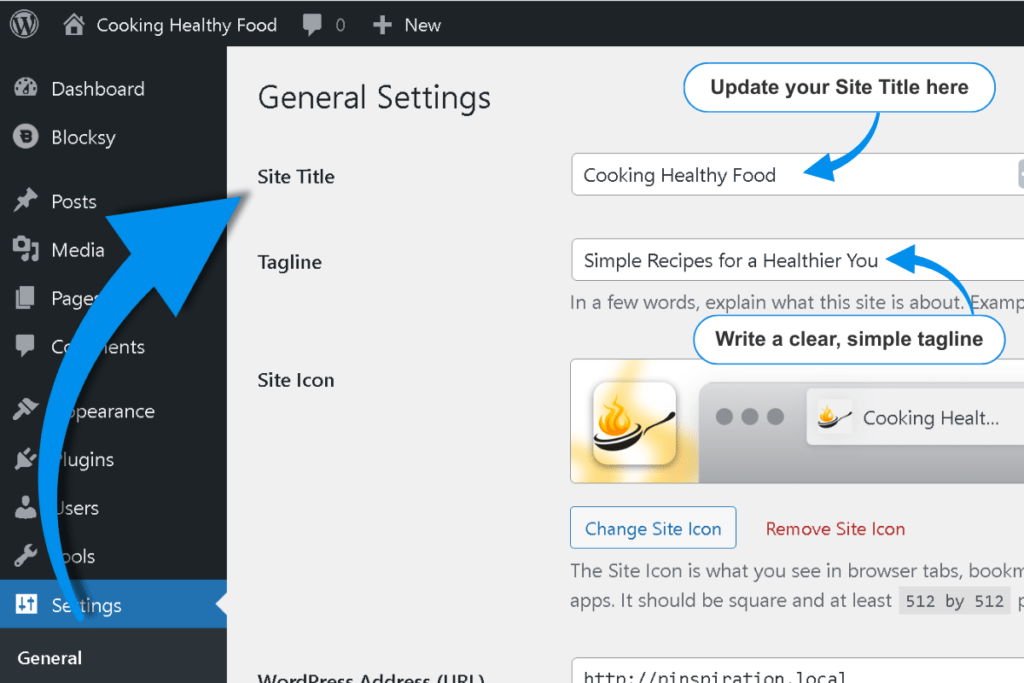
Setting #4: General settings (Site title, tagline, and email)
What are general settings?
These are the foundational details about your blog: its title, tagline, and the email address WordPress uses for notifications.
Why these matter
- Site Title: Appears in search results, browser tabs, and social media shares
- Tagline: Shown in some themes and meta descriptions (can help with SEO)
- Admin Email: Receives critical notifications like password resets, plugin updates, and security alerts
If you leave these as default placeholders, your blog looks unfinished—and you might miss important notifications.
How to update general settings
- In your WordPress dashboard, go to Settings → General
- Update Site Title to your blog’s name (e.g., “Wellness Wins” or “Budget Mom Life”)
- Update Tagline to a short description (e.g., “Simple self-care tips for busy women” or “Practical budgeting for families”)
- Confirm Administration Email Address is an inbox you actually check
- Scroll to the bottom and click Save Changes
Tagline tips
Your tagline doesn’t have to be perfect, but it should clearly explain what your blog is about. Think of it as a one-sentence elevator pitch.
Examples:
- Food blog: “Quick weeknight dinners for busy parents”
- Finance blog: “Debt-free living made simple”
- Parenting blog: “Honest advice for first-time moms”
Keep it under 10 words, and focus on who you help and how.
Setting #5: Discussion settings (Turn off pingbacks and manage comments)
What are discussion settings?
Discussion settings control how comments, pingbacks, and trackbacks work on your blog.
What are pingbacks and trackbacks?
Pingbacks and trackbacks are notifications other blogs can send you when they link to your content. In theory, they’re helpful. In practice, they’re mostly spam.
Why you should disable them
- Spammers abuse them constantly
- They clutter your comment notifications
- They don’t provide meaningful engagement
Most bloggers turn them off immediately.
How to disable pingbacks and trackbacks
- In your WordPress dashboard, go to Settings → Discussion
- Under Default post settings, uncheck “Allow link notifications from other blogs (pingbacks and trackbacks) on new posts”
- Scroll to the bottom and click Save Changes
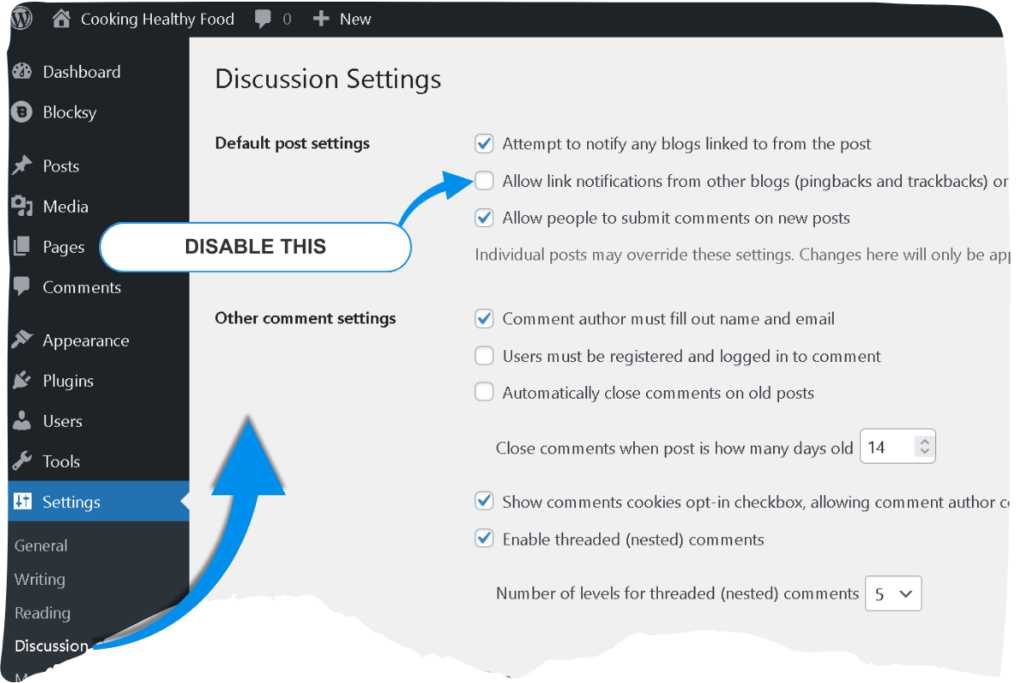
This won’t delete existing pingbacks—it just stops new ones from coming in.
Should you allow comments?
This depends on your goals.
Reasons to allow comments:
- Builds community and engagement
- Increases time on page (good for SEO)
- Provides valuable reader feedback
Reasons to disable comments:
- Reduces spam management workload
- Keeps your focus on Pinterest and email (not comment replies)
- Some niches (like finance or parenting) attract contentious comments
There’s no wrong answer. If you’re unsure, leave comments enabled for now—you can always turn them off later.
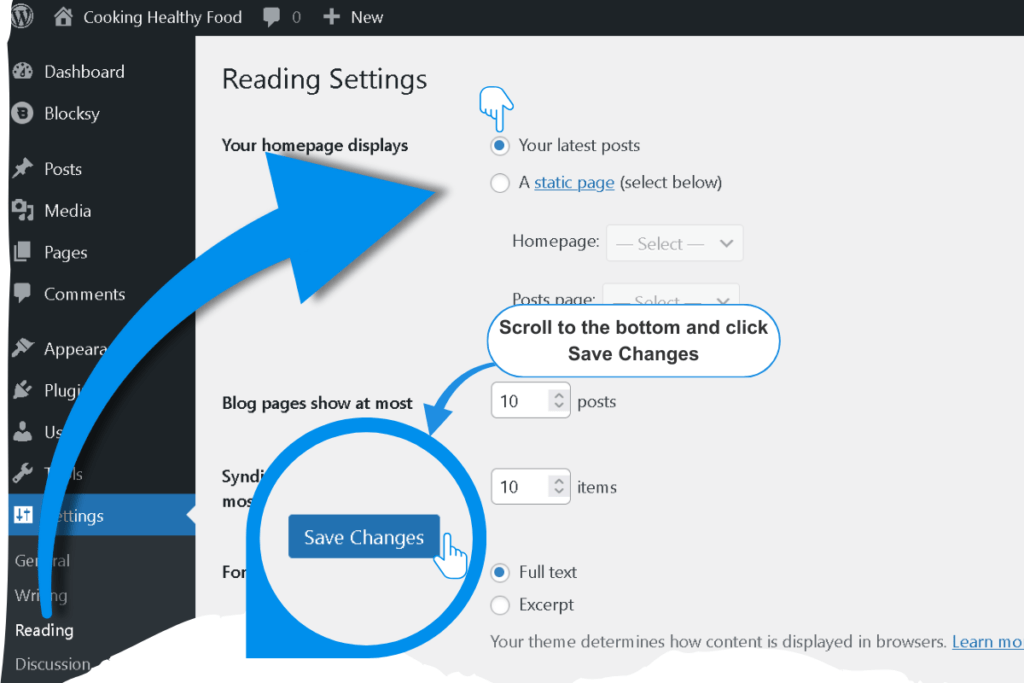
Setting #6: Reading settings (Homepage display and posts per page)
What are reading settings?
Reading settings control what visitors see on your homepage and how many blog posts display per page.
Homepage display: Posts vs. static page
WordPress gives you two options:
- Your latest posts (default): Your homepage displays your most recent blog posts
- A static page: Your homepage is a custom welcome page, and your blog posts live on a separate “Blog” page
Which should you choose?
Choose “Your latest posts” if:
- You’re running a traditional blog where new content is the main focus
- You want visitors to see your newest posts immediately
- You’re prioritizing Pinterest traffic (pins lead directly to posts)
Choose “A static page” if:
- You want a custom homepage with a welcome message, opt-in form, or services page
- You’re building a personal brand or business site with a blog section
- You want more control over your homepage design
Most beginner bloggers choose “Your latest posts”—it’s simpler and works well for Pinterest-focused blogs.
Posts per page
This setting controls how many blog posts appear before pagination kicks in (e.g., “Older posts” button).
The default is 10, which works for most blogs. If you have a visually heavy theme (large featured images), you might reduce this to 6-8 to improve page load speed.
How to adjust reading settings
- In your WordPress dashboard, go to Settings → Reading
- Under Your homepage displays, choose Your latest posts (or select A static page if you’ve created a custom homepage)
- Set Blog pages show at most to 10 posts (or adjust based on your preference)
- Scroll to the bottom and click Save Changes
Setting #7: Writing settings (Change default post category)
What is the default post category?
Every WordPress blog post must belong to at least one category. If you don’t select a category when writing a post, WordPress automatically assigns it to the default category—which, by default, is called “Uncategorized.”
Why “Uncategorized” is a problem
“Uncategorized” looks unprofessional in URLs, archives, and Pinterest pins. It tells readers (and search engines) that you didn’t bother organizing your content.
Example of a bad URL:https://yoursite.com/category/uncategorized/post-title/
Example of a good URL:https://yoursite.com/category/recipes/post-title/
How to change your default category (Quick Setup)
⚠️ Note: This section is a brief introduction only. For a complete guide on creating and organizing blog categories with a strategic framework, see our dedicated post: How to Create & Organize WordPress Categories for Pinterest Traffic.
Quick steps:
- In your WordPress dashboard, go to Posts → Categories
- Add a new category (e.g., “Recipes” for a food blog, “Money Tips” for a finance blog)
- Click Add New Category
- Go to Settings → Writing
- Under Default Post Category, select your newly created category from the dropdown
- Click Save Changes
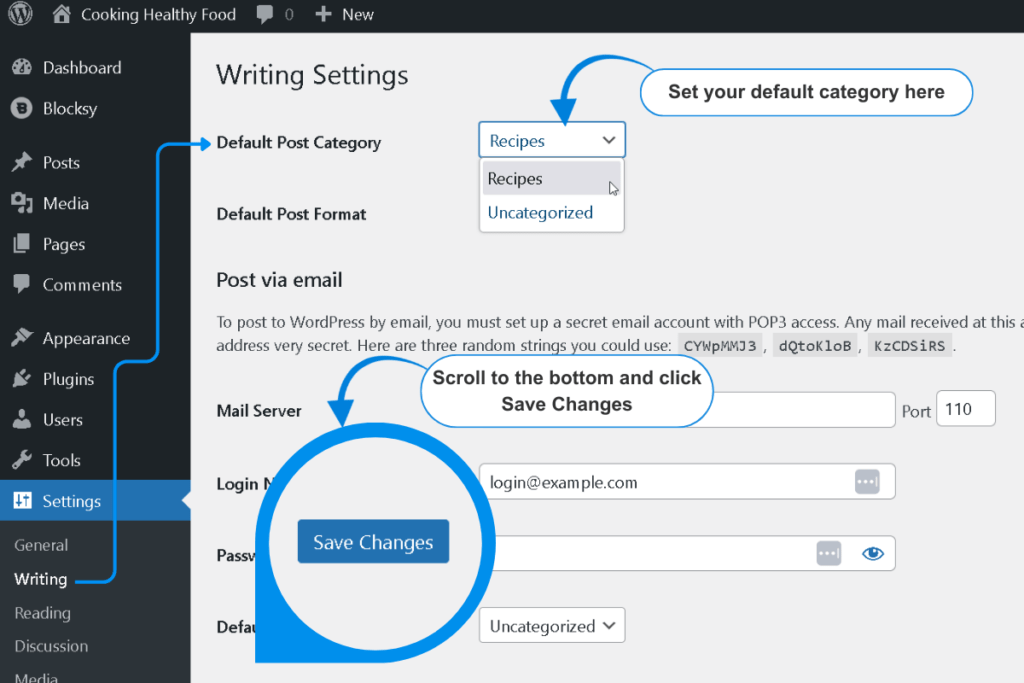
Now, any post you forget to categorize will automatically go into your chosen category instead of “Uncategorized.”
🤖 AI Assistance: Brainstorming Categories
Not sure what categories to create? Try this prompt in Google Gemini:
Prompt:
“I’m starting a [niche] blog focused on [target audience]. Suggest 5-7 blog categories that would work well for Pinterest traffic and help organize my content clearly. Keep categories broad enough to fit multiple posts but specific enough to be useful.”
Replace [niche] with “meal prep,” “budgeting,” “toddler activities,” etc., and replace [target audience] with “busy moms,” “college students,” “first-time homeowners,” etc.
Gemini will suggest category ideas tailored to your niche and audience.
Quick troubleshooting: What if settings won’t save?
If you click “Save Changes” and nothing happens—or WordPress shows an error—here are the most common causes:
1. Browser cache issue
Fix: Clear your browser cache or try a different browser (Chrome, Firefox, Safari). Sometimes old cached data prevents settings from updating.
2. Plugin conflict
Fix: Temporarily deactivate all plugins (go to Plugins → Installed Plugins, select all, and choose “Deactivate” from the bulk actions menu). Then try saving your settings again. If it works, reactivate plugins one by one to find the culprit.
3. Hosting permissions issue
Fix: Contact your hosting support (Hostinger, Bluehost, etc.) and ask them to check file permissions for your WordPress installation. This is rare, but it can prevent settings from being written to the database.
🤖 AI Assistance: Technical Troubleshooting
If you’re stuck, try this prompt in Google Gemini:
Prompt:
“My WordPress settings won’t save when I click ‘Save Changes.’ I’m using [hosting provider] and [theme name]. What are the most common causes and how do I fix them step-by-step?”
Replace [hosting provider] with “Hostinger,” “Bluehost,” etc., and [theme name] with “Blocksy,” “Astra,” etc.
Gemini will walk you through diagnostics specific to your setup.
Key takeaways: WordPress settings checklist
Before you start writing blog posts, make sure you’ve completed these 7 settings:
- ✅ Permalinks: Set to “Post name” for clean, SEO-friendly URLs
- ✅ Site Visibility: Unchecked “Discourage search engines” box
- ✅ Timezone: Set to your city for accurate post scheduling
- ✅ General Settings: Updated site title, tagline, and admin email
- ✅ Discussion Settings: Disabled pingbacks and trackbacks
- ✅ Reading Settings: Chose homepage display and posts per page
- ✅ Writing Settings: Changed default category from “Uncategorized”
These seven settings take 15 minutes to configure, but they’ll save you hours of headaches (and potential traffic disasters) down the road.
Your blog is now set up correctly. Next step: plugins.
What’s next?
Your WordPress settings are locked in. Your blog is visible to search engines. Your URLs are clean. Your timezone is correct.
Now it’s time to add the essential plugins that will protect your site, speed it up, and make it easier to grow.
Ready to get the best plugins for your blog? Learn which plugins every new blogger needs (and which ones to skip) in our step-by-step WordPress plugin setup guide.
Next: Must-Have WordPress Plugins for New Bloggers (2026 Essentials)
Frequently Asked Questions
Can I change my permalink structure later?
Technically, yes—but you’ll break every existing link to your blog. Pinterest pins, Google search results, and email links will all lead to 404 errors unless you set up complex redirects. That’s why it’s critical to set permalinks correctly before publishing your first post.
What happens if I accidentally check “Discourage search engines”?
Your blog becomes invisible to Google, Bing, and other search engines. No organic traffic, no Pinterest indexing, no growth. If you realize this happened, uncheck the box immediately, then submit your sitemap to Google Search Console to request re-indexing.
Should I delete the “Uncategorized” category?
You can’t delete it while it’s set as the default category. First, create a new category, set it as the default in Settings → Writing, and then delete “Uncategorized.” WordPress will automatically move any posts from “Uncategorized” to your new default category.
Do I need to set up categories before writing my first post?
Not required, but highly recommended. If you write posts without categories, they’ll all go into “Uncategorized”—and you’ll have to recategorize them later. It’s easier to set up 3-5 broad categories now and refine them as you go.
How many categories should a new blog have?
Start with 3-5 broad categories. Too many categories fragment your content and confuse readers. Too few make navigation harder. You can always add more later as your blog grows.
What if my theme doesn’t show a tagline?
Some themes hide the tagline by default. Even if it’s not visible on your homepage, search engines and social media platforms may still use it in meta descriptions. It’s worth filling in—just keep it concise and descriptive.