
This post may contain affiliate links. As an affiliate, I may earn a commission if you purchase through my links, at no extra cost to you.
Thinking you need to buy hosting first?
That’s where most beginners get it wrong — and why so many blogs never make it past month three.
Here’s what nobody tells you: the success of your blog is decided before you ever touch WordPress. Before you register a domain. Before you spend a single dollar.
“But don’t I need a website first?”
You need clarity first. Structure first. Systems first.
This guide shows you the exact pre-launch steps that separate blogs that thrive from blogs that quietly disappear. No tech required yet. Just the smart groundwork that makes everything else easier.
What You’ll Learn
- Why 80% of new blogs fail (and the 3 questions that prevent it)
- How to plan your first 10 blog posts using Pinterest and AI—before you ever touch WordPress
- The password manager setup that prevents “forgot password” chaos across 20+ accounts
- Why a dedicated blog email saves you from inbox overwhelm in week three
- The folder system that keeps you organized when you’re juggling 47 posts
Why Most Beginner Blogs Fail (And How to Avoid It)
Here’s the brutal truth: 80% of new blogs quit within their first year — not because of technical problems, but because they skipped the foundation.
They bought hosting on impulse. Installed WordPress. Stared at a blank screen. And had no idea what to write or who they were writing for.
The blogs that succeed do this differently:
They spend 1-2 weeks planning before they spend money. They get organized before they get overwhelmed. They know their audience before they write a single post.
Let’s build your foundation the right way.
Step 1: Define Your Blog’s Direction (Before Anything Else)
Every successful blog starts with a clear answer to three questions:
1. Who am I writing for?
Not “everyone.” Be specific. A busy mom trying to meal prep on a budget? A young professional learning to invest her first paycheck? The clearer your reader, the easier your content becomes.
2. What problem am I solving?
Blogs that grow solve specific problems. “I help busy moms meal prep in under 30 minutes.” “I teach first-time investors how to start with $100.” Nail this one sentence.
3. What makes my angle different?
You’re not the first person blogging about your topic — and that’s fine. But what’s your unique lens? Your personal story? Your specific method?
Use AI to Get Clarity Faster
If you’re stuck on these questions, AI can help you brainstorm.
Try this in Perplexity:
I want to start a blog about [your topic]. Help me define:
1. Who my ideal reader is (be specific about age, situation, struggles)
2. What specific problem I'm solving for them
3. What makes my angle different from other blogs in this space
Perplexity will research similar blogs and help you find gaps you can fill.
Try this in Google Gemini:
I'm a [your background] who wants to blog about [topic]. Based on my experience with [your unique angle], suggest 3 ways I could position my blog differently from competitors.Gemini excels at creative brainstorming and finding your unique voice.
Tool I Use: Perplexity is my go-to for research-backed brainstorming. The free version works great; Pro ($20/month) gives deeper insights.
Action Step: Open a Google Doc (or grab paper) and answer those three questions. Use AI to help if you’re stuck. Write freely for 10 minutes. This becomes your North Star.
Need a deeper framework? See the complete guide to defining your audience and choosing your niche: Define Your Audience & Choose Your Blog Niche (Without Overthinking It)
Step 2: Plan Your First 5-10 Posts (Yes, Before You Launch)
Here’s what top bloggers do differently: they plan 5-10 posts BEFORE launching their blog.
Why?
- You prove to yourself you actually enjoy this topic
- You avoid “blank page paralysis” after launch
- You learn what content comes naturally vs. what feels forced
- You launch with substance, not an empty website
How to Brainstorm Post Ideas
Go to Pinterest. Type your niche topic in the search bar. Look at the autocomplete suggestions — those are real searches from real people.
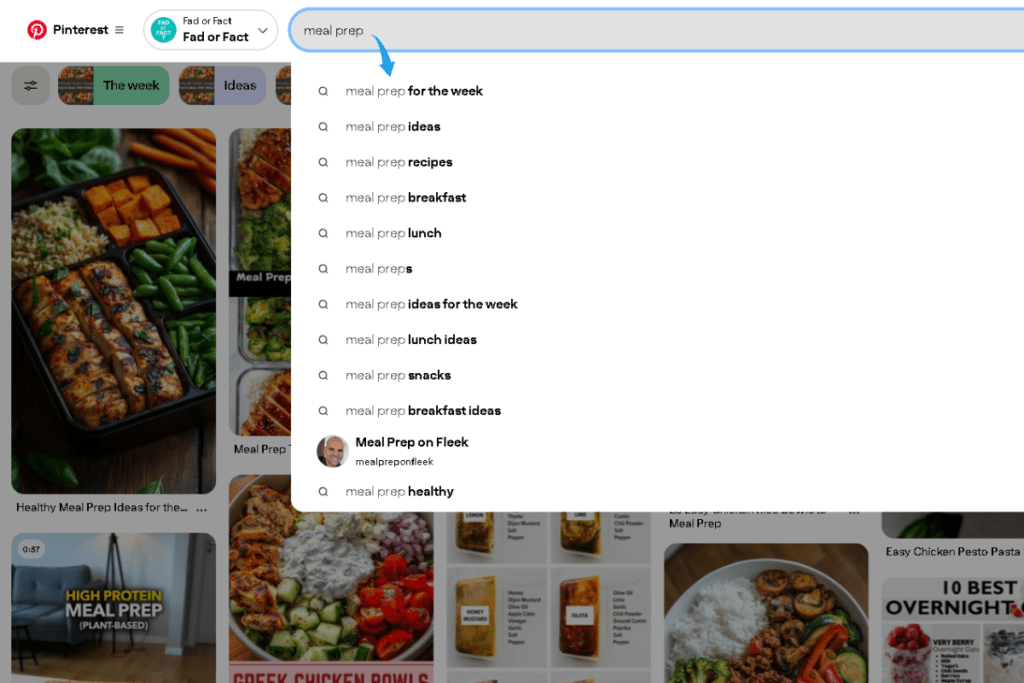
Example for a meal prep blog:
Type “meal prep” → Pinterest suggests:
- meal prep for beginners
- meal prep on a budget
- meal prep for weight loss
- healthy meal prep ideas
Each autocomplete suggestion = a blog post idea your audience is already searching for.
Example for a personal finance blog:
Type “budgeting” → Pinterest suggests:
- budgeting for beginners
- budgeting tips to save money
- budgeting printables
- budgeting for college students
Use AI to Expand Your Ideas
Once you have 5-10 ideas from Pinterest, use AI to fill in the gaps.
Try this in Gemini:
I'm starting a meal prep blog for busy moms. Based on Pinterest trends, here are my first 5 post ideas:
1. Meal prep for beginners
2. Budget meal prep grocery list
3. 30-minute meal prep recipes
4. Meal prep containers guide
5. Weekly meal prep schedule

Suggest 5 more post ideas that would complement these and appeal to the same audience.
Try this in Perplexity:
What meal prep topics are trending on Pinterest right now? I want blog post ideas that busy moms are actively searching for.Action Step: Create a simple spreadsheet:
| Blog Post Idea | Who This Helps | Problem It Solves |
|---|---|---|
| Meal Prep for Beginners | Busy mom, new to meal prep | Doesn’t know where to start |
| Budget Meal Prep Grocery List | Mom trying to save money | Overwhelmed by food costs |
| 30-Minute Meal Prep Recipes | Working mom, limited time | No time to cook |
Aim for 10 ideas minimum. You won’t use them all immediately — but you’ll never stare at a blank screen wondering what to write.
Ready to strategize your content calendar? Check out our detailed guide: How to Plan Your Blog Content Categories and The Blog Organization System That Keeps Everything in One Place
Step 3: Set Up Your Security Foundation
Now we get tactical. Before you buy hosting or register a domain, lock down your digital identity.
A. Install a Password Manager
Within your first month of blogging, you’ll create accounts for:
- Hosting
- WordPress
- Email marketing (Systeme.io, ConvertKit)
- Pinterest Business
- Canva
- Google Analytics
- Affiliate programs
That’s 7+ passwords. Maybe 20+ by month six.
Recommended tools:
Budget Pick: Bitwarden — Free, open-source, highly secure. Perfect for beginners.
Premium Pick: 1Password — $2.99/month, family sharing, travel mode. Worth it if you want extra features.
Install the browser extension, create one master password, and let the tool generate secure passwords for everything else.
Takes 5 minutes. Saves hours of “forgot password” headaches.
B. Create a Dedicated Blog Email
Don’t use your personal Gmail. Here’s why:
Your blog email will receive:
- Hosting notifications
- WordPress updates
- Affiliate approval emails
- Brand collaboration requests
- Reader messages
- Newsletter confirmations
Mixing this with personal email = chaos within weeks.
How to set it up:
- Go to gmail.com
- Click “Create account”
- Choose a professional format:
yourblogname@gmail.comyourname.blog@gmail.comhello.yourblogname@gmail.com
- Immediately save this login in your password manager
Pro tip: Use this email for ALL blog-related signups. Keep it separate from personal stuff.
Step 4: Prep Your Digital Identity
Here’s what experienced bloggers wish they’d done from day one: set up your visual identity early.
You’ll need a recognizable face or logo that appears:
- Next to your blog comments
- In Pinterest pins
- On social media
- In email replies
- Across WordPress author bios
Option 1: Use Your Photo
If you’re comfortable showing your face (recommended for personal blogs):
- Take a simple selfie in natural light
- Clean background, friendly expression
- Crop it square (400×400 pixels minimum)
- Save as:
yourname-profile.jpg
Option 2: Create a Simple Logo
If you prefer privacy or run a brand-focused blog:
- Go to Canva.com (free account)
- Search “blog logo” templates
- Customize with your blog name + simple icon
- Download as PNG, square format
Don’t overthink this. You can always change it later. Right now, you just need something professional.
Set Up Gravatar (5-Minute Identity Hub)
Gravatar connects your photo to your email across the internet. Once set up, your image automatically appears on:
- WordPress blogs where you comment
- Forum profiles
- Many email clients
Setup:
- Go to gravatar.com
- Sign up with your new blog email
- Upload your photo or logo
- Add a 2-line bio: “I help [audience] with [problem]. Follow my journey at [future blog name].”
Future you will thank present you for doing this now.
Step 5: Create Your Blog Organization System
Before you write a single post in WordPress, set up your local file system. This prevents the nightmare of “Where did I save that?!” moments.
Create this folder structure on your computer:
📁 [YourBlogName]
   ├── 📁 Blog Posts
   │   ├── 📁 Drafts
   │   ├── 📁 Ready to Publish
   │   └── 📁 Published
   ├── 📁 Images
   │   ├── 📁 Blog Images
   │   ├── 📁 Pinterest Pins
   │   └── 📁 Social Media
   ├── 📁 Research & Notes
   │   ├── 📄 Content Ideas
   │   ├── 📄 Keyword Research
   │   └── 📄 Competitor Notes
   └── 📁 Branding Assets
       ├── 📄 Logo & Profile Images
       ├── 📄 Brand Colors & Fonts
       └── 📄 Bio & About Me Text
Why this matters:
When you’re creating Pinterest pins at 11pm, you’ll know exactly where your blog images are. When you’re writing post #47, you’ll have a folder full of researched ideas ready to go.
Organization isn’t sexy — but it’s the difference between sustainable blogging and burnout.
Action Step: Spend 10 minutes creating these folders now. Future you (three months in, juggling 20 posts) will be grateful.
You’re Not Behind — You’re Building Smart
Here’s what you’ve accomplished without spending a dollar:
✅ Defined your audience and angle
✅ Planned your first 10 blog posts
✅ Secured your accounts with a password manager
✅ Created a dedicated blog email
✅ Set up your visual identity (photo + Gravatar)
✅ Built an organized file system
You’re ahead of 90% of bloggers who rush into WordPress with no plan.
What’s Next?
Now that your foundation is solid, you’re ready to build your system for organizing content.
👉 Next step: The Blog Organization System That Keeps Everything in One Place
Let’s take your folder structure deeper and add the templates that make publishing effortless.
This foundation you’ve built is critical. Learn the complete blogging blueprint in Sophia Lee’s Beginner Blogging Course — designed for beginners who want results without the overwhelm.