This post may contain affiliate links, which means I may earn a small commission if you make a purchase through those links — at no extra cost to you. I only recommend tools I personally use or have thoroughly tested. Your trust matters more than any commission.
You just finished setting up your contact form — your blog is starting to feel like a real website. But here’s a question you’ll start asking soon: is anyone actually visiting?
Google Analytics answers that question for free. It shows you exactly who visits your blog, where they come from (hint: Pinterest will likely be your biggest source), and which posts they actually read.
In this tutorial, you’ll install a free official Google plugin that sets up everything for you automatically — Google Analytics and Google Search Console — in about 10 minutes. No code to copy. No tracking IDs to paste. Just a setup wizard that handles the technical work while you click through.
What you’ll learn in this guide
By the end of this post, you’ll know how to:
- Install and configure the official Site Kit by Google WordPress plugin
- Automatically connect Google Analytics 4 and Search Console — without copying or pasting a single line of code
- Verify your setup is actively tracking using the Realtime report
- Read and understand the only three Google Analytics reports that matter for beginner bloggers
- Identify the differences between what Google Analytics and Pinterest Analytics actually track
Let’s get your blog’s data flowing.
Why track your blog traffic?
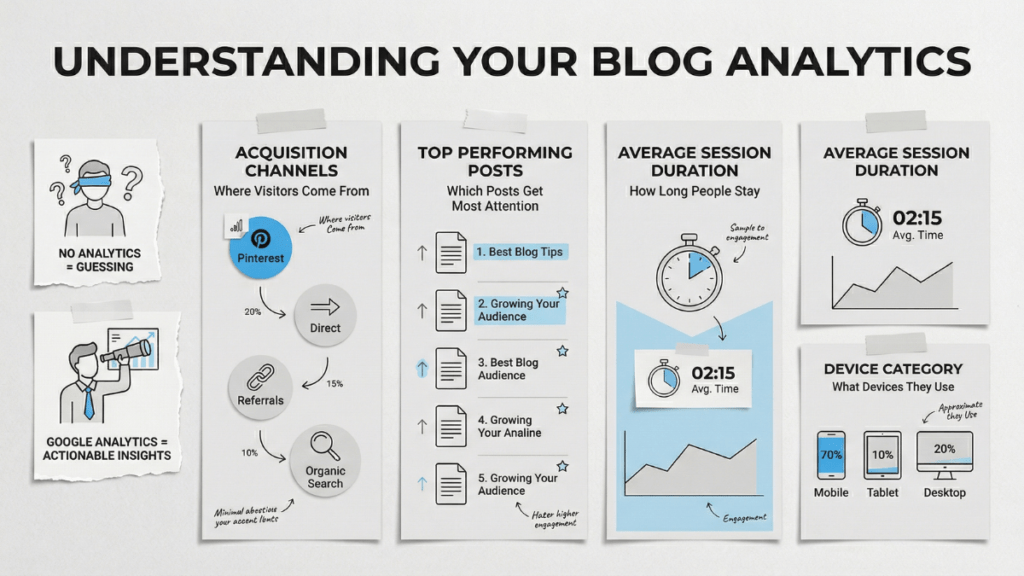
Running a blog without analytics is like posting pins with your eyes closed — you have no idea what’s working. Google Analytics is a free tool from Google that tracks every visit to your blog and turns that data into reports you can actually use.
Here’s what it tells you:
- Where visitors come from — Pinterest, direct visits, other websites, or search engines
- Which posts get the most attention — so you can create more of what resonates
- How long people stay — a sign of whether your content is genuinely helpful
- What devices they use — most Pinterest users browse on mobile, and your blog needs to reflect that
Without this data, you’re guessing. With it, you’re making decisions based on what your readers actually do — not what you think they do.
When should you install Google Analytics?
You don’t need to install analytics on day one. If you’re still building pages, choosing categories, and writing your first posts, focus on that foundation first.
The right time to install Google Analytics is when:
- Your blog has at least 5–10 published posts
- You’ve started pinning content to Pinterest
- You’re ready to see whether your efforts are getting traction
Many experienced bloggers recommend waiting until you have roughly 60–90 days of consistent content and pinning before diving into analytics. This gives Google Analytics enough data to show meaningful patterns instead of random noise.
That said, installing it early means data starts collecting from day one — even if you don’t check the reports right away. There’s no harm in setting it up now and checking back in a few weeks.
What you need before starting
Before you begin, make sure you have these ready:
- Your dedicated blog Gmail — this is the email address you created specifically for your blogging project during the pre-launch checklist (from What to Do BEFORE You Start a Blog — 2026 Pre-Launch Checklist). Use that Gmail here — not your personal email. If you skipped that step, pause and create a separate Gmail just for your blog at accounts.google.com before continuing. Keeping blog tools on one dedicated Gmail keeps everything organized and avoids inbox chaos.
- WordPress admin access — you need to log in to your WordPress dashboard
That’s it. No other plugins needed for this method. The plugin you’ll install handles everything.
What is Site Kit by Google?
Site Kit by Google is the official free WordPress plugin built by Google themselves. It connects your blog to Google’s most useful tools — without requiring you to copy code, paste tracking IDs, or edit any files.
Here’s what makes it perfect for beginners:
- 5+ million active installations and a 4-star rating on WordPress.org — it’s the most widely used Google integration plugin
- Zero code required — the setup wizard walks you through everything with point-and-click steps
- Automatically creates Google Search Console and Google Analytics — you don’t need to visit analytics.google.com or search.google.com/search-console separately. Site Kit creates and connects both services for you during setup
- Shows key stats inside your WordPress dashboard — you can see basic traffic data without leaving your blog’s admin area
- Built and maintained by Google — last updated within the past few days, compatible with current WordPress versions, and regularly improved
Think of Site Kit as Google’s official bridge between your WordPress blog and their analytics tools. One plugin, one setup wizard, and you’re connected to everything.
Video walkthrough
If you prefer watching someone go through the setup process, this video demonstrates the Site Kit installation and configuration step-by-step:
The written steps below cover the same process — follow whichever format you prefer.
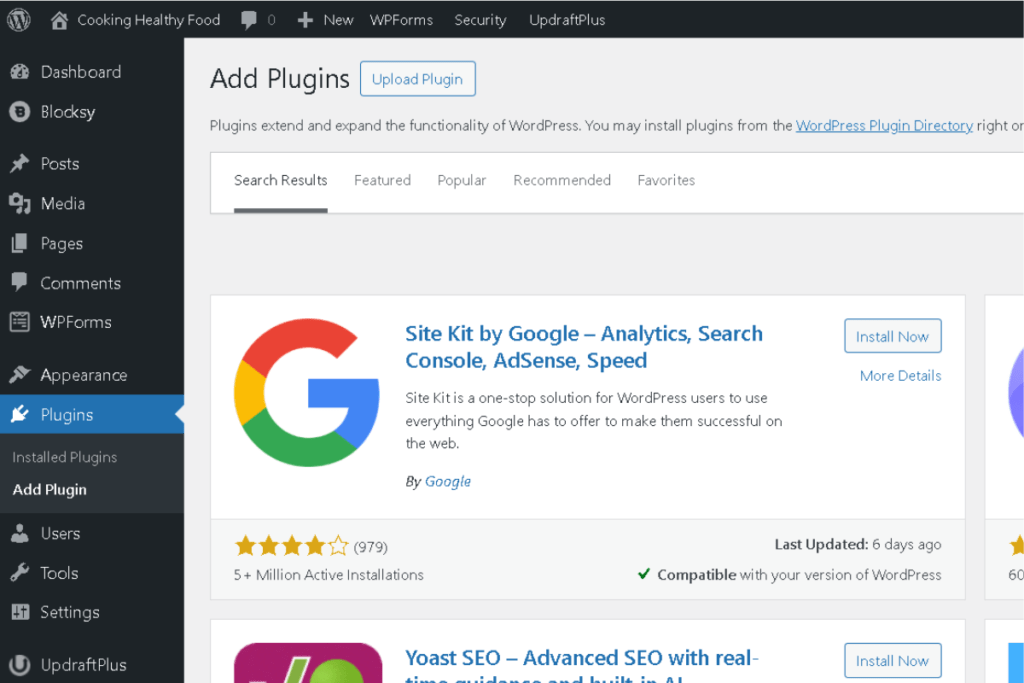
Step 1: Install and activate Site Kit by Google
- Log in to your WordPress dashboard
- Go to Plugins → Add New
- In the search bar, type Site Kit by Google
- Look for the plugin by Google — it has a colorful “G” logo and says “Site Kit by Google – Analytics, Search Console, AdSense, Speed”
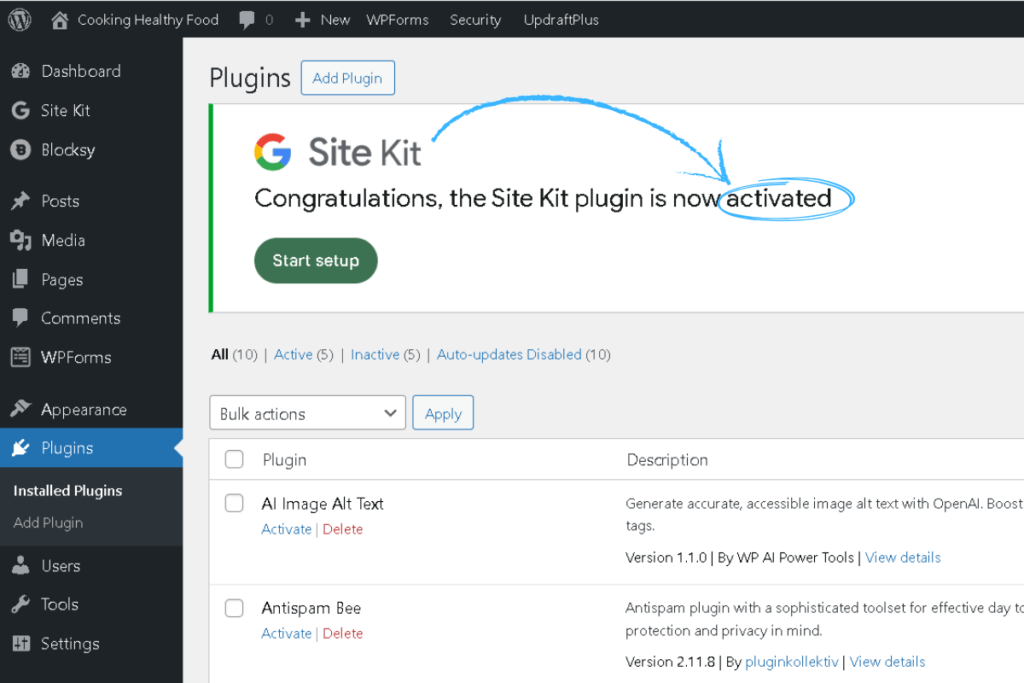
- Click Install Now, then click Activate
After activation, you’ll see a new Site Kit menu item appear in your WordPress sidebar. You’ll also see a setup prompt at the top of your dashboard.
Step 2: Run the Site Kit setup wizard
This is where the magic happens. The setup wizard connects your blog to Google’s tools automatically — no manual account creation needed.
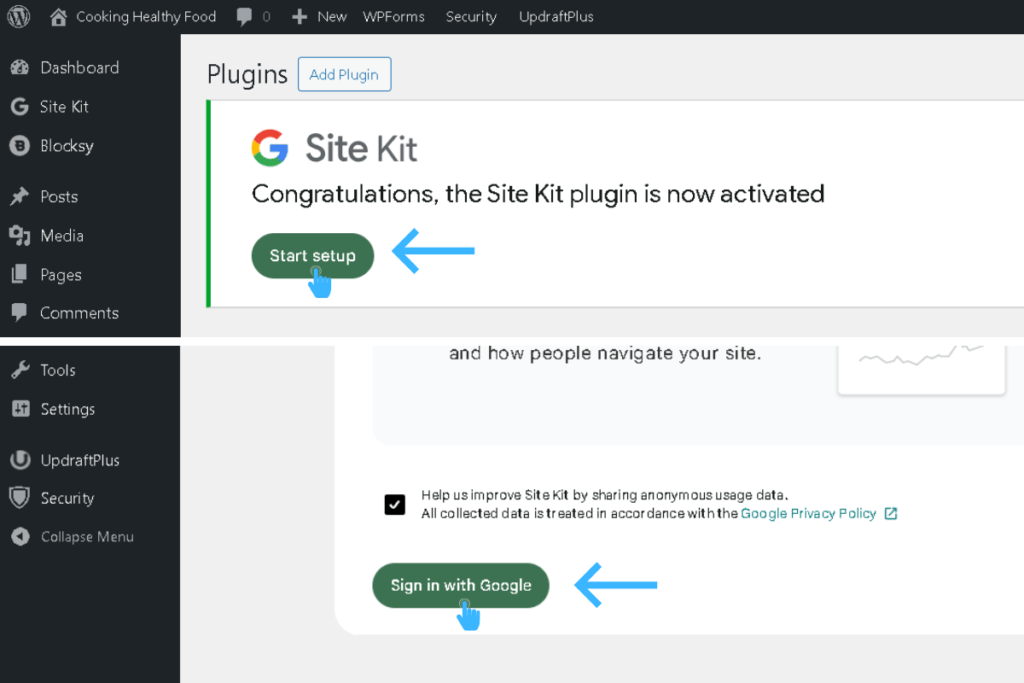
- Click the Start Setup button (it appears at the top of your dashboard after activation, or navigate to Site Kit in your sidebar)
- Click Sign in with Google
- Sign in with your dedicated blog Gmail — the same one you created during the pre-launch checklist
- Google will ask for permissions — these allow Site Kit to manage your analytics and search console data. Click Allow on each permission screen
- Site Kit verifies your site ownership — this happens automatically in the background
- Google Search Console is now connected — Site Kit creates and verifies your Search Console property without any extra steps from you
You’ll see a confirmation screen showing that Search Console is set up. This is a bonus you get for free — Search Console shows how your blog appears in Google search results, which queries people use to find you, and whether Google can properly read your pages.
Step 3: Connect Google Analytics
After the initial setup completes, Site Kit prompts you to connect additional Google services. This is where you add Google Analytics.
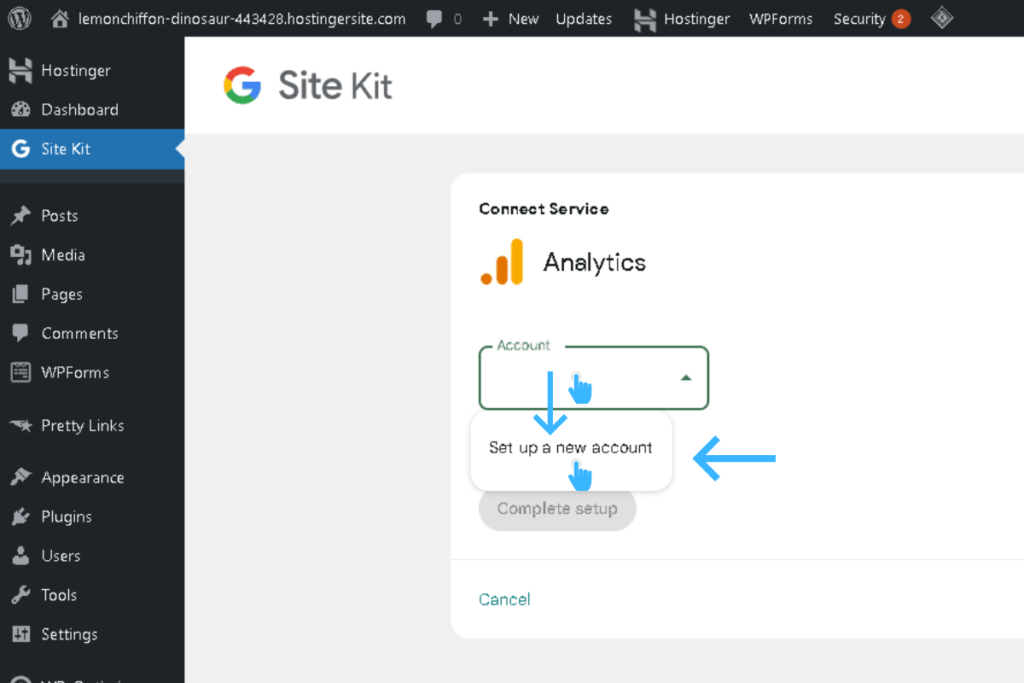
- On the Site Kit dashboard (or under Site Kit → Settings), you’ll see Analytics listed as an available service
- Click Set up Analytics (or Connect Service)
- Site Kit will either:
- Create a brand-new Google Analytics 4 account and property for you automatically (this is what happens if you’ve never used Google Analytics before — which is most beginners), or
- Let you select an existing account if you already have one
- Follow the on-screen prompts — Site Kit handles creating the GA4 property, the data stream, and installing the tracking code on your blog
- Click Configure Analytics (or Complete Setup)
That’s it. No Measurement IDs to copy. No code to paste. No header/footer editing. Site Kit places the tracking code on every page of your blog automatically.
Step 4: Verify everything is working
Give it a few minutes, then check that both services are connected properly.
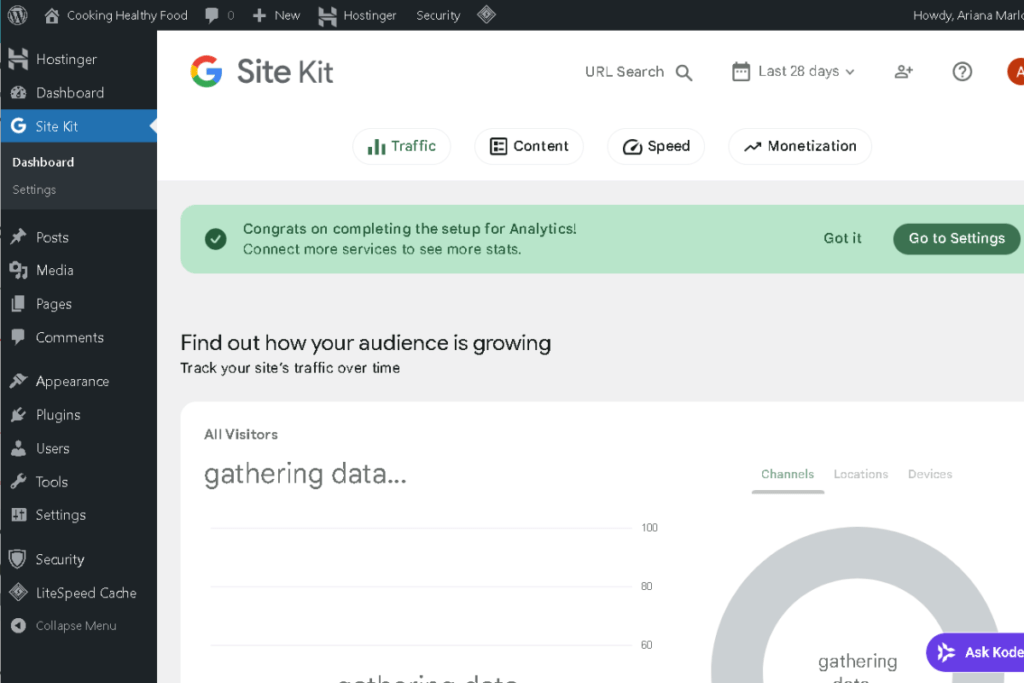
Check inside WordPress:
- Go to Site Kit → Dashboard in your WordPress sidebar
- You should see panels for both Search Console and Analytics
- Search Console may show “Gathering data” initially — this is normal for new sites
Check with the Realtime report:
- Open a new browser tab and go to analytics.google.com
- Sign in with your blog Gmail
- Click Reports → Realtime from the left sidebar
- Open your blog in another tab (visit your homepage)
- Go back to Google Analytics — you should see at least 1 active user (that’s you!)
Important: Standard reports take 24–48 hours to start showing data. The Realtime report updates within minutes, but full reports like traffic sources and page views need time to process. Don’t panic if your dashboard looks empty on day one — check back in 2 days.
The only 3 reports beginners actually need
Google Analytics has dozens of complex reports, but you don’t need to leave WordPress to find the data that matters. The Site Kit plugin pulls the most important beginner metrics directly into your WordPress backend.
Whenever you log in, go to Site Kit → Dashboard. By default, you’ll be on the Key metrics tab. Focus on these three areas:
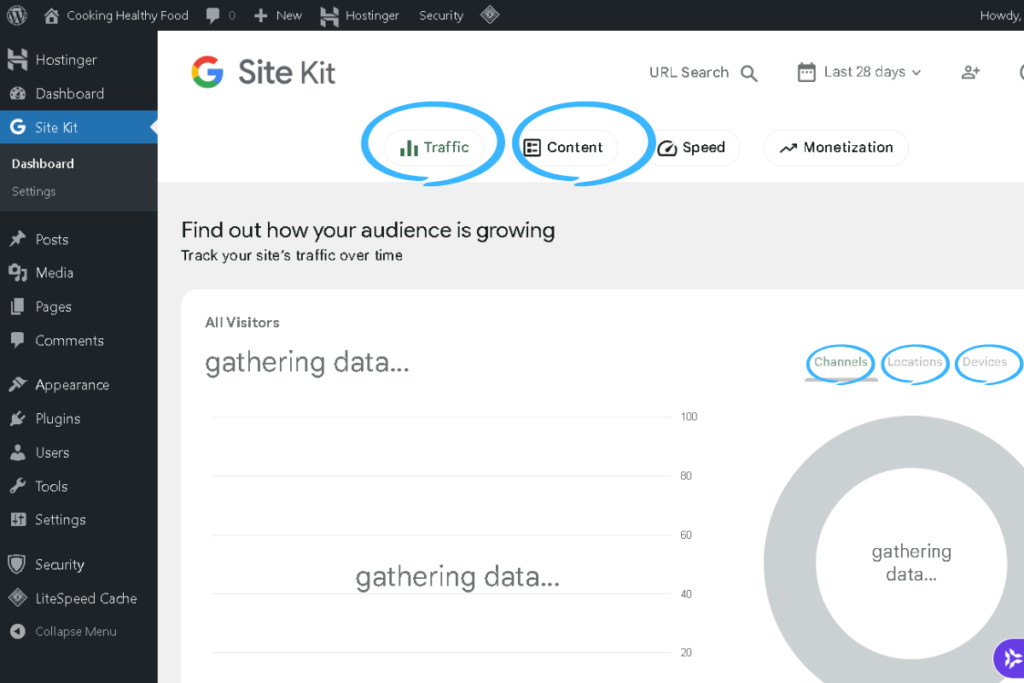
1. Channels: where visitors come from
Scroll down slightly to the box titled “Find out how your audience is growing.” On the right side of that box, click the word Channels.
This will switch the chart to show exactly how people are discovering your blog (like Organic Search, Direct, or Social). Since you’re focusing on Pinterest, watch the “Social” metric closely. This is your quick daily check to confirm that your pinning strategy is driving traffic.
2. Content: which posts get read
Look back up at the very top of your Site Kit dashboard and click the Content button (next to Key metrics and Traffic).
This area shows your most-visited blog posts over the last 28 days. Use it to identify what resonates with your audience, then create more of it. For example, if you’re a wellness blogger and your post about morning routines gets 5x more views than your post about supplements, this list tells you exactly where to focus your future writing.
3. Devices and Locations: who your readers are
Go back to the main Key metrics tab and look at the “Find out how your audience is growing” box again. On the right side, click the Locations or Devices text.
- Locations tells you what countries your readers are from.
- Devices breaks down your audience by Mobile, Desktop, and Tablet. Because Pinterest users overwhelmingly browse on their phones, you will likely see “Mobile” dominating this chart. It’s the perfect daily reminder of why your blog needs to load fast and look beautiful on mobile screens.
Google Analytics vs. Pinterest Analytics: what’s the difference?
You might wonder why you need Google Analytics when Pinterest already has its own analytics dashboard. They track different things.
| What it tracks | Google Analytics | Pinterest Analytics |
|---|---|---|
| Blog visits from all sources | Yes | No (only Pinterest traffic) |
| Which blog posts get the most views | Yes | No (tracks pin performance) |
| How long visitors stay on your blog | Yes | No |
| Pin impressions, saves, and clicks | No | Yes |
| Which pins drive the most traffic | Partially (shows referral URLs) | Yes |
| Traffic from repins by other users | Yes (captures all Pinterest referrals) | Only your own pins |
Pinterest Analytics tells you how your pins perform. Google Analytics tells you how your blog performs. You need both — Pinterest Analytics to optimize your pinning strategy, and Google Analytics to understand what happens after someone clicks through to your blog.
One important note: Pinterest Analytics and Google Analytics often show different numbers for the same time period. This is normal. Pinterest counts outbound clicks differently than Google counts sessions. Don’t stress about the gap — focus on trends over time, not exact matching numbers.
AI assistance: troubleshoot your analytics setup
If you run into issues during setup, these copy-paste prompts will help you get unstuck fast.
Use Perplexity for research-backed troubleshooting:
I just installed Site Kit by Google on my WordPress blog. The setup wizard completed and says Search Console is connected, but when I try to connect Google Analytics, it shows an error (or gets stuck). What are the most common causes and verified fixes? I’m on Hostinger shared hosting with WordPress and the Blocksy theme.
Use Google Gemini for step-by-step guidance:
I’m setting up Site Kit by Google on my WordPress blog. The plugin is installed but I’m confused about the permissions screen — it’s asking me to allow access to multiple Google services. Is this safe? Walk me through exactly what each permission does and whether I should allow all of them.
If your data isn’t showing after 48 hours:
My Site Kit by Google has been installed for more than 48 hours. The Site Kit dashboard inside WordPress says “Gathering data” for Analytics, and when I check analytics.google.com directly, standard reports still show no data. I verified the Realtime report works (it shows my visits). What could cause standard reports to remain empty, and what steps should I take to fix it?
Common mistakes beginners make and how to avoid them
Installing the tracking code twice. If you use Site Kit and another analytics method (like pasting tracking code into WPCode Lite or another analytics plugin like MonsterInsights), your tracking code may fire twice — inflating your data. Use one method only. Since you’re using Site Kit, let it handle everything. Don’t add the Google Analytics tracking code anywhere else.
Connecting the wrong Google account. Make sure you sign in with your dedicated blog Gmail during the Site Kit setup — not your personal Gmail. If you connect the wrong account, you can disconnect and reconnect under Site Kit → Settings.
Checking reports too early. Google Analytics needs 24–48 hours to process standard report data. Realtime reports appear within minutes, but the full Traffic acquisition and Pages reports need time. Don’t assume your setup is broken — give it 2 full days.
Connecting AdSense during setup. Site Kit will offer to connect Google AdSense as well. Skip this for now. You need significant traffic before AdSense is useful, and your site needs to be approved by Google’s AdSense team first. Focus on Analytics and Search Console only.
Obsessing over numbers when traffic is low. If your blog has 5 visitors this week, daily analytics checks won’t help. Check weekly or biweekly during the early months. Focus your energy on creating content and pinning consistently — the traffic will come.
Quick checklist before you move on
Run through this list to confirm everything is solid:
- Site Kit by Google plugin installed and activated
- Setup wizard completed — signed in with your dedicated blog Gmail
- Google Search Console connected (automatic during setup)
- Google Analytics connected (via “Set up Analytics” after initial setup)
- Site Kit dashboard shows panels for both Search Console and Analytics
- Realtime report shows at least 1 active user when you visit your blog
- Bookmark analytics.google.com for easy access
- Plan to check standard reports in 2 days (after processing completes)
If every item checks out, your blog is now tracking every visit. You’ll finally know where your readers come from and which posts connect — and that data will guide every content decision you make from here.
What’s next?
Now that you can see who’s visiting your blog and where they come from, it’s time to give those visitors a reason to stay connected. In the next guide — How to Build Your Email List for Free with Systeme.io — Beginner Setup — you’ll set up a free email opt-in so readers can hear from you directly, no algorithm required.
Ready to get eyes on your new blog? Anastasia Blogger’s Pinterest SEO Traffic SecretsaPinterest SEO Traffic Secrets walks you through the exact strategy to turn this setup into consistent traffic.