This post may contain affiliate links. As an affiliate, I may earn a commission if you purchase through my links, at no extra cost to you.
Now that you’ve installed your essential WordPress plugins, there’s one small setup step most beginner bloggers skip—and it quietly undermines their credibility from day one.
Your author profile.
It sounds trivial. After all, you’re focused on writing blog posts, choosing Pinterest boards, and getting traffic. But here’s what happens when you don’t set this up properly: Your posts are published by “admin” or a username like “sarah2024blogger.” Your bio section is empty. And where readers expect to see a professional headshot, there’s a blank silhouette or a mysterious gray avatar.
To a new visitor scrolling Pinterest, these details whisper one thing: This person isn’t serious.
The truth is blunt: your author profile is your blog’s first impression in places you might not even see. It appears at the bottom of every blog post. It shows up when people leave comments. It’s visible on your author archive page. And if your theme supports it, it appears in author boxes that readers use to decide whether they should trust your advice.
This post walks you through setting up your WordPress author profile the right way—your display name, your bio, and your Gravatar profile picture—so that every post you publish looks professional, credible, and Pinterest-ready from the start.
In this guide, you’ll learn:
- How to change your WordPress display name to protect your site from security risks
- How to write a professional author bio that builds credibility with readers (with niche-specific examples you can adapt)
- How to set up your Gravatar profile picture so it appears automatically across your site
- Where your author profile actually shows up on your blog (and why it matters for Pinterest traffic)
- How to troubleshoot common Gravatar issues when your profile picture doesn’t appear
- AI prompts to speed up bio writing and get unstuck faster
Why Your WordPress Author Profile Matters (Even If You’re a One-Person Blog)
Most beginner bloggers think, “I’m the only person writing on this blog. Why do I need an author profile?”
Here’s why it matters more than you think.
Your Author Profile Appears in More Places Than You Realize
Even on a solo blog, WordPress displays your author information in multiple places:
At the bottom of blog posts: Many WordPress themes automatically display an author box below each post. This box includes your display name, bio, and profile picture. If you leave these fields empty, the box either shows placeholder text or disappears entirely—both of which look unfinished.
On your author archive page: WordPress creates an author archive page for every user on your site. The URL typically looks like yoursite.com/author/yourname/. If someone clicks your name on a post, they land here. An incomplete profile makes this page look abandoned.
In blog comments: When you reply to comments on your own blog, your Gravatar appears next to your name. If you haven’t set one up, WordPress shows a generic avatar—a gray silhouette or a default pattern. This makes you look like just another commenter, not the blog owner.
In email notifications: Some themes and plugins display your profile picture in email notifications when readers subscribe or receive updates. A professional headshot here reinforces your brand.
Pinterest Users Scan for Credibility Signals Fast
Pinterest users are planners and researchers. They save ideas for later, but they also evaluate whether a pin’s source is trustworthy before clicking through.
When your pin sends someone to your blog, they make a split-second decision: Is this person credible, or is this another random internet opinion?
Your author profile is part of that credibility check. A filled-out bio that says “Jordan Lee helps new budgeters master their money through practical saving strategies” signals expertise. An empty bio or a username like “admin” signals amateur hour.
According to research on online trust and credibility, readers evaluate website authority based on small design and content cues—including author bios and professional imagery. A study published in the Journal of Computer-Mediated Communication found that visible author information significantly increases perceived trustworthiness, especially for informational content.
It Helps Pinterest’s Algorithm Understand Your Content
Pinterest isn’t just looking at your pins—it’s also reading your website. When Pinterest’s crawler visits your blog, it looks for signals about what your site is about and who writes it.
A well-optimized author profile with a clear bio helps Pinterest categorize your content. If your bio says “Sarah Martinez writes about 30-minute family dinners and meal prep strategies,” Pinterest understands your niche and can suggest your pins to users searching for meal prep content.
This is part of Pinterest’s broader shift toward rewarding credible, authoritative content creators. The platform now prioritizes profiles and pins that demonstrate expertise, and your author bio is one of those signals.
The 3 Essential Parts of Your WordPress Author Profile
Your WordPress author profile has three main components you need to set up:
- Display Name: The name that appears publicly on your blog posts and comments.
- Biographical Info: A short bio (50-100 words) that describes who you are and what you write about.
- Gravatar: Your profile picture, managed through the Gravatar service.
Let’s set up each one step-by-step.
Step 1: Change Your Display Name (Critical for Security)
By default, WordPress uses your username as your public display name. This is a security risk.
Here’s why: Your username is one half of your login credentials. If someone knows your username, they only need to guess your password to access your site. And WordPress makes it surprisingly easy to discover usernames—they’re visible in author archive URLs, in your site’s code, and through simple URL tricks.
Changing your display name hides your username from public view.
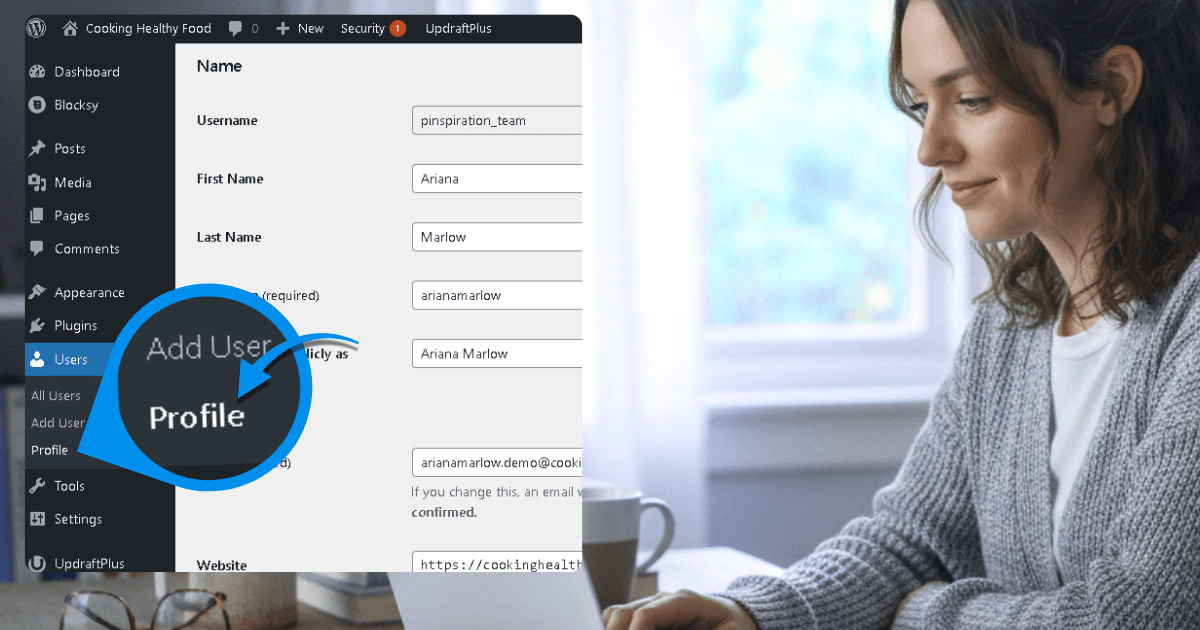
How to Change Your Display Name
Log into your WordPress dashboard and hover over your username in the top-right corner. You’ll see a dropdown menu. Click “Edit Profile” (or navigate to Users > Your Profile from the left sidebar).
Scroll down to the Name section. You’ll see fields for:
- Username (this cannot be changed without database editing)
- First Name
- Last Name
- Nickname
- Display name publicly as (dropdown menu)
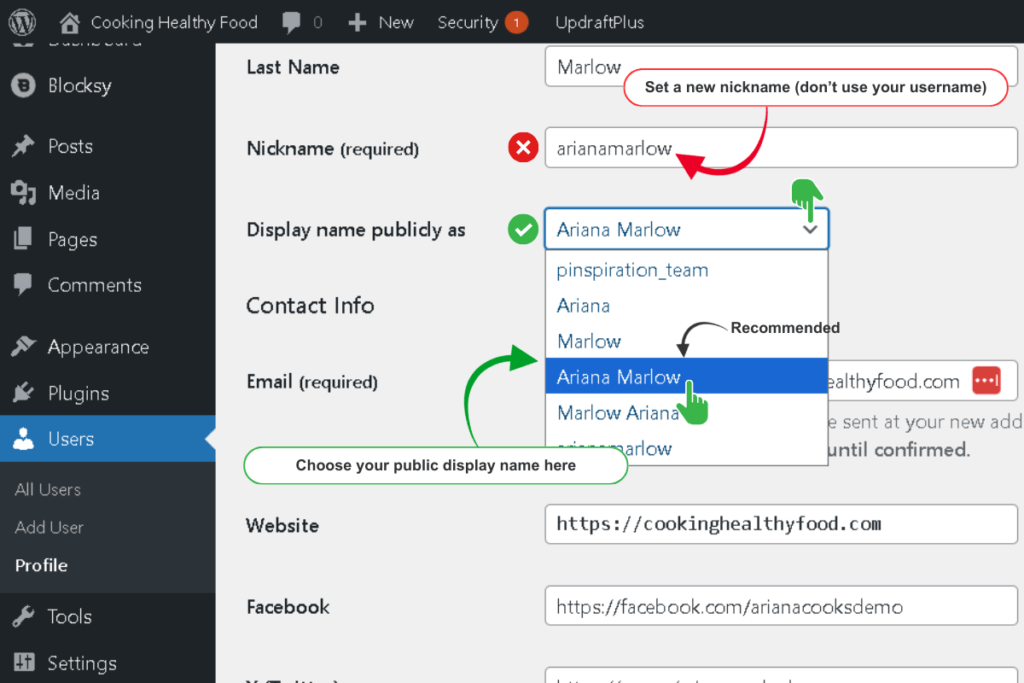
Fill in your First Name and Last Name if they’re not already there. Then change the Nickname field. By default, WordPress auto-fills this with your username. Replace it with something else—your real name, your blog name, or a pen name.
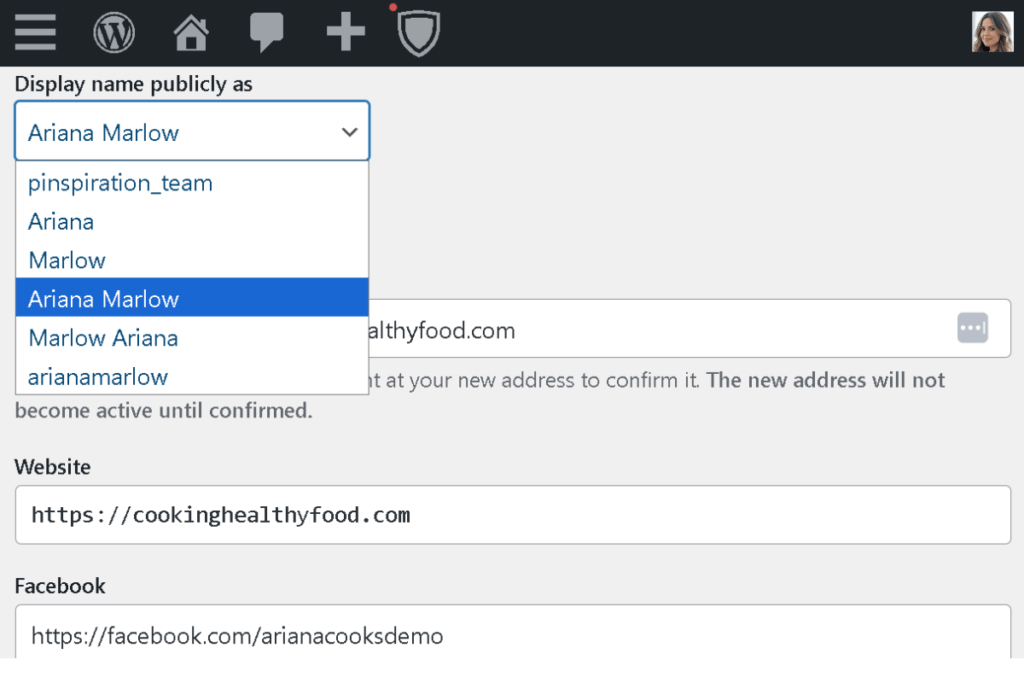
Now look at the “Display name publicly as” dropdown. This menu shows all the possible combinations WordPress can create from the fields above. You’ll see options like:
- Username (your login name—NEVER select this)
- First Name
- Last Name
- First Name + Last Name
- Nickname
Choose First Name + Last Name OR your custom Nickname. Never select your username.
After you’ve made your selection, scroll to the bottom of the page and click “Update Profile.”
Why This Matters for Security
Even after changing your display name, your username can still be discovered through your author archive URL. If someone visits yoursite.com/?author=1, WordPress redirects them to yoursite.com/author/yourusername/.
For absolute beginners, changing the display name is enough to prevent casual exposure. If you want advanced security, you can change the user_nicename field in your WordPress database (this controls the author archive URL), but that requires database access and is beyond beginner-level setup. For now, focus on setting a display name that isn’t your username.
Security plugins like Wordfence or Really Simple Security can also block user enumeration attempts, which prevent attackers from discovering usernames through URL tricks.
Step 2: Write Your Author Bio (50-100 Words)
Your biographical info appears in author boxes, on your author archive page, and sometimes in theme-specific widgets. This is where you tell readers who you are and why they should trust your advice.
What to Include in Your Author Bio
Your bio should be short, professional, and focused on your expertise. Aim for 50-100 words.
Here’s what to include:
Your name and niche focus: “Sarah Martinez is a food blogger specializing in 30-minute family dinners.”
What you write about: “She writes about meal prep strategies and budget-friendly recipes for busy parents.”
Relevant credentials (if applicable): “Sarah is a certified nutritionist and former restaurant chef.”
Your audience: “She helps working moms get dinner on the table without stress.”
Write your bio in third person (she/he/they, not “I”). This sounds more authoritative and professional, and it’s the standard format for author bios across most websites.
What to AVOID in Your Author Bio
- Personal life details unless relevant: Don’t mention your pets, hobbies, or family unless they directly relate to your niche. A parenting blogger might mention being a mom of three. A finance blogger shouldn’t.
- Overly long bios: Some themes and plugins enforce character limits (140-180 characters). Keep it under 100 words to ensure compatibility.
- Vague statements: “I love blogging and sharing ideas” tells readers nothing. Be specific about what you write and who you help.
- Email addresses or phone numbers: These are spam magnets. Use a contact form instead.
Niche-Specific Author Bio Examples
Food Blog (Meal Prep Niche):
“Sarah Martinez is a food blogger specializing in 30-minute family dinners and meal prep strategies for busy parents. She’s a certified nutritionist and former restaurant chef who believes weeknight cooking shouldn’t feel like a chore. Sarah writes practical recipes and meal planning tips for working moms who want dinner on the table fast.”
Wellness Blog (Fitness Niche):
“Alex Chen writes about fitness routines and mental wellness practices for beginners looking to build sustainable healthy habits. A certified personal trainer and mindfulness coach, Alex helps readers develop workout plans that fit into real life, not fantasy schedules.”
Finance Blog (Budgeting Niche):
“Jordan Lee helps new budgeters master their money through practical saving strategies and debt payoff plans. A former financial advisor turned blogger, Jordan breaks down budgeting basics for people who’ve never tracked a dollar in their lives.”
Parenting Blog (Toddler Activities Niche):
“Taylor Kim shares toddler activities and parenting tips for first-time parents navigating early childhood development. A mom of two and early childhood educator, Taylor creates screen-free activity ideas that actually keep toddlers engaged.”
How to Add Your Bio in WordPress
Go back to Users > Your Profile (or Edit Profile from the top-right dropdown).
Scroll down to the About Yourself section (or About the user if you’re editing another user’s profile).
You’ll see a large text box labeled Biographical Info. Paste or type your bio here.
When you’re done, scroll to the bottom and click “Update Profile.”
Your bio will now appear on your author box (if your theme supports it), your author archive page, and anywhere else WordPress displays author information.
🤖 AI Assistance: Drafting Your Author Bio
Writing about yourself feels awkward. If you’re stuck, use AI to speed up the brainstorming process.
Copy-Paste Prompt for Google Gemini:
I'm a beginner blogger writing about [YOUR NICHE]. My target audience is [DESCRIBE YOUR READER]. I need to write a 50-100 word author bio for my WordPress profile that:

1. Explains what I write about
2. Highlights my relevant experience or credentials (if any)
3. Shows who I help and why they should trust my advice
4. Is written in third person

My name is [YOUR NAME]. Here's what I want to emphasize: [LIST 2-3 KEY POINTS ABOUT YOUR EXPERIENCE OR FOCUS].

Write 3 different versions of my author bio so I can choose the one that feels most authentic.
What This Prompt Does:
- Generates multiple bio options so you can pick the best one
- Ensures third-person format (professional standard)
- Keeps bios focused on your niche and audience
- Tailors each version to your specific experience level
When to Use AI:
- After you’ve identified your niche and audience (from earlier setup posts)
- When you’re struggling to describe yourself without sounding vague or overly self-promotional
- To see how different phrasing options sound before committing
Pro Tip: Don’t copy AI-generated bios word-for-word. Use them as starting points, then edit for authenticity. Your bio should sound like you, not like a marketing robot.
Step 3: Set Up Your Gravatar Profile Picture
WordPress doesn’t support profile pictures natively. Instead, it integrates with Gravatar (short for “Globally Recognized Avatar”), a free service owned by Automattic, the company behind WordPress.com.
Your Gravatar is tied to your email address. Once you upload a profile picture to Gravatar, it automatically appears anywhere that email is used across the web—on WordPress sites, in blog comments, on forums, and more.
How to Create a Gravatar Account
Go to Gravatar.com in your web browser.
Click the “Create Your Gravatar” button (or “Sign Up” if it’s labeled differently).
You’ll be asked to sign in with a WordPress.com account or create a new one. This is NOT the same as your WordPress.org website login. WordPress.com is a separate service, but it powers Gravatar, so you need an account there.
If you already have a WordPress.com account, sign in with those credentials. If not, click “Create an account” and follow the prompts. You’ll need to verify your email address.
Once you’re logged in, you’ll see your Gravatar dashboard.
How to Add Your Email and Upload a Photo
Click “Add email address” (or “Avatar” in the left sidebar, depending on the interface).
Enter the same email address you use for your WordPress user account. This is critical—Gravatar matches your profile picture to your email, so if the emails don’t match, your Gravatar won’t appear on your blog.
Check your email for a confirmation link from Gravatar. Click the link to verify the email address.
After verification, click “Upload Image” and choose a professional headshot or your logo. You’ll have the option to crop the image to fit Gravatar’s circular frame.
Choose an image rating (usually G-rated for general audiences, unless you have a specific reason to select a different rating).
Finally, click “Make primary” next to the email address you want to use as your main Gravatar identity (if you manage multiple email addresses in one account).
Step 4: Enable Gravatars in Your WordPress Settings
Now that you’ve created your Gravatar, you need to make sure WordPress is set to display Gravatars on your site.
Go to your WordPress dashboard and navigate to Settings > Discussion from the left sidebar.
Scroll down to the Avatars section (near the bottom of the page).
Make sure the “Show Avatars” checkbox is checked. If it’s not, check it now.
Below that, you’ll see a Default Avatar dropdown. This controls what avatar WordPress shows for users who don’t have a Gravatar set up (like commenters who haven’t created an account). Choose any option you like—Gravatar Logo, Mystery Person, or a geometric pattern. This won’t affect your profile picture, only the fallback for others.
Scroll to the bottom of the page and click “Save Changes.”
Troubleshooting: Why Isn’t My Gravatar Showing?
If you’ve set up your Gravatar but it’s not appearing on your blog, here are the most common causes and fixes.
1. Email Mismatch
The email address in your WordPress user profile must exactly match the email address you used to create your Gravatar.
Go to Users > Your Profile and check the Email field. Compare it to the email address you verified on Gravatar.com. If they don’t match, change your WordPress email or add the correct email to your Gravatar account.
2. Avatars Are Disabled
Double-check Settings > Discussion and confirm that “Show Avatars” is checked. If this box is unchecked, WordPress won’t display any Gravatars, even if yours is set up correctly.
3. Caching Issues
If you use a caching plugin (like WP‑Optimize or LiteSpeed Cache), your site may still be showing an old cached version of your pages. To fix this, clear your cache:
- Look at the top admin bar — most caching plugins add a “Purge Cache” or “Clear Cache” button there
- If you don’t see it, open the plugin from the left sidebar (e.g., WP‑Optimize → Cache, LiteSpeed Cache → Toolbox)
- Click “Purge Cache” or “Clear All Caches”
If you’re using Hostinger, you can also clear your site cache directly from the Hosting Dashboard → Clear Cache (as shown in the screenshot).
After clearing the cache, reload your blog post in a private/incognito window to force a fresh load.
4. Plugin or Theme Conflict
Some plugins or themes override WordPress’s default avatar display. To test for conflicts:
- Temporarily switch to a default WordPress theme (like Twenty Twenty-Four)
- Check if your Gravatar appears
- If it does, your theme was blocking it—contact your theme developer for help
You can also deactivate all plugins, then reactivate them one by one to identify which plugin is causing the conflict.
5. Gravatar Service Delay
Occasionally, Gravatar takes a few minutes to sync your new profile picture across the web. Wait 10-15 minutes, clear your cache, and check again.
What Your Author Profile Looks Like on Your Blog
Once you’ve completed all three steps—display name, bio, and Gravatar—here’s where your author profile will appear on your blog:
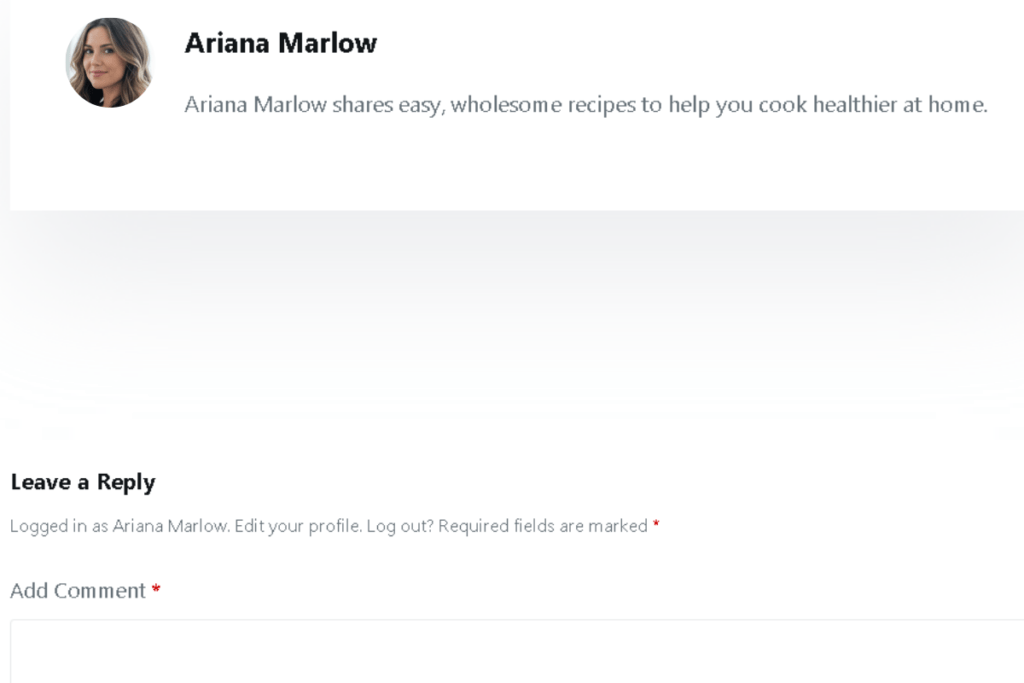
At the bottom of blog posts: Most WordPress themes automatically display an author box below each post. This box shows your Gravatar, display name, and bio. Some themes also include social media links or a link to your author archive page.
On your author archive page: If someone clicks your name on a post, they land on your author archive page (usually yoursite.com/author/yourname/). This page lists all the posts you’ve published, along with your profile picture and bio at the top.
In blog comments: When you reply to comments, your Gravatar appears next to your name. This makes it clear that you’re the blog owner, not just another commenter.
In theme-specific widgets: Some themes include author profile widgets for sidebars or footer areas. If your theme supports these, your Gravatar and bio will appear there automatically.
What’s Next?
Your WordPress author profile is now fully set up. Every post you publish will display your professional name, bio, and profile picture automatically.
But your blog still isn’t ready to launch. Before publishing your first post, you need to create the core pages every blog must have — the ones that appear in your footer:
- About Me
- Privacy Policy
- Terms & Conditions
- Affiliate Disclosure
These pages build trust, meet legal requirements, and make your blog look complete.
That’s exactly what we’ll cover in the next post: Essential Pages Your Blog Needs Before Launch.
Take the Next Step
Want to turn your blog setup into consistent Pinterest traffic? Anastasia Blogger’s Pinterest SEO Traffic Secrets walks you through the exact strategy to optimize your profile, pins, and content for long-term growth.