This post contains affiliate links. As an affiliate, I may earn a commission if you purchase through my links, at no extra cost to you. I only recommend tools I personally use, have researched thoroughly, or that trusted blogging experts rely on every day.
Now that you’ve configured your essential WordPress settings from [WordPress Settings You Need to Change Right After Installing], your blog has the right foundation.
But WordPress out of the box is like a kitchen with only a stove—functional, but missing the essential tools you need to actually prepare a complete meal.
Plugins extend WordPress functionality without requiring any coding knowledge. Think of them as apps for your blog. The right plugins protect your site from hackers, back up your content automatically, speed up loading times, and help readers contact you.
But here’s where most beginners go wrong: WordPress.org hosts over 60,000 plugins, and the temptation is to install everything that looks useful.
I’ve seen new bloggers launch with 30+ plugins because every tutorial recommended “must-have” tools. The result? Slow sites, constant conflicts, and overwhelming maintenance.
The truth is simpler: you only need 6-8 plugins on day one. That’s it. Everything else can wait until you actually need it—when you start monetizing, tracking traffic, or producing heavy image content.
This guide shows you exactly which plugins to install right after setup, which ones to save for later, and why this minimal approach keeps your blog fast, secure, and manageable.
Why most beginners install too many plugins
Every plugin tutorial promises “essential” tools. Install this for SEO. Install that for social sharing. Add another for analytics. Before you know it, you’re managing 25+ plugins before publishing your first post.
Here’s what actually happens with plugin overload:
Your site slows down. Each plugin adds scripts, stylesheets, and database queries.
Research shows that poorly coded plugins impact performance more than quantity, but beginners can’t distinguish good code from bad. The safest strategy? Start minimal.
Conflicts multiply. With 30 plugins from 30 different developers, compatibility becomes a nightmare. One update breaks another plugin. Troubleshooting takes hours because you don’t know which plugin caused the problem.
Maintenance becomes overwhelming. Every plugin needs updates. With 25 plugins, you’re testing updates constantly. Miss one security update and you’ve left a door open for hackers.
You pay for features you don’t use. Many beginners buy premium plugins “just in case” they need advanced features later. That’s backwards. Install plugins when you have a specific problem to solve, not hypothetically.
The expert approach is different: install only what you need right now. Start with 6-8 core plugins that every blog requires—security, backups, speed, spam protection, forms, and basic SEO. Add specialized plugins later when your traffic and monetization justify them.
This keeps your site fast, your maintenance simple, and your troubleshooting manageable. Let’s break down exactly what you need.
The 6-8 plugin rule for beginners
After analyzing recommendations from WordPress experts, established bloggers, and security specialists, the consensus is clear: new blogs need 6-8 core plugins covering the essentials.
Sites like WPBeginner run 62+ plugins successfully, but they have the technical expertise and server resources to manage that complexity. You’re just starting out. Your shared hosting plan has limited resources. Your technical skills are developing. And most importantly, you don’t need 62 plugins yet.
Here’s the framework that works:
Core essentials (6-8 plugins): Security, backups, performance, spam protection, contact forms, and optional SEO. Install these on day one. They protect your work, keep your site fast, and give readers a way to reach you.
Stage-based additions (3-5 plugins): Link management for affiliates, code snippet management for tracking pixels, image optimization for heavy visual content. Install these only when you reach that stage—not before.
This approach gives you everything you need without the bloat. Your site stays fast. Updates stay manageable. And you’re not paying for premium features you won’t use for months.
Let’s start with the core essentials every blog needs from day one.
Core essential plugins (install on day 1)
These 6-8 plugins form your foundation. Install them immediately after WordPress setup, configure them once, and focus on creating content. Everything else can wait.
Essential plugin #1: Security with Solid Security
Your blog is under attack before you even publish your first post. Automated bots scan the internet looking for WordPress sites, then try thousands of username and password combinations hoping to break in. Without security protection, you’re leaving your front door unlocked.
→ Install Solid Security to lock down your login page and block automated attacks.
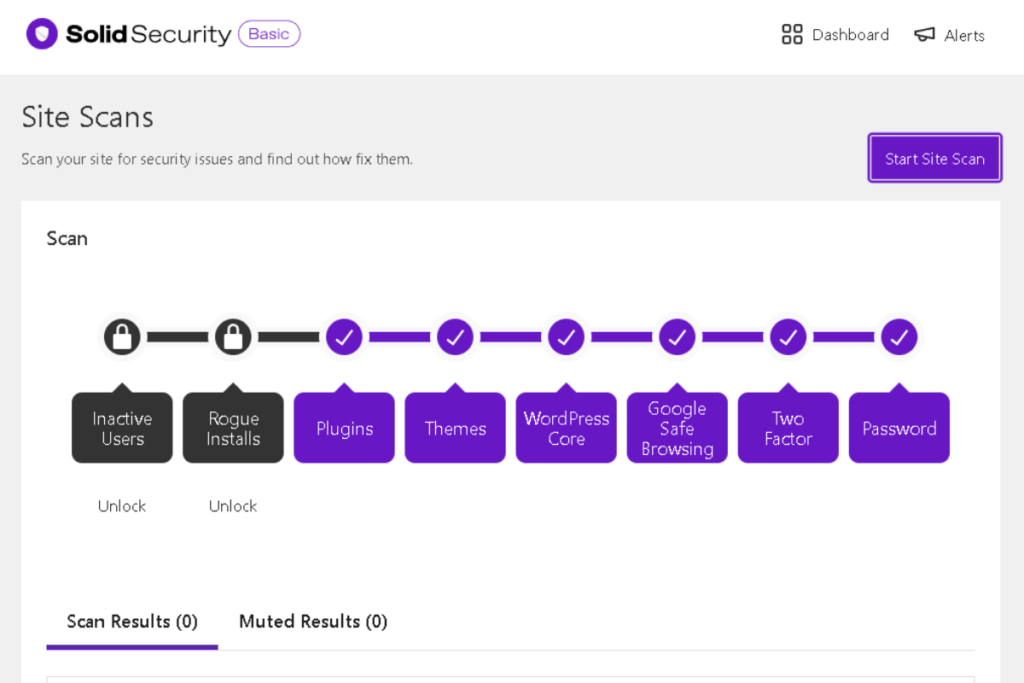
Solid Security (formerly iThemes Security) is the security plugin I recommend for new bloggers. It focuses on WordPress hardening—locking down vulnerabilities before attackers can exploit them.
Why Solid Security over other options
I’m recommending Solid Security specifically because it balances beginner-friendly setup with comprehensive protection. Other popular security plugins exist, but they often overwhelm beginners with complex dashboards or consume significant server resources during scans—a problem on budget hosting plans.
Solid Security takes a prevention-first approach. Instead of constantly scanning for malware (which uses CPU resources), it hardens your WordPress installation to prevent attacks in the first place. This makes it lighter on shared hosting while still protecting your site effectively.
What Solid Security does for your blog
The free version covers everything beginners need:
Hides your login page URL. By default, every WordPress site uses /wp-admin for logging in. Bots know this and target that URL with brute-force attacks. Solid Security changes your login URL to something custom like /my-secret-login, instantly blocking automated attacks that don’t know where your login page is.
Enforces strong passwords. Weak passwords are the #1 cause of WordPress hacks. Solid Security requires all users to create passwords that meet security standards—no more “password123” compromising your site.
Limits login attempts. After too many failed login attempts from the same IP address, Solid Security automatically blocks that IP. This stops brute-force bots from trying millions of password combinations.
Monitors file changes. If a hacker modifies your WordPress files, Solid Security detects the change and alerts you immediately. Early detection means early response—before damage spreads.
How to set up Solid Security (basic guide)
→ Before we walk through the setup, download Solid Security here — it’s the simplest security plugin for beginners.
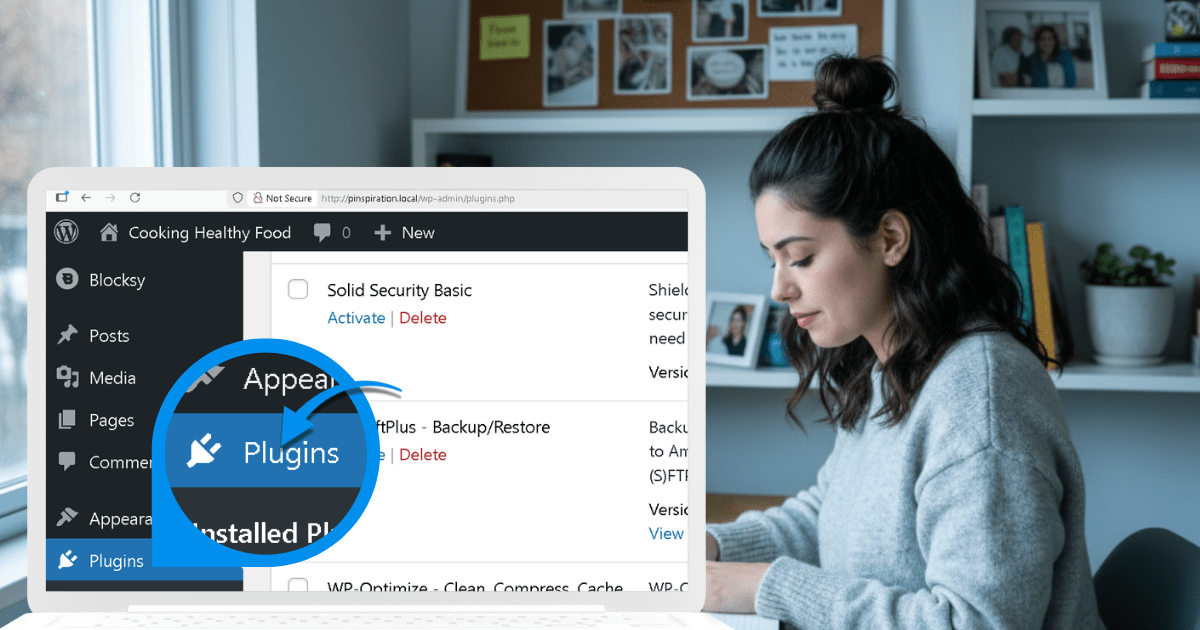
Install the plugin by going to your WordPress dashboard → Plugins → Add New. Search for “Solid Security” (make sure it’s by SolidWP), click Install Now, then Activate.
After activation, Solid Security runs a security check and guides you through recommended settings. The setup wizard takes about 5 minutes and handles the technical work automatically.
When you go through the wizard, make sure you:
- Hide login area – Change your login URL from
/wp-adminto something custom. Write down your new login URL and store it somewhere safe. You’ll need this every time you log in. - Enforce strong passwords – Turn on strong password requirements so new users and admins can’t use weak passwords.
- Enable brute force protection – Set a sensible limit (for example, 5 attempts) before an IP gets locked out to stop bots from guessing passwords.
- Turn on file change detection – Let Solid Security alert you alert you when important WordPress files change unexpectedly, so you can react quickly.
The free version handles everything you need as a new blogger. The Pro version adds more advanced features, but you can safely skip that for now and upgrade later if your site and income justify it.
Want a detailed walkthrough? If you prefer watching someone configure every setting step-by-step, this comprehensive tutorial walks through the entire Solid Security setup process:
Essential plugin #2: Automated backups with UpdraftPlus
Imagine waking up to a blank site. A plugin update went wrong and corrupted your database. Or a hacker deleted your files. Or your hosting provider had a catastrophic server failure. Without backups, everything is gone—every post, every image, every hour of work.
→ Install UpdraftPlus to protect your site from data loss.
UpdraftPlus is the backup plugin recommended by WordPress experts worldwide because it automates the entire process. Configure it once, and it backs up your site on a schedule you set, storing files safely in cloud storage. If disaster strikes, you restore your entire site with one click.
Why automated backups are non-negotiable
Manual backups don’t work for beginners because you forget to do them. You’re busy writing content, promoting posts, learning WordPress. Backups slip through the cracks until it’s too late.
Research shows that 60% of small websites that lose data shut down within six months. Most never recover their content. Automated backups eliminate this risk completely—your site gets backed up whether you remember or not.
→ Get UpdraftPlus — the easiest automated backup tool for beginners.
What UpdraftPlus backs up
UpdraftPlus backs up everything that makes your blog work:
Your database – This contains all your posts, pages, comments, and WordPress settings. It’s the heart of your blog.
Your files – This includes your theme, plugins, uploaded images, and any customizations you’ve made.
Separate backup schedules – You can back up your database daily (since posts and comments change frequently) while backing up files weekly (since themes and plugins change less often). This saves storage space while keeping everything protected.
The free version integrates with Google Drive, Dropbox, and other cloud storage services, so your backups live off-site. If your hosting server crashes, your backups remain safe in the cloud.
Setting up your backup schedule
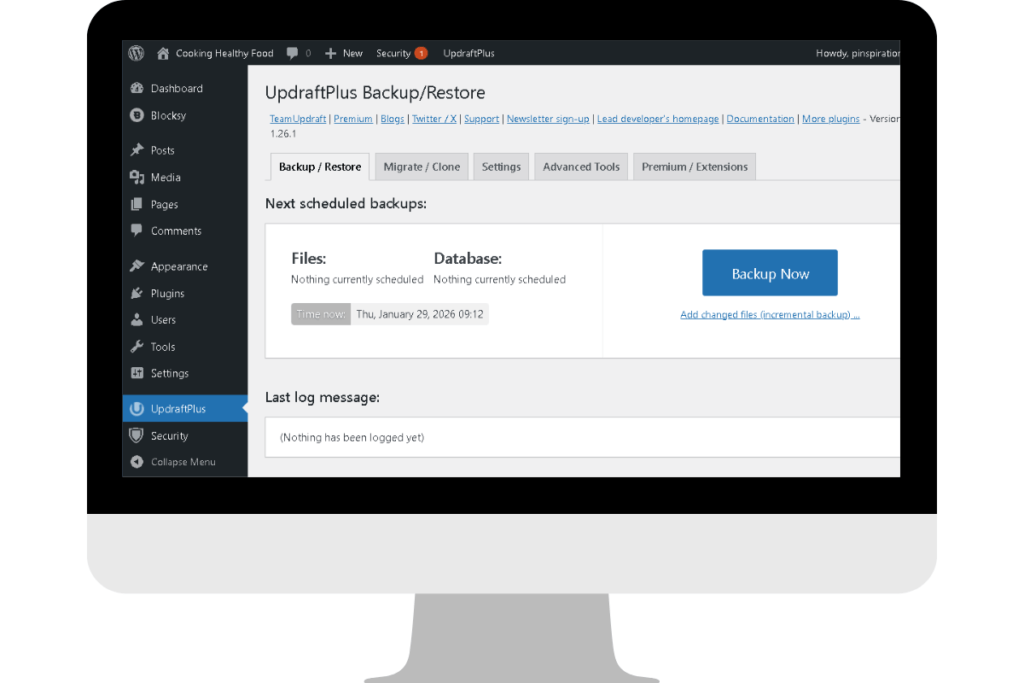
Install UpdraftPlus: Plugins → Add New → Search “UpdraftPlus” → Install Now → Activate.
After activation, go to Settings → UpdraftPlus Backups → Settings tab. Here’s the beginner-friendly schedule I recommend:
Files backup schedule: Weekly. Your theme, plugins, and images don’t change often, so weekly backups capture everything without eating up storage space.
Database backup schedule: Daily if you publish multiple times per week; weekly if you publish once per week or less. Your database contains all your posts and comments, so back it up more frequently than files.
Retain this many backups: Keep 4 file backups and 7 database backups. This gives you multiple restore points without filling up your Google Drive. UpdraftPlus automatically deletes older backups to stay within this limit.
Connecting to Google Drive
UpdraftPlus needs somewhere to store your backups. Google Drive is the easiest option for beginners—you get 15GB free storage (plenty for a new blog), and setup takes 2 minutes.
In UpdraftPlus Settings, scroll to “Choose your remote storage.” Click the Google Drive icon.
Click “Authenticate with Google.” This opens a new window where you log into your Google account and grant UpdraftPlus permission to create a folder and save files. UpdraftPlus creates its own folder inside your Google Drive and stores all backups there—it never touches your other files.
After authentication, UpdraftPlus confirms the connection. Click “Save Changes” at the bottom of the settings page.
Testing your first backup
Never assume backups work—always test them. Go to the “Current Status” tab in UpdraftPlus. Click “Backup Now.”
Check both boxes: “Include your database in the backup” and “Include your files in the backup.” Click “Backup Now.”
UpdraftPlus shows real-time progress as it packages your database and files, then uploads them to Google Drive. This first backup might take 5-10 minutes depending on your site size.
Once complete, open your Google Drive. You should see a new “UpdraftPlus” folder containing backup files with names like backup_2026-01-28-wordpress-database.gz. That’s your safety net.
If you ever need to restore, go to UpdraftPlus → Existing Backups, select the backup date, click “Restore,” and choose which components to restore (database, plugins, themes, uploads, etc.). UpdraftPlus handles the rest automatically.
🤖 AI Assistance:

Confused about backup frequency for your publishing schedule? Use this prompt in Google Gemini:

"I run a [food/wellness/finance/parenting] blog and publish [X] times per week. What's the optimal UpdraftPlus backup schedule for my database and files? Explain why this frequency makes sense for my workflow."
Essential plugin #3: Speed optimization with performance plugins
A slow blog loses readers before they even see your content. Research shows that 53% of mobile users abandon sites that take longer than 3 seconds to load. Speed isn’t just about user experience—it directly impacts whether people actually read your work.
You need ONE performance plugin to handle caching, image compression, and database cleanup. But which one depends on your hosting.
Performance plugin option 1: WP-Optimize (recommended for most beginners)
WP-Optimize is my default recommendation for new bloggers because it combines three essential speed tools in one plugin: caching, image compression, and database cleanup. Instead of installing separate plugins for each function, you get everything in one lightweight package.
What WP-Optimize does:
Caching – Generates static HTML versions of your pages so WordPress doesn’t rebuild them from scratch for every visitor. This dramatically reduces server load and speeds up page delivery.
Image compression – Automatically compresses every image you upload without visible quality loss. High-resolution photos that would normally be 5MB become 300-500KB, making pages load 10x faster.
Database cleanup – Removes post revisions, auto-drafts, spam comments, and other clutter that accumulates over time. A lean database means faster queries and better performance.
Setting up WP-Optimize
Install WP-Optimize: Plugins → Add New → Search “WP-Optimize” → Install Now → Activate.
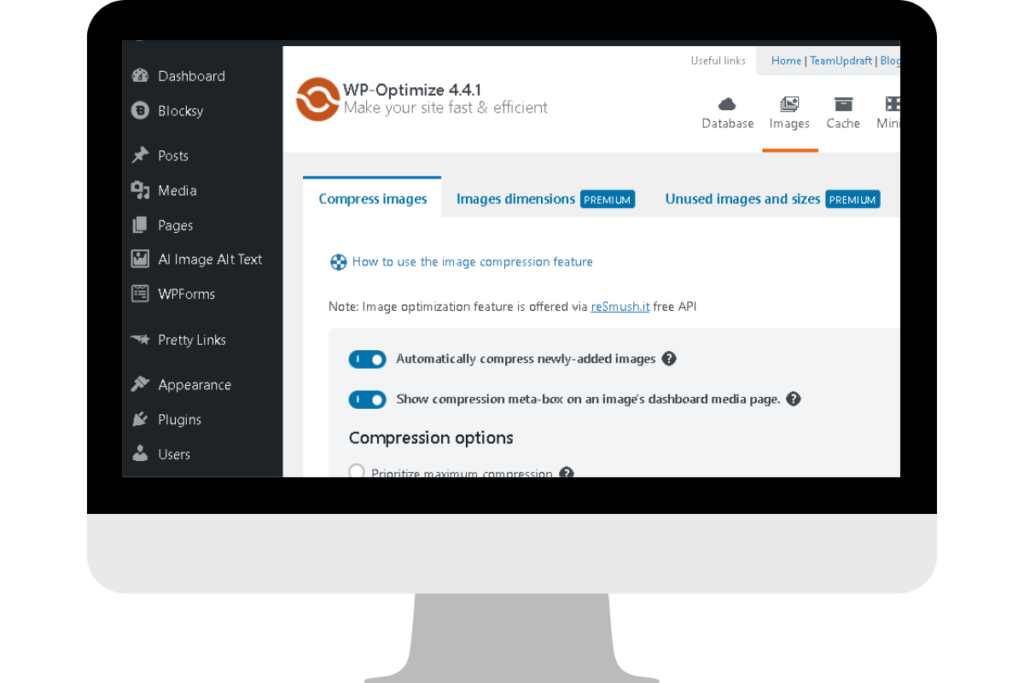
After activation, WP-Optimize shows three main tabs: Database, Images, and Cache.
Database tab: Click “Run all optimizations” to immediately clean out post revisions, auto-drafts, spam comments, and transient options. Enable “Weekly” automatic cleanups so your database stays lean without manual work.
Images tab: Turn on “Auto-compress new images.” WP-Optimize will compress every image you upload automatically going forward. For images already on your site, click “Compress images” to bulk-optimize everything at once.
Cache tab: Enable caching by clicking the toggle. WP-Optimize creates static files for faster page loads. Important: purge (clear) the cache whenever you update your site design, publish new content, or change settings. This ensures visitors see the latest version.
Add this exact line to keep it beginner‑friendly and safe:
🤖 AI Assistance

If you get stuck or something doesn’t work, you can ask an AI assistant like Google Gemini for help — just don’t share passwords or login links. You can also take a screenshot of your WP‑Optimize screen and paste it into the AI chatbox so it can guide you even more accurately.

Sample prompt:

“I’m using WP‑Optimize on my WordPress blog. Here’s a screenshot. Can you tell me which settings to enable for best speed and how to fix any issues?”
Performance plugin option 2: LiteSpeed Cache (only if on LiteSpeed hosting)
If your hosting provider uses LiteSpeed web servers (check your hosting dashboard or ask support), use LiteSpeed Cache instead of WP-Optimize. It’s purpose-built for LiteSpeed servers and delivers the fastest performance possible—often better than premium alternatives.
LiteSpeed Cache handles server-level caching, which is faster than plugin-level caching. It also includes image optimization, CSS/JS minification, and lazy loading for images.
When to choose LiteSpeed Cache: Only if your host uses LiteSpeed servers (examples: HostArmada, Hostinger with certain plans). It won’t harm other servers, but it won’t deliver its full performance benefits either.
When to choose WP-Optimize: If you’re not sure what server your host uses, or if you’re on Apache/Nginx servers. WP-Optimize works universally and gives you the all-in-one benefits of caching, images, and database in one plugin.
Why you only need ONE performance plugin
Never install multiple caching plugins. Running both WP-Optimize and LiteSpeed Cache (or any other caching plugin combination) creates conflicts, slows your site, and causes errors.
Choose one based on your hosting:
- LiteSpeed servers → LiteSpeed Cache
- Everything else → WP-Optimize
That’s it. Don’t add separate image compression plugins, separate minification plugins, or separate caching plugins. One good performance plugin handles everything.
🤖 AI Assistance

If you’re not sure which LiteSpeed Cache settings to enable, or something isn’t working, you can ask an AI assistant like Google Gemini — just don’t share passwords or login links.
You can also screenshot your LiteSpeed settings and paste it into the AI chatbox so it can guide you more accurately.

Sample prompt:

“I’m using LiteSpeed Cache on my WordPress blog. Here’s a screenshot. Which settings should I enable for best speed, and how do I fix any issues?”
Performance Plugin Option 3: Should You Use WP Rocket?
WP Rocket is a premium caching plugin ($49/year) that delivers excellent results with zero configuration. It’s popular because it automatically applies most performance best practices the moment you activate it.
If you prefer a hands‑free, non‑technical option, WP Rocket is the simplest solution. Everything is done for you. No settings to figure out.
You can learn more about it on their official page if you want to explore the features in detail.
But for beginners, WP‑Optimize’s free version already gives you most of the benefits at no cost. You can always upgrade to WP Rocket later when your blog is earning and you want to improve speed even further.
Video tutorial
🤖 AI Assistance

If you’re unsure whether WP Rocket is right for you, or you want help understanding what it improves, you can ask an AI assistant like Google Gemini — just don’t share passwords or login links.

You can also take a screenshot of your current setup and paste it into the AI chatbox so it can guide you more accurately.

Sample prompt:

“I’m considering WP Rocket for my WordPress blog. Here’s a screenshot. Can you tell me what improvements WP Rocket will handle automatically, and whether it’s worth upgrading for me?”
Essential plugin #4: Spam protection with Antispam Bee
Once your blog goes live, spam comments start pouring in. Bots promote sketchy products, drop malicious links, and clutter your comment section with nonsense. Without protection, you’ll waste hours deleting junk instead of writing content.
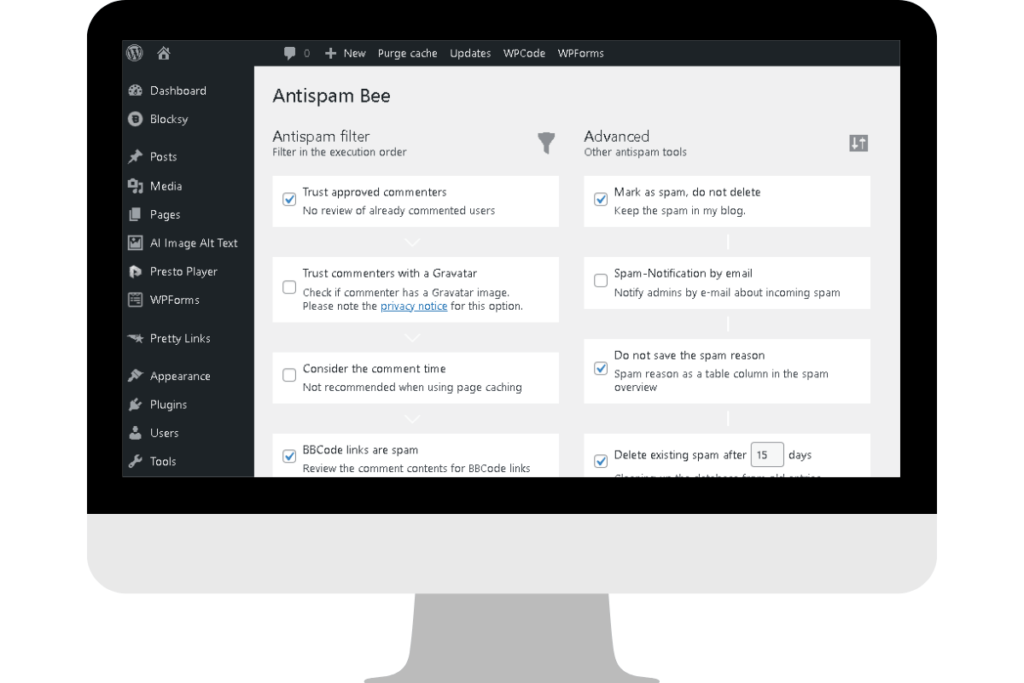
Antispam Bee is a free, privacy‑focused spam filter that blocks spam comments automatically — no setup required. Activate it once, and it quietly protects your site in the background.
Who maintains Antispam Bee?
Antispam Bee was originally created by developer Sergej Müller, and it’s now maintained by pluginkollektiv, a trusted volunteer team that manages several GDPR‑friendly WordPress plugins. Their entire philosophy is privacy‑first: no tracking, no external servers, no data sharing.
Why Antispam Bee is perfect for new bloggers
Antispam Bee is 100% free for everyone — personal blogs, business sites, commercial use. There are no premium upgrades, no hidden features, and no upsells. Install it and forget about it.
It’s also fully GDPR‑compliant. Unlike some spam filters that send visitor data to third‑party servers, Antispam Bee analyzes comments locally on your site. No external API calls, no privacy risks, and no unnecessary data sharing.
The plugin uses pattern recognition to detect spam: suspicious links, known spam IPs, and comment patterns that match bot behavior. In real‑world use, it blocks around 90–95% of spam automatically while still letting legitimate comments through.
Setting up Antispam Bee
Install Antispam Bee:
Plugins → Add New → Search “Antispam Bee” → Install Now → Activate
That’s it. The plugin works instantly with smart default settings — no configuration needed.
If you want extra protection, you can enable a few optional features under Settings → Antispam Bee:
Block comments from specific countries – Useful if your audience is concentrated in one region (e.g., Malaysia). This cuts down a huge amount of bot spam.
Trust approved commenters – Once someone leaves a legitimate comment, their future comments are auto‑approved. Great for building community.
Delete spam after X days – Set this to 7 or 14 days. It keeps your database clean without you lifting a finger.
What about contact form spam?
Antispam Bee only protects WordPress comments. For contact form spam, WPForms (covered next) includes built‑in spam protection with CAPTCHA and honeypot fields. With Antispam Bee for comments and WPForms for contact forms, your entire site stays spam‑free without needing multiple spam plugins.
Essential plugin #5: Contact forms with WPForms Lite
Every blog needs a way for readers to reach you—whether it’s collaboration requests, reader questions, or partnership opportunities. Without a contact form, you’re forced to display your email publicly, which invites spam bots straight into your inbox.
WPForms Lite is a drag‑and‑drop form builder that lets you create a professional contact form in under 5 minutes. It’s 100% free forever, with no limits on basic forms and no forced upgrades.
You can learn more on the official WPForms Lite page
Why WPForms for beginners
WPForms uses a visual builder—you see your form exactly as you build it. No coding, no shortcode confusion, no technical setup. If you can click and drag, you can create a form.
The free version includes everything beginners need:
Unlimited forms – Create as many forms as you want: contact forms, feedback forms, survey forms. No restrictions.
All essential fields – Name, email, message, phone number, dropdowns, checkboxes. Everything required for basic communication.
Built‑in spam protection – CAPTCHA and honeypot fields block bots before they submit spam. No extra spam plugin needed for forms.
Email notifications – Every submission is emailed to you automatically. You never miss a message.
The Pro version ($199/year) adds payment forms, conditional logic, and email marketing integrations. But for a simple contact form? The free version is perfect.
Building your first contact form
Install WPForms Lite:
Plugins → Add New → Search “WPForms” → Install Now → Activate
After activation, WPForms prompts you to create your first form. Click Add New and choose the Simple Contact Form template.
WPForms pre‑builds a form with Name, Email, and Message fields—enough for 95% of blogs. You can drag in extra fields from the left sidebar if needed, but start simple.
When you’re happy with the form, click Save. WPForms generates a shortcode like:
[wpforms id="123"]Copy this shortcode.
Adding your form to a page
Create a new page:
Pages → Add New
Title it Contact.
Paste your WPForms shortcode into the page content. WordPress automatically converts it into a working form when visitors view the page.
Publish the page. Your contact form is now live.
WPForms sends submissions to your WordPress admin email by default. To change this, go to:
WPForms → Your Form → Settings → Notifications
Update the Send To Email Address field.
🤖 AI Assistance:

Not sure how to set up your contact form with WPForms Lite or what to write on your contact page? Try this prompt in Google Gemini:

 “I’m creating a contact page for my [food/wellness/finance/parenting] blog using the WPForms Lite Simple Contact Form. Please guide me step by step on how to set up the form in WordPress and write beginner‑friendly, welcoming text (2–3 paragraphs) that encourages readers to reach out. Keep it conversational and warm.”

For more accurate guidance, take a screenshot of your current WPForms screen and paste it into the AI chat so it can see your setup.
Optional Plugin: SEO (Yoast SEO or Rank Math)
SEO plugins are helpful if you’re aiming for Google search traffic, but the approach taught here focuses on Pinterest as the primary traffic source, not Google. Pinterest doesn’t use meta descriptions, XML sitemaps, or keyword scoring, so an SEO plugin won’t make a difference at this stage. You can safely skip it and keep your setup lighter.
If you ever decide to expand into Google search later, you can add an SEO plugin when it actually becomes relevant.
Yoast is simpler for beginners, Rank Math offers more control — both work fine once you need them.
When the full, step‑by‑step guides for each plugin are ready, I’ll link them here so you can dive deeper whenever you choose.
Your core plugin stack: The complete day‑1 setup
This is everything a brand‑new blog needs to stay secure, backed up, fast, spam‑free, and fully functional from day one. Nothing extra, nothing confusing — just the essentials:
- Solid Security – Hardens WordPress, blocks brute‑force attacks, enforces strong passwords
- UpdraftPlus – Automated backups to Google Drive with one‑click restore
- WP‑Optimize (or LiteSpeed Cache on LiteSpeed hosting) – Caching, image compression, database cleanup
- Antispam Bee – Automatic, GDPR‑friendly spam protection
- WPForms Lite – Simple, reliable contact form with built‑in spam filtering
- Yoast SEO or Rank Math – Optional SEO plugin (only needed if you plan to target Google search later)
Total plugin count: 5–6 plugins
(5 if you skip SEO, 6 if you add it)
This is your entire day‑one setup. No bloat, no overlap, no “maybe later” tools. Just the core foundation that keeps your site protected, stable, and ready to grow.
Next, we’ll look at when to add more plugins — and why waiting is the smarter move.
Stage‑based plugins (install when you reach this phase)
Most tutorials push 20+ plugins on day one. That’s unnecessary. You don’t need affiliate tracking before you have affiliate partnerships. You don’t need heavy image optimization before you’re producing visual content. You don’t need analytics scripts before you have traffic worth measuring.
These plugins are genuinely useful — just not on day one. Install them only when you reach the stage where they actually matter.
Install when monetizing: Pretty Links
Pretty Links transforms long, ugly affiliate URLs into clean, branded short links that look professional and track clicks.
When you need Pretty Links
Install Pretty Links when you start affiliate marketing. Not before.
If you’re not yet promoting affiliate products or services, you don’t need link management. Save the plugin slot and the learning curve for when you have actual affiliate links to organize.
But once you join your first affiliate program, Pretty Links becomes essential. Here’s why:
Cleans up affiliate URLs. Affiliate links are often long and filled with tracking parameters: https://affiliate-network.com/track?id=12345&campaign=xyz&ref=blogger. They look spammy. Pretty Links shortens them to yourblog.com/go/toolname—clean, professional, trustworthy.
Protects against link rot. If an affiliate program changes their link structure, you’d normally need to update every post where you mentioned the product. With Pretty Links, you update the destination once in the plugin dashboard, and all your posts automatically redirect to the new URL.
Tracks clicks. Pretty Links shows you which links get the most clicks. This data reveals which products resonate with your audience, helping you focus on what actually drives revenue.
Setting up Pretty Links
Install Pretty Links: Plugins → Add New → Search “Pretty Links” → Install Now → Activate.
After activation, go to Pretty Links → Add New.
Redirection URL: Paste your full affiliate link here (the long, messy one from your affiliate dashboard).
Pretty Link: Choose your short URL slug. Use a format like /go/toolname or /recommends/toolname. Make it memorable and relevant to the product.
Title: Add a descriptive title like “Hostinger Affiliate Link” so you can identify it later in your dashboard.
Click “Create” and Pretty Links generates your short URL. Use this clean link in your blog posts instead of the raw affiliate URL.
Pretty Links tracks every click automatically. Check your dashboard to see which products get the most attention.
Install when adding tracking codes: WPCode Lite
WPCode Lite lets you add code snippets to your WordPress site without editing theme files. This is essential for tracking pixels, verification codes, and analytics scripts.
When you need WPCode Lite
Install WPCode Lite when you need to add tracking codes to your site:
Pinterest site verification – Pinterest requires you to add a meta tag to your site’s header to verify ownership.
Google Analytics tracking code – If you’re tracking traffic with Google Analytics (wait until you have consistent traffic before bothering).
Ad network scripts – When you join ad networks like Mediavine or AdThrive, they provide header/footer scripts that must be installed site-wide.
Before you reach these milestones, WPCode sits unused. Wait until you actually need to add code snippets.
Why WPCode instead of editing theme files
Beginners are often told to add code snippets to their theme’s functions.php file or header/footer templates. This creates two problems:
Theme updates overwrite your changes. Every time your theme updates, your custom code disappears. You have to remember what you added and re-add it after every update.
One syntax error breaks your entire site. If you accidentally delete a bracket or add an extra character, your site displays a fatal error. Beginners panic and don’t know how to fix it.
WPCode Lite solves both problems. Your code snippets live in the plugin database, separate from your theme. Theme updates don’t affect them. And WPCode validates code before saving it, preventing syntax errors from breaking your site.
Setting up WPCode Lite
Install WPCode Lite: Plugins → Add New → Search “WPCode Lite” → Install Now → Activate.
When you need to add a code snippet (like Pinterest verification), go to Code Snippets → Add New.
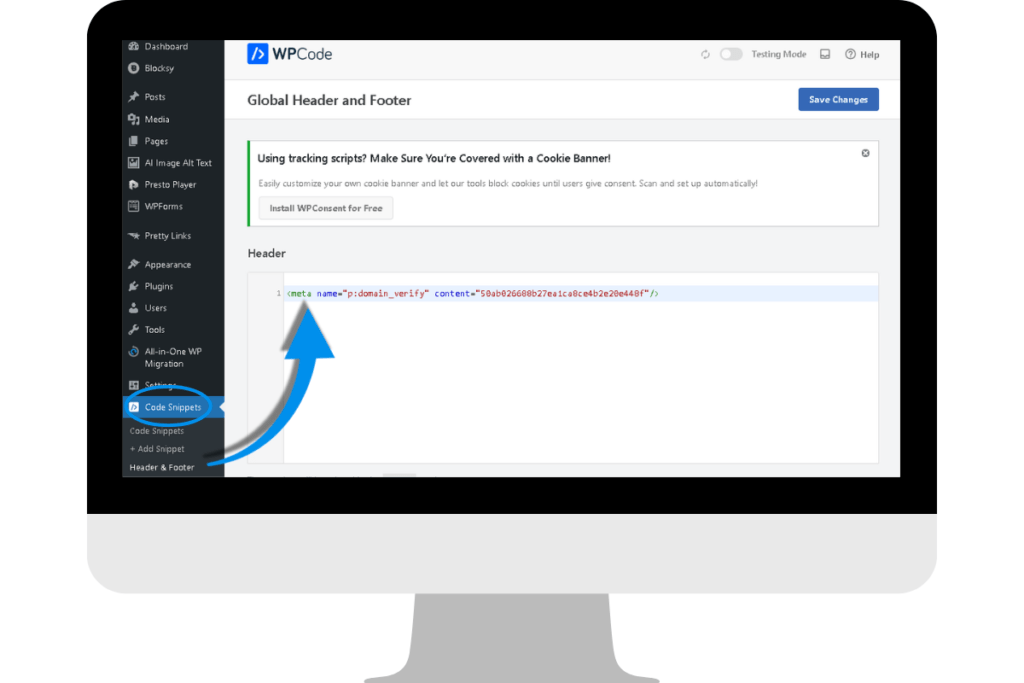
Choose snippet type: Select “HTML Snippet” for most tracking codes (meta tags, analytics scripts, verification codes).
Paste your code: Copy the code from Pinterest, Google Analytics, or your ad network, and paste it into the code box.
Choose location: Select “Site-wide Header” for meta tags and analytics. Select “Site-wide Footer” for ad scripts (footer placement improves page speed).
Activate snippet: Toggle “Active” and click “Save Snippet.”
That’s it. Your code is now live site-wide without touching theme files.
Install when producing lots of images: AI image alt text plugins
If you’re running an image‑heavy blog (food photography, travel photography, DIY tutorials with step‑by‑step images), adding alt text to every image becomes tedious. AI‑powered alt text plugins automate this task so you can focus on writing and publishing.
When you need automatic alt text
Install an AI alt text plugin when you’re regularly uploading 10+ images per post. Before that, manually writing alt text is still faster than learning and configuring automation.
Alt text serves two purposes:
Accessibility – Screen readers rely on alt text to describe images to visually impaired visitors. This is legally required in many regions and ethically important everywhere.
Supportive context for search engines – Alt text helps search engines understand what an image shows, but this is a secondary benefit compared to accessibility.
Writing alt text for a few images per post is manageable. But bloggers who publish posts with 10–15 images can easily spend 20 minutes just writing descriptions. AI plugins generate descriptive alt text in seconds.
Choosing an AI alt text plugin
If you want automation inside WordPress, a simple option is:
- AI Image Alt Text (by Rustaurius) – free plan with a 25‑image monthly limit, uses AI to analyze the image and generate descriptive alt text automatically
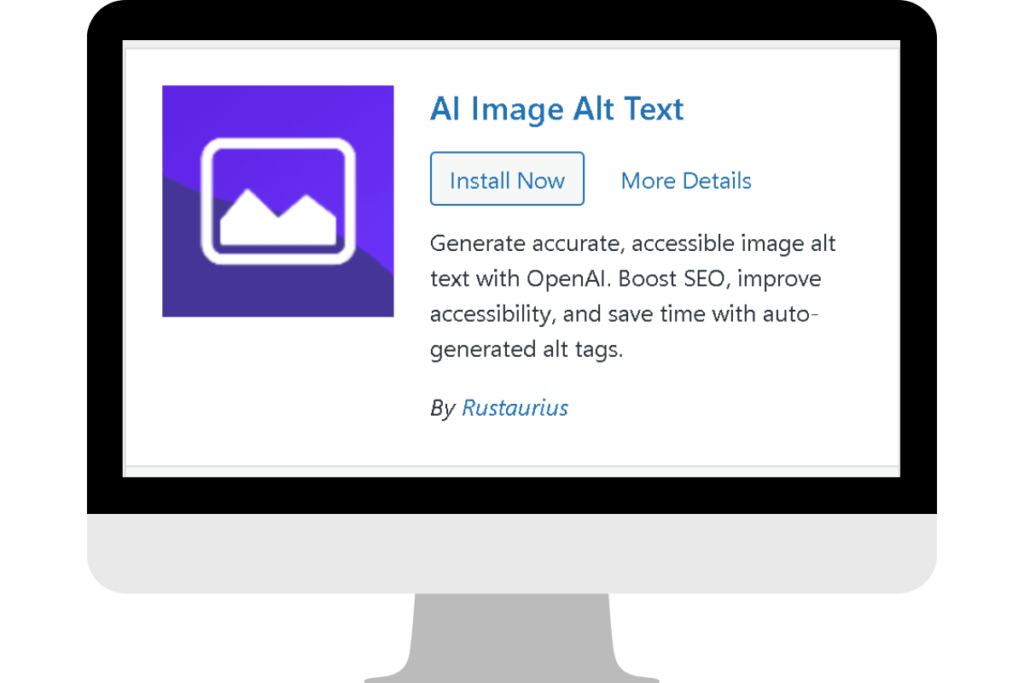
This plugin “looks” at the image using AI, understands what’s in it, and produces a short descriptive sentence you can review and edit before publishing.
Wait to install an alt text plugin until you’re consistently uploading large numbers of images. Don’t install it preemptively.
🤖 AI Assistance:

Prefer not to install an AI alt text plugin and want to generate alt text using an external AI instead? Use Google Gemini for this task and upload your image (or a screenshot of it) into the chatbox first, then try this prompt:

“I’m writing a blog post and I’m not using any WordPress plugins for alt text. Please look at this image and write a short, clear, descriptive alt text in one sentence that explains what the image shows.”

For more accurate guidance, make sure the image is attached in the AI chat so it can see what you’re working with.
Why this minimal approach keeps your blog healthy
Starting with 5-6 core plugins and adding specialized tools only when needed delivers three major benefits:
Your site stays fast
Every plugin adds scripts, stylesheets, and database queries. With 6 well-coded plugins, your site loads in 1-2 seconds. With 30 plugins (many redundant or poorly coded), load times balloon to 5+ seconds and readers abandon your site before seeing your content.
Research shows that well-coded plugins have minimal performance impact. The problem is that beginners can’t distinguish good code from bad code. A bloated page builder plugin or a poorly optimized social sharing plugin can slow your site more than 10 lightweight plugins combined.
Starting minimal protects you from accidentally installing performance-killing plugins while you’re still learning which ones are quality.
Maintenance stays manageable
Every plugin needs updates. With 6 plugins, you’re testing 6 updates and monitoring 6 potential conflicts. This takes 15-20 minutes per week.
With 30 plugins, you’re managing 30 updates and troubleshooting exponentially more potential conflicts. A typical update session takes 2+ hours, and one bad update can break your site for days while you figure out which plugin caused the problem.
New bloggers should spend time writing content and promoting posts, not troubleshooting plugin conflicts. Start minimal, stay focused on content, add plugins gradually as you learn WordPress.
You learn plugins deeply instead of superficially
When you install 25 plugins on day one, you skim the settings, click “activate,” and hope they work. You don’t understand what each plugin does or how to troubleshoot when something breaks.
With 6 plugins, you actually read the documentation, explore the settings, and understand how each tool works. When you add Pretty Links later for affiliate links, you focus on learning link management thoroughly. When you add WPCode for tracking codes, you understand snippet management completely.
This deep learning approach makes you competent with the tools you use, rather than overwhelmed by tools you barely understand.
Common plugin mistakes (and how to avoid them)
Mistake #1: Installing multiple plugins for the same function
The most common beginner mistake is installing redundant plugins. Two caching plugins. Two SEO plugins. Two security plugins. Multiple social sharing plugins.
This creates conflicts. Plugins fight over who controls what. One caching plugin clears the cache, the other rebuilds it. Your site gets stuck in a loop.
Fix: One plugin per function. Choose Solid Security OR another security plugin (we recommend Solid Security). Choose WP-Optimize OR LiteSpeed Cache OR another performance plugin. Choose Yoast SEO OR Rank Math. Never both.
Mistake #2: Keeping inactive plugins installed
Inactive plugins still pose security risks. Outdated code remains in your database. Hackers can exploit vulnerabilities even in deactivated plugins.
Fix: If you’re not using a plugin, don’t just deactivate it—delete it completely. Go to Plugins → Installed Plugins → Deactivate → Delete. Remove plugins you tested but decided not to use.
Mistake #3: Installing premium plugins “just in case”
Many beginners buy premium plugins for features they might need eventually. A 99/year SEO plugin with advanced schema markup. A 200 page builder for complex layouts. A $150 analytics suite before they have traffic.
This wastes money on features you’re not using and adds complexity you don’t need.
Fix: Start with free versions. Most WordPress plugins offer free versions that cover 80% of use cases. Upgrade to premium only when you hit a specific limitation that the paid version solves.
Mistake #4: Ignoring plugin compatibility warnings
When you install a plugin, WordPress checks compatibility with your current WordPress version. If it says “untested with your version” or “requires WordPress 6.0+” (and you’re on 5.9), proceed carefully.
Incompatible plugins cause crashes, errors, and data corruption.
Fix: Always test new plugins on a staging site first if possible. If you don’t have staging, create a full backup with UpdraftPlus before installing potentially incompatible plugins. This lets you restore if something breaks.
Mistake #5: Installing plugins from untrusted sources
Some websites offer “nulled” (pirated) premium plugins for free. These often contain malware, backdoors, or security vulnerabilities that compromise your site.
Fix: Only install plugins from WordPress.org (the official repository) or directly from the developer’s website (for premium plugins). Never download plugins from third-party sites offering “free” versions of paid plugins.
What’s next after installing your plugins?
You now have a secure, backed up, fast, and spam-free WordPress blog. Your core plugin stack protects your work, optimizes performance, and gives readers a way to contact you.
But your blog still needs one critical element: a professional author profile. When readers connect with your About section and author bio, they’re more likely to subscribe, share your content, and trust your recommendations.
Your author profile includes your bio, display name, and Gravatar image—the photo that appears next to your comments and posts. Setting this up correctly builds credibility with every piece of content you publish.
Next, learn how to set up your WordPress author profile so readers see a professional, trustworthy blogger behind every post.
This foundation you’ve built is critical. Learn the complete blogging blueprint in Sophia Lee’s Beginner Blogging Course—designed for beginners who want results without the overwhelm.