This post contains affiliate links. As an affiliate, I may earn a commission if you purchase through my links, at no extra cost to you. I only recommend tools I personally use, have researched thoroughly, or that trusted blogging experts rely on every day.
Now that you’ve created the essential pages your blog needs before launch from “7 Pages Every Blog Needs Before You Launch (Complete Checklist)”, your site finally has a real foundation—not just a blank theme.
The next step is making those pages easy to find with a simple, beginner‑friendly navigation menu.
Without a clear menu, readers land on your site, get lost, and bounce—even if your content is exactly what they were hoping to Save for later. A well‑organized menu quietly tells them, “You’re in the right place. Here’s where to go next.”
In this guide, you’ll learn how to create blog categories that make sense for your readers and turn them into a clean WordPress navigation menu that works on both desktop and mobile—without touching any code.
What you’ll learn in this guide
By the end of this tutorial, you’ll know how to:
- Choose beginner‑friendly blog categories that match your content plan
- Create and assign categories to your posts inside WordPress
- Build a simple main navigation menu step‑by‑step using the WordPress menu editor
- Add important pages like Home, About, and Contact to your menu
- Make sure your menu looks good on mobile (where most Pinterest users click through)
You’ll also see niche‑specific examples—like a wellness blog or family finance blog—so you can visualize how this looks in real life instead of guessing.
Before you start: quick checklist
Before setting up your menu, make sure you’ve already:
- Installed WordPress and your theme (for this project we use Blocksy, but the steps work with most modern themes).
- Created your core pages: Home, About, Contact, Privacy Policy, Terms & Conditions, Affiliate Disclosure, and Start Here, using the earlier guide on essential pages.
- Chosen your main categories using the post on “How to Choose Blog Categories That Work on Pinterest (Pre‑Launch Planning)”.
If any of these pieces are missing, pause and work through those guides first—you’ll set up your menu much faster when the building blocks are ready.
Why your navigation menu matters for Saves (not just clicks)
Most tutorials talk about menus in terms of “user experience” or “SEO.” That matters—but on Pinterest, your menu does something more emotional.
When someone taps through from a pin and sees:
- A clear Start Here link
- Simple category names that match what they were just reading about
- A visible About or Contact link
they subconsciously feel: “This blogger is organized and trustworthy. I can Save this—it’s worth coming back to.”
A messy menu works the opposite way. Ten tiny links, jargon‑heavy category names, or no visible way to learn more about you quietly signal chaos. People close the tab instead of Saving your content.
So as you follow the steps below, think less “perfect structure” and more “how can I give a stressed, tired reader one obvious next step?”
Step 1: choose 3–5 simple categories for your menu
Your menu shouldn’t list every category you will ever create. Instead, it should highlight 3–5 core paths that match what your future posts will cover.
If you followed the earlier category guide, you already have a shortlist. Here’s how to sanity‑check it before using it in your menu.
How to pick reader‑friendly category names
Use names your reader would actually say out loud—not clever brand terms.
Good examples:
- Food blog (meal‑prep focus): “Easy dinners,” “Meal prep,” “Budget meals,” “Kitchen basics”
- Wellness blog (busy women): “Quick workouts,” “Healthy recipes,” “Stress relief,” “Sleep & recovery”
- Finance blog (families): “Budgeting,” “Saving money,” “Debt payoff,” “Money for kids”
- Parenting blog (early years): “Baby routines,” “Toddler activities,” “Family routines,” “Parent mindset”
Avoid vague labels like “Inspiration,” “Lifestyle,” or “Uncategorized.” If a reader has to think twice about what they’ll see after clicking, it’s too abstract.
Practical exercise: test your category list
Grab a piece of paper and write your planned categories as a simple vertical list.
Then ask yourself:
- Could a total beginner guess what each category means in 3 seconds?
- Does each category connect to at least 5–10 future posts?
- Do these categories line up with your Pinterest boards and content plan?
If you answer “no” to any of those, tweak the names now. It’s much easier than changing them after you have 30 posts.
Step 2: create your categories inside WordPress
Once you’re happy with your shortlist, it’s time to add the categories into WordPress so you can use them in your menu and on your posts.
How to add a new category
- Log in to your WordPress dashboard.
- In the left sidebar, hover over Posts, then click Categories.
- Under Add New Category, fill in:
- Name: The reader‑friendly name (for example, “Meal Planning”).
- Slug: A short URL version with hyphens, like
meal-planning. - Parent Category: Leave this as “None” for now unless you’re creating sub‑categories.
- Description: A short explanation of what this category covers; some themes display it under the category title.
- Click Add New Category.
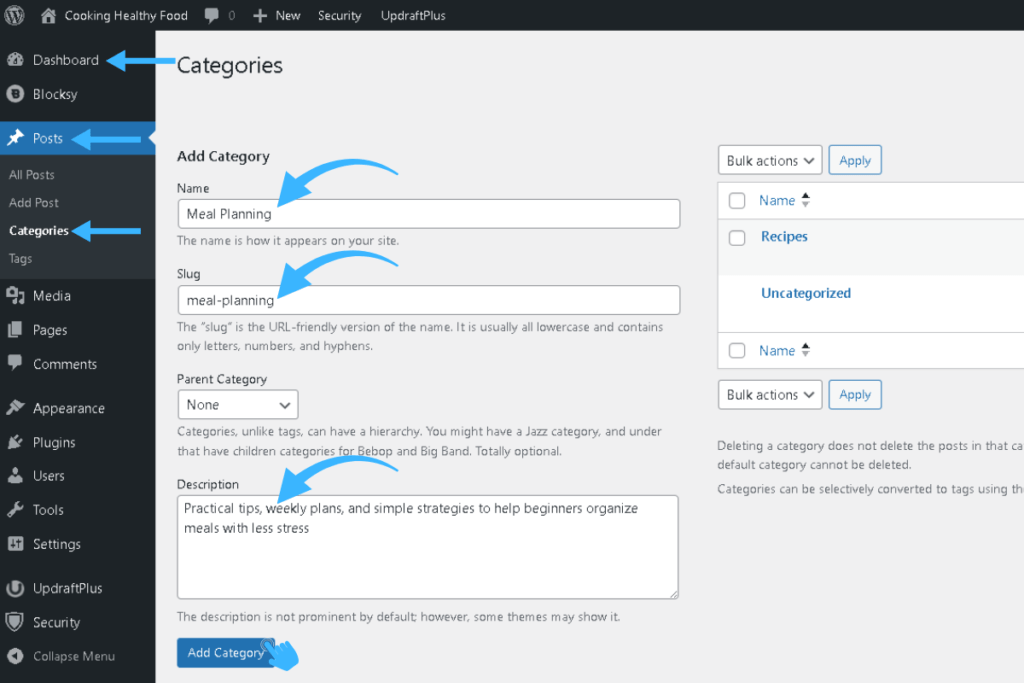
Repeat this for each of your 3–5 core categories.
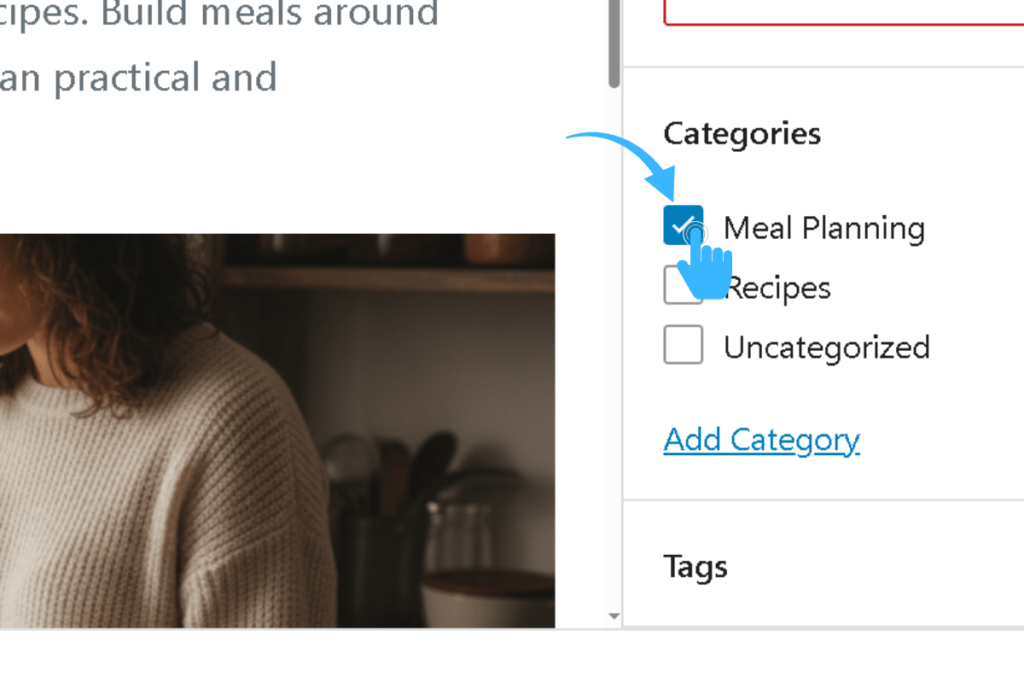
Assign categories to your existing posts
Categories are most helpful when your current posts already use them.
- Go to Posts → All Posts.
- Hover over a post and click Quick Edit or Edit.
- On the right side, under Categories, tick the box for the category that fits that post.
- Click Update.
Do this for each published post so your menu links actually lead somewhere useful.
Niche example: cooking blog categories
Imagine you run a beginner‑friendly cooking blog focused on simple, stress‑free meals for busy people.
Your main categories might be:
- Recipes – easy dinners, one‑pot meals, quick lunches
- Meal Planning – weekly plans, pantry checks, simple prep routines
- Kitchen Basics – knife skills, ingredient swaps, beginner techniques
- Healthy Cooking – lighter meals, balanced plates, nutritious swaps
As you assign posts, make sure each one clearly belongs to a single primary category. This makes your menus and category archives cleaner, and it helps readers see patterns instead of noise.
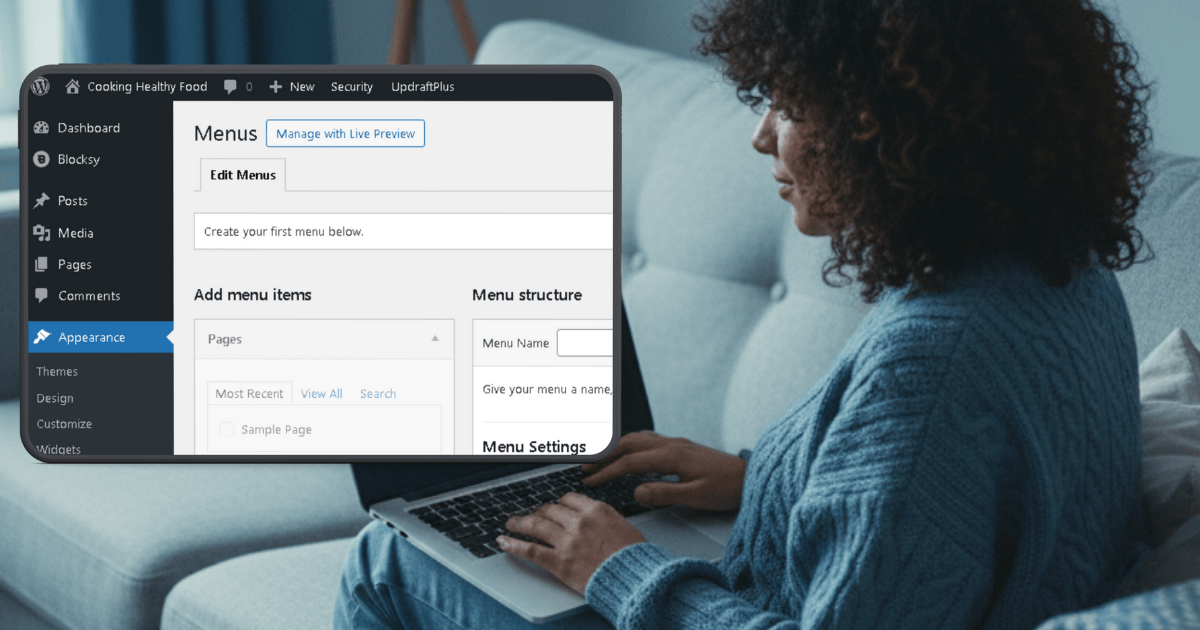
Step 3: open the WordPress menu editor
With your categories ready, you can now build the actual navigation menu your readers will use.
Depending on your theme, menus may live in different places, but the underlying WordPress menu system is the same.
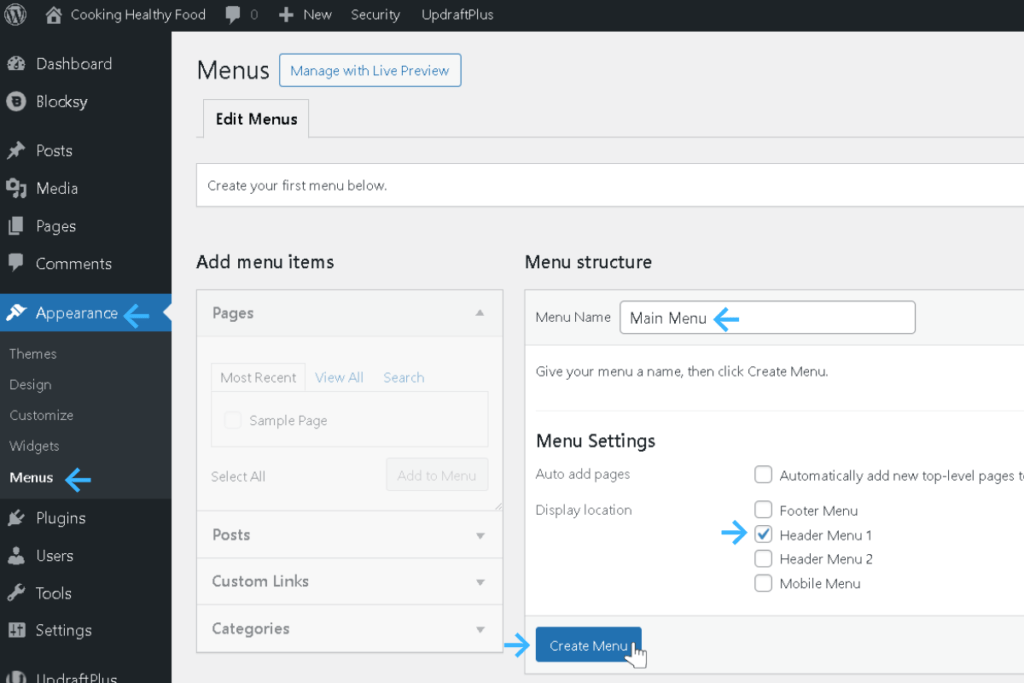
Where to find the menu settings
- From your WordPress dashboard, go to Appearance → Menus.
- If your theme uses the newer Appearance → Customize → Menus path, choose Menus there instead.
- If you already see a menu name like “Main Menu” or “Primary,” select it. If your dashboard shows a blank screen, click Create a new menu and name it something like “Main Menu.”
Make sure this will be your primary navigation:
- Look for options like Display location, Primary menu, or Header menu 1, and tick the box that matches your main header area.
This tells your theme to show this menu at the top of your site.
Step 4: add your core links (Home, categories, and key pages)
Now it’s time to build the menu structure itself. Think of it like arranging road signs for your reader.
Which items to include in your main menu
For a brand‑new blog, a simple, effective menu looks like this:
- Home
- 3 core categories
That’s it. You don’t need anything else in the top navigation when you’re just starting out.
Pages like Contact, About, Start Here, Privacy Policy, or Terms can all live in the footer menu instead. This keeps your main navigation clean and focused while still giving readers access to those pages when they need them.
How to add items to your menu
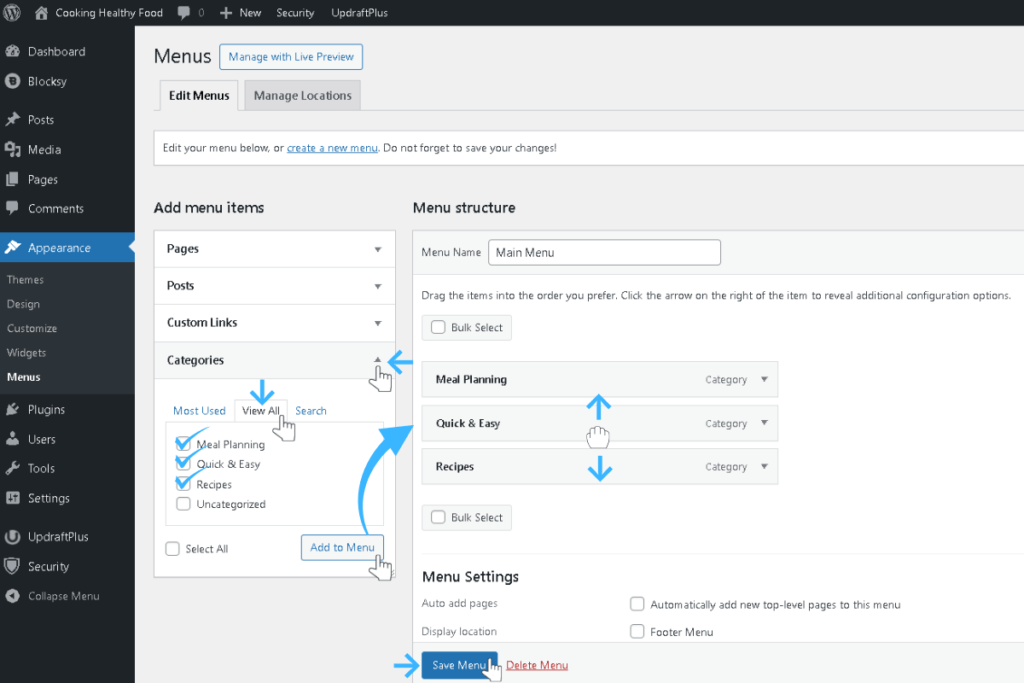
- In the Menus screen, look at the left side where you’ll see boxes like Pages, Posts, Custom Links, and Categories.
- To add your Home page:
- Open Pages, tick the box next to your Home page, then click Add to Menu.
- To add your categories:
- Open Categories, tick the boxes for your main categories, then click Add to Menu.
You’ll now see a vertical list of menu items on the right. Drag and drop to reorder them.
A clean beginner‑friendly order could be:
- Home
- Category 1
- Category 2
- Category 3 (and optionally Category 4–5)
Click Save Menu when you’re done.
Niche example: cooking blog navigation
For a simple cooking blog focused on everyday meals, your menu might look like:
- Home
- Meal Planning
- Quick & Easy
- Recipes
When a new reader arrives from a Pinterest pin about “15‑minute dinners,” they immediately see “Quick & Easy” and “Meal Planning” as natural next clicks. That’s what encourages Saves and repeat visits.
Step 5: create simple dropdowns (only if you truly need them)
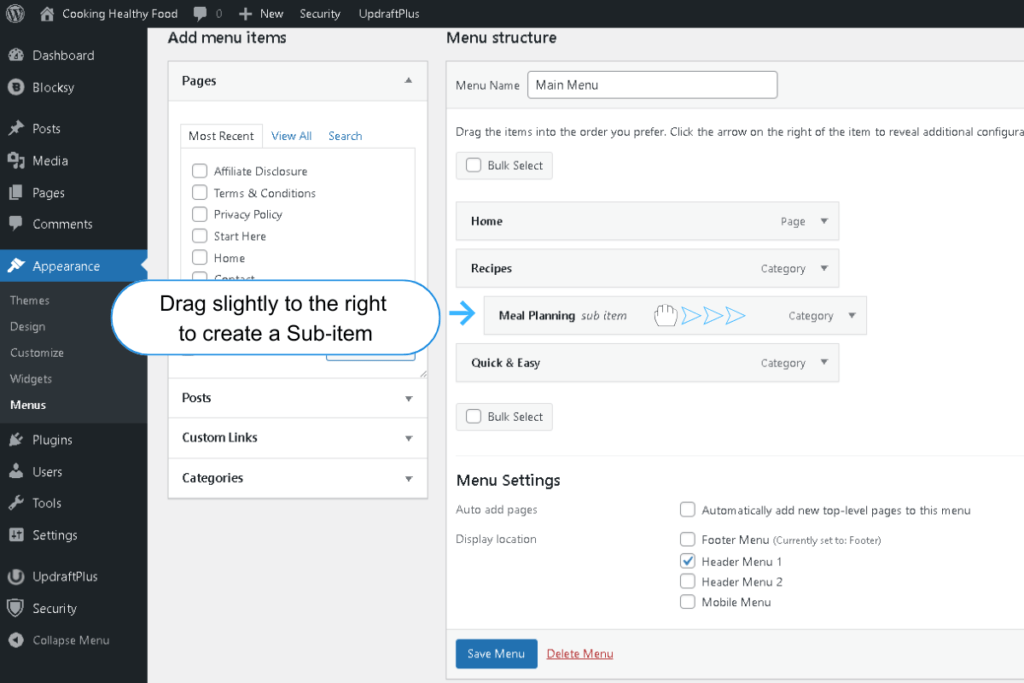
Dropdown menus can help once your blog grows, but they add complexity. For a new cooking blog with just Meal Planning, Quick & Easy, and Recipes, you don’t need dropdowns yet.
Use them only when your content expands and a category naturally splits into smaller sub‑topics.
When dropdowns make sense
Use a dropdown if:
- A category has multiple sub‑topics that deserve their own link
- You publish different types of content under one theme (for example, “Meal Planning Tips” vs. “Meal Planning Printables”)
Examples:
- Meal Planning
- Weekly plans
- Pantry staples
- Recipes
- Breakfast
- Dinner
- Snacks
How to create a dropdown in WordPress
- Add all the items you want to use as dropdowns to your menu.
- In the menu editor, drag each dropdown item slightly to the right under its parent item. WordPress will label it as Sub‑item.
- Save your menu.
Check your site on desktop and mobile. If tapping the dropdown feels awkward or too small, simplify. Clear, straightforward navigation always performs better for beginners.
Step 6: make your menu mobile‑friendly
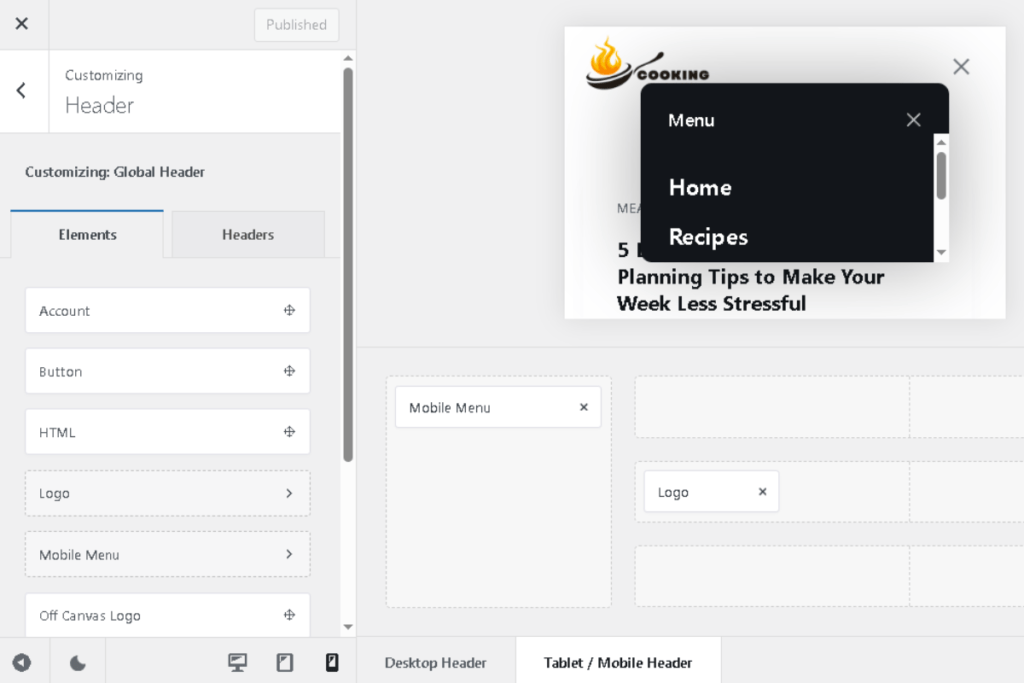
Most of your Pinterest traffic will arrive on mobile, so your header must be easy to tap and read on a small screen.
This process is theme‑specific. The screenshots and steps in this tutorial use the Blocksy theme as the example.
To check and adjust your mobile menu:
- In your WordPress dashboard, go to Appearance → Customize → Header.
- At the bottom of the Customizer panel, tap the mobile phone icon to switch to mobile view.
- Click the Off‑Canvas Area / Mobile Menu button.
- In the side panel, open Select Menu and choose Main Menu.
- In the mobile preview, tap the hamburger icon to open your mobile menu.
- Scroll down to confirm the footer also looks correct on mobile.
Review your mobile layout:
- Are the links large enough to tap comfortably?
- Is the spacing readable?
- Does the order still make sense on a narrow screen?
If the mobile header feels crowded:
- Move low‑priority links (Privacy Policy, Terms) to the footer.
- Keep only your core items in the mobile header: Home, Recipes, Meal Planning, Quick & Easy.
Step 7: connect your menu to your overall launch sequence
Your navigation is part of your full launch system. It pulls together everything you’ve built so far and turns it into a smooth experience for first‑time readers.
By this point in the Start a Blog series, you’ve:
- Defined your niche and categories
- Organized your files with a simple blog “second brain”
- Set up hosting, installed WordPress, and chosen a theme
- Adjusted key WordPress settings and installed essential plugins
- Created the pages your blog needs before launch
Your menu is the bridge between all of that work and the reader’s journey. It helps Pinterest visitors, email subscribers, and word‑of‑mouth traffic understand your blog instantly.
Revisit your menu every few months. As you publish new posts, ask whether your menu still shows the clearest path for a brand‑new reader.
🤖 AI assistance: refine categories and menu labels
AI can help you brainstorm category names or simplify your menu while you stay in control.
Use Google Gemini for category name ideas
Copy and paste this prompt into Google Gemini:
I’m starting a [NICHE] blog for [TARGET AUDIENCE].
I need 3–5 simple blog categories that:
- Use everyday language my readers would actually say
- Cover the main problems they want to solve
- Can each hold at least 5–10 future blog posts
My current post ideas include: [LIST 5–10 POST IDEAS].
Suggest 2–3 sets of category names and explain why each set is beginner‑friendly and Pinterest‑friendly.
Gemini will give you clear category sets you can compare with your Pillar Map.
Use Perplexity for research‑backed navigation guidance
When you want reassurance that your menu follows current UX best practices, ask Perplexity:
I’m building a WordPress blog for beginners in the [NICHE] space.
What does current research and user‑experience data say about:
- How many main menu items most users can process easily
- Whether dropdown menus help or hurt navigation on mobile
- Best practices for naming categories so users know what to click
Give me a short list of research‑backed principles I can follow to design a simple yet effective navigation menu.
Use these principles as a final check before locking in your menu.
What’s next? Turn your pages into a guided journey
You’ve now created a clean navigation menu that makes your blog feel trustworthy, organized, and Save‑worthy for Pinterest readers.
Next, you’ll turn individual pages—like your About page—into powerful connection points that convert casual visitors into loyal readers and subscribers.
In the next guide, you’ll learn how to write an About page that genuinely connects with your readers and makes them feel seen, understood, and excited to stick around.