This post may contain affiliate links. As an affiliate, I may earn a commission if you purchase through my links, at no extra cost to you.
Ever had a brilliant blog post idea while in the shower, only to forget it by the time you dried off?
Or maybe you’ve wasted 20 minutes hunting for that one specific Pinterest pin template you made last week.
Here’s the hard truth: Chaos kills creativity.
You can’t write brilliant content if your mental energy is wasted searching for files. Most beginners try to “wing it” with a messy desktop and a few random Google Docs. Then, three months in, they hit a wall. They have 15 drafts, 40 images, and no idea where anything is.
Already worked through What to Do BEFORE You Start a Blog? Perfect. Now that you know your direction, let’s organize your workspace so you can actually execute.
Today, we’re building your Blog Second Brain.
This isn’t just “tidying up. This is a professional workflow adapted from the PARA Method (Projects, Areas, Resources, Archives) developed by productivity expert Tiago Forte and used by thousands of content creators worldwide.
We’ve simplified it specifically for beginner bloggers. It keeps your ideas, drafts, and assets flowing so you never feel scattered again.
What You’ll Learn
By the end of this guide, you’ll know how to:
- Set up a Blog Command Center in Google Drive using a simplified PARA method that keeps every draft, asset, and finished post in one place.
- Build four core folders—Active Projects, Blog Assets, Content Library, and The Vault—so you always know exactly where to put (and find) anything related to your blog.
- Use AI to customize sub‑folders for your specific niche, whether you blog about food, travel, finance, or anything else.
- Create a 5‑second idea capture system that stops you from losing great post ideas to busy days and scattered notes.
- Name your files with a simple, searchable convention so future‑you can grab the exact draft, image, or pin you need in seconds.
The Hybrid Strategy: Cloud + Local
Storing everything only on your laptop is dangerous (hard drives fail). Storing everything only in the cloud is risky (internet goes down).
The Golden Rule: Work in the Cloud (Google Drive/Dropbox) → Sync to Local.
This gives you:
- Access anywhere: Write on your phone, edit on your laptop.
- Automatic backups: No manual “save” button needed.
- Easy sharing: Send drafts to editors or grab images from your phone.
Step 1: Create Your “Command Center” Folder
Open your cloud drive (Google Drive is best for this) and create one master folder:
📂 [YourBlogName] - Command Center
Inside this folder, we’re going to use a modified PARA system (Projects, Areas, Resources, Archives) specifically designed for bloggers.
Create these 4 exact sub-folders:
01_Active_Projects(What you’re working on NOW)02_Blog_Assets(Your brand files & templates)03_Content_Library(Where finished posts live)04_The_Vault(Backups, legal, & admin)
Using AI to Suggest Folder Structures
If your blog has a specific niche (like food or travel), your folder needs might be unique. Ask AI to customize this structure for you.
Try this prompt in Gemini:
I run a [food/travel/finance] blog. Based on the standard PARA method
(Projects, Areas, Resources, Archives), suggest specific sub-folders I should
create inside my "Content Library" to organize my photos, drafts, and research efficiently.
Gemini might suggest folders like Raw_Food_Photos or Trip_Itineraries that generic guides miss.
Step 2: Set Up “01_Active_Projects” (The Kitchen)
This is your messy workspace. It’s where you cook. Only put things here that are in progress.
Create these sub-folders:
📂 Idea_Inbox(Dump every raw idea here)📂 Drafting(Posts you are currently writing)📂 Image_Prep(Photos waiting to be edited)
The Workflow Rule: Once a post is published, move it out of here. Keep this kitchen clean.
Step 3: Build “02_Blog_Assets” (The Pantry)
This is where you grab your ingredients. These files never change; they just get used repeatedly.
Structure it like this:
📂 02_Blog_Assets
   ├── 📂 Brand_Identity (Logos, Hex Codes, Headshots)
   ├── 📂 Pin_Templates (Your Canva templates)
   ├── 📂 Affiliate_Info (Links & Media Kits)
   └── 📂 Legal_Pages (Privacy Policy drafts)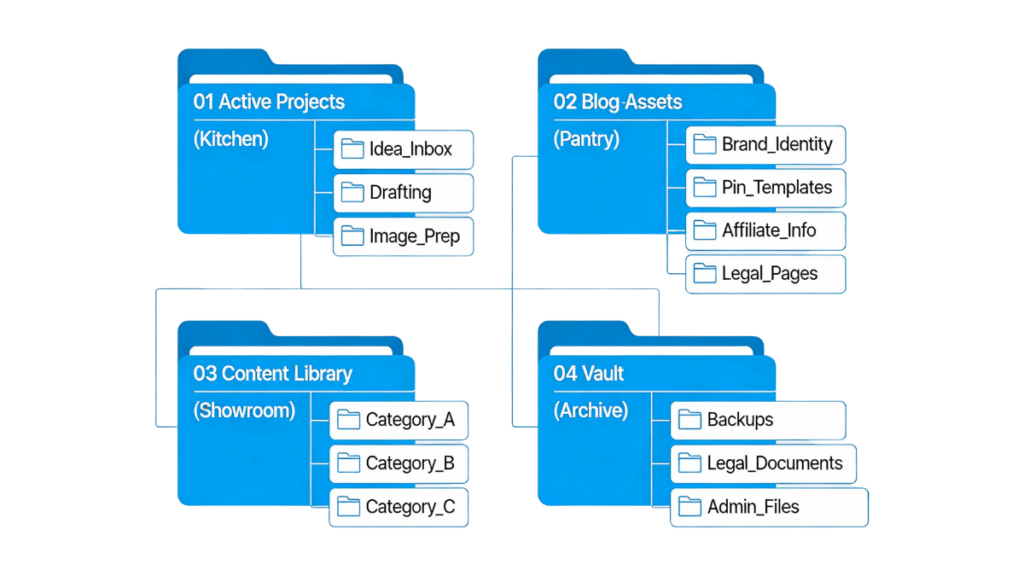
Step 4: The “Content Library” (The Showroom)
This is your archive of finished work. When you hit “Publish” on WordPress, drag your folder from “Drafting” to here.
Organize it by Category so you can find old posts fast:
📂 03_Content_Library
   ├── 📂 Category_A
   ├── 📂 Category_B
   └── 📂 Category_C
Why this saves you: A year from now, when you want to update an old post or repost a pin, you won’t dig through a messy “Downloads” folder. You’ll go straight to Content Library > Recipes > Best Lasagna.
Step 5: The Idea Capture System (Never Lose a Thought)
The biggest fail point for beginners isn’t losing files — it’s losing ideas.
You need a capture system that works in 5 seconds or less.
Option A: The “Notes App” Method (Simplest) Create a pinned note on your phone called “BLOG IDEAS.” Use voice-to-text to capture ideas instantly. Once a week, move them to your Idea_Inbox folder.
Option B: The “Google Keep” Method (Visual) Use Google Keep to snap photos of inspiration or record voice memos. It syncs instantly to your Google Drive.
The Rule: Don’t judge the idea. Don’t try to write the post. Just capture it and get back to your life.
Step 6: Naming Your Files (The “Searchable” Secret)
Stop naming files IMG_5543.jpg or Draft1.docx. Future you will hate you.
Use this naming convention: YYYY-MM-Keyword-Type
Examples:
2026-05-Budget-Tips-PinterestPin.jpg2026-05-Budget-Tips-Draft.docx2026-05-Budget-Tips-FeaturedImage.jpg
Why?
- YYYY-MM sorts everything chronologically.
- Keyword makes it searchable.
- Type tells you what it is without opening it.
You Built Your Second Brain. Now Use It.
Organization feels boring — until it saves your butt.
By setting this up today, you aren’t just organizing files. You’re building a publishing machine. You’re removing the friction between “I have an idea” and “I published a post.”
Your Homework:
- Create your
Command Centerin Google Drive. - Add the 4 main folders.
- Move your current random files into their new homes.
- Take a deep breath. You’re officially a professional.
Take the Next Step
Organization is the foundation, but execution is everything.
Sophia Lee’s Beginner Blogging Bundle gives you the complete system — from writing your first post to getting consistent Pinterest traffic. It’s the missing piece between “I have a plan” and “I’m actually publishing.”
What’s Next?
Your files are ready. Your workspace is organized. Now let’s define exactly who you’re writing for.
Next step: How to Choose a Profitable Blog Niche (Without Second-Guessing Yourself)