Affiliate Disclaimer: This post may contain affiliate links. As an affiliate, I may earn a commission if you purchase through my links, at no extra cost to you. Please read our full disclosure for more info.
Thinking you can wait until you have “enough traffic” to start an email list?
That’s the most common mistake new bloggers make. If you want to build a sustainable business, you need to set up free email marketing for bloggers from day one. It doesn’t matter if you have ten visitors or ten thousand—owning your audience is the only way to protect your growth.
In our last guide, we showed you How to Track Your Blog Traffic: Google Analytics Setup for Beginners. Now that you can see who is visiting your site, you need a way to keep them there.
Because here is the cold, hard truth: 95% of people who visit your blog today will never come back.
They’ll find your pin on Pinterest, read your helpful advice, and then get distracted by a notification or another shiny idea. Unless you have a way to reach out to them directly, that connection is lost forever.
Today, we’re changing that. I’m walking you through the exact steps to build your email list from scratch using Systeme.io—the platform that lets you grow to 2,000 subscribers and send unlimited emails for $0.
No tech degree required. No hidden costs. Just a clear path to owning your audience.
What You’ll Learn
- The “Permission Asset” Rule: Why an email list is the only traffic source you truly own (and why Pinterest is the bridge, not the destination).
- Systeme.io Free Setup: How to create a professional opt-in form and landing page without spending a dime.
- The “Lead Magnet” Hook: Crafting a simple, niche-specific freebie (Checklist, Recipe, Budget Tracker) that makes readers want to subscribe.
- The “Welcome Chain”: Setting up an automated email that delivers your freebie instantly so you can build trust while you sleep.
- WordPress Integration: Placing your sign-up form where visitors from Pinterest will actually see and use it.
This guide is Phase 3, Step 20 of our Start Here: How to Start a Blog for Beginners (Step-by-Step Roadmap).
Why you need an email list before you have traffic
Most beginners think an email list is something you build after you’re successful. In reality, the email list is what makes you successful.
The social media trap and how to avoid it
Pinterest is incredible for traffic (it’s our primary strategy here), but you don’t own Pinterest. If the algorithm shifts tomorrow, your traffic could dip. Your email list is “owned media.” No algorithm can stand between you and your subscribers. When you have a new post or a product to launch, you simply hit “send.”
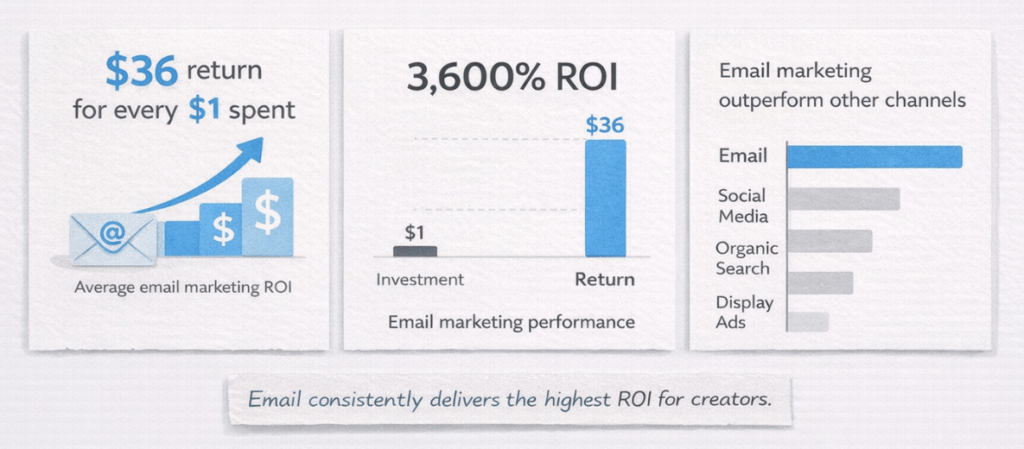
Why email marketing ROI is still 3,600% in 2026
According to current marketing benchmarks, email marketing still delivers a return of $36 for every $1 spent. That’s a 3,600% ROI. For a beginner blogger, this is the most cost-effective way to turn casual readers into loyal fans who actually buy your recommendations.
Choosing your free email platform: why Systeme.io?
Many email tools offer “free” plans, but most come with limits that slow down a growing blog — things like capped subscribers, restricted automation, or required branding. Systeme.io avoids those early bottlenecks, which is why it’s a strong fit for beginners who want a simple, scalable setup.
Why Systeme.io is the best free email marketing tool for beginners
Many popular platforms have recently slashed their free limits. For example, MailerLite now caps their free plan at just 500 contacts, and Mailchimp has dropped to 250
Systeme.io remains the most generous choice because it doesn’t just give you a high contact limit—it gives you the automation tools you need to run your blog on autopilot without paying a dime.
| Feature | Systeme.io | Kit (formerly ConvertKit) | MailerLite | Mailchimp |
|---|---|---|---|---|
| Subscriber Limit | 2,000 | 10,000* | 500 | 250 |
| Monthly Emails | Unlimited | Unlimited | 12,000 | 500 |
| Automation Rules | Included | 1 Visual Automation | Limited | None |
| Custom Domain | 1 Included | Included | Paid Only | Paid Only |
| Landing Pages | Unlimited | Unlimited | 10 | 1 |
While Kit offers up to 10,000 subscribers on their free plan, there is a catch: you are forced to enable their “Recommendations” feature, meaning you must actively promote other creators’ newsletters to your hard-earned traffic
The Verdict: Systeme.io is the clear winner for beginner bloggers. Instead of forcing you to share your audience, Systeme.io gives you 2,000 contacts with zero strings attached. Plus, it includes the visual automations you actually need to deliver your freebies on autopilot—features that most competitors lock behind expensive paid tiers.
Systeme.io currently charges $0/month for up to 2,000 contacts (as of this writing). Systeme.io — Click to verify current rates, as pricing and promotions update frequently.
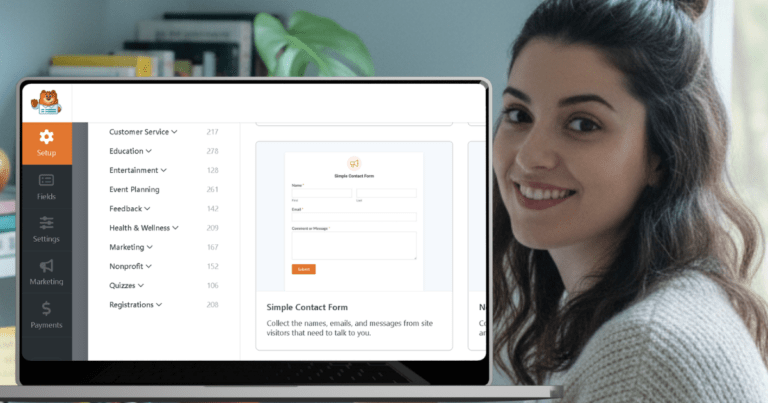
Building your first high-converting lead magnet
People won’t give you their email address just for “updates.” They want a solution to a problem. This is called a Lead Magnet.
3 lead magnet ideas that Pinterest users love

Pinterest users are “planners.” They love anything that saves them time or organizes their thoughts.
- The Checklist: A “7-Day Stress Reset” or “Budget Travel Packing List.”
- The Template: A “Zero-Based Budget” Google Sheet or a “Weekly Meal Prep Calendar.”
- The Quick Guide: A 5-page PDF teaching one specific skill (e.g., “How to Style Your Bookshelf”).
Short, focused lead magnets (like 1‑page checklists) typically convert better than long ebooks because they promise a fast, low‑effort result.
Phase 1: Setting up the ‘bucket’ (your tag & funnel)
Let’s get your foundation ready. Before we design the form, we need to tell Systeme.io where to put the people who sign up.
Step 1: Account creation and domain authentication
Let’s get your foundation ready. This process connects your blog to your new email platform so your messages look professional and avoid the spam folder.
1. Create your free Systeme.io account
Go to Systeme.io and enter the dedicated Gmail address you created during our pre-launch checklist setup. Click the button to create your account. Systeme.io will send you a verification email—click the link inside, and your dashboard is ready to go.
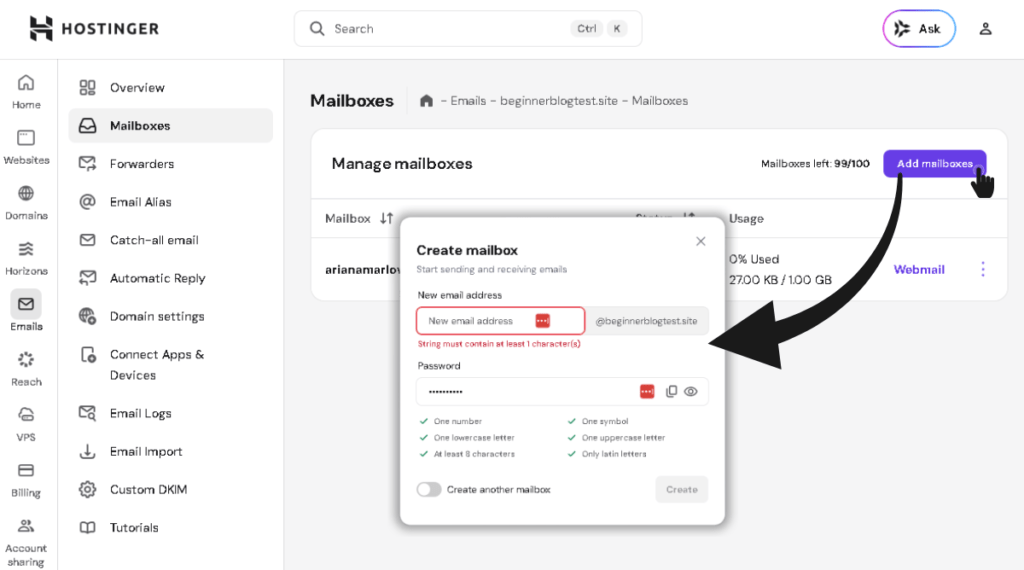
2. Create a professional domain email
To build trust and improve deliverability, you need an email address that matches your blog’s domain — for example, contact@yourdomain.com or hello@yourdomain.com.
If you host your blog with Hostinger:
- Log into your hPanel and go to your website dashboard.
- Click on the Free business Email button.
- Under the Mailboxes section, click View All or Add mailbox.
- Follow the on-screen instructions to create your new professional email address.
Step 2: Authenticate your domain (Beginner-Friendly, Step-by-Step)
If you want your emails to land in inboxes instead of spam, you need to authenticate your domain. This step connects your domain (Hostinger) to your email sender (Systeme.io).
It sounds technical, but it’s really just copying and pasting four records. Follow this guide slowly, and you’ll be done in under 10 minutes.
Why this step matters (in plain English)
When you send emails from Systeme.io, email providers (like Gmail) want proof that you own the domain, you’re not a spammer, and your emails are legitimate. Authentication gives you that proof. Without it, your emails may go to spam or fail to send entirely.
1. Get your DNS records from Systeme.io
- Log in to Systeme.io.
- Go to Profile > Settings > Emails > Domains.
- Click Add domain.
- Enter your domain like this:
yourdomain.com(Nowww, nohttps://). - After saving, click the eye icon next to your domain.
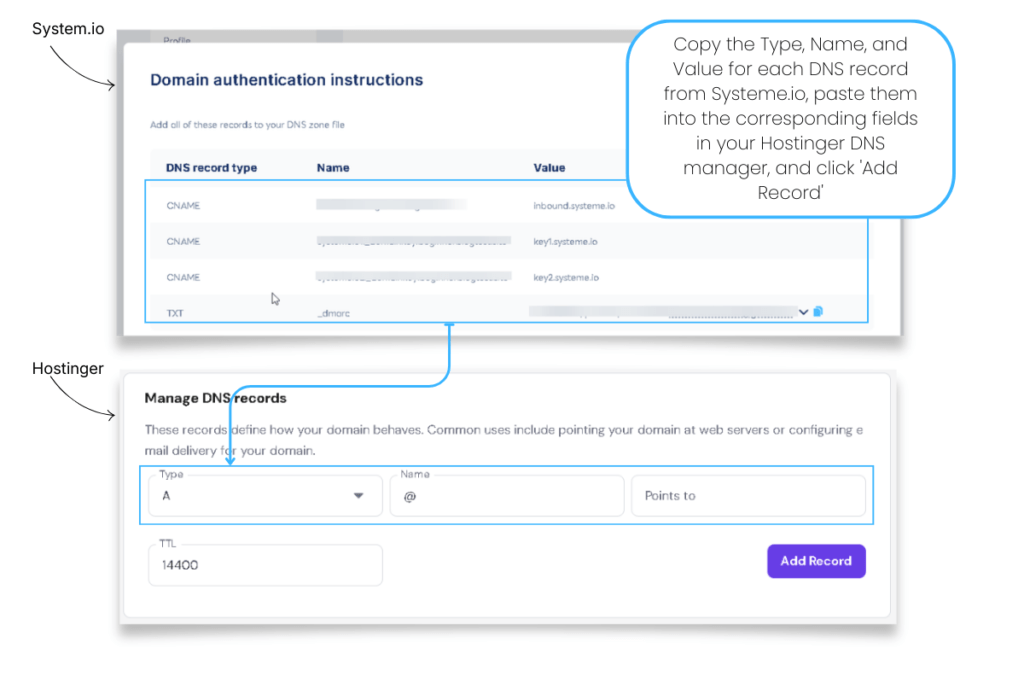
Systeme.io will now show you four DNS records (3 CNAMEs and 1 TXT). They will look similar to the examples below, but your values will be unique.
| DNS record type | Name (example) | Value (example) |
|---|---|---|
| CNAME | si1234567 | inbound.systeme.io |
| CNAME | systemeio1._domainkey | key1.systeme.io |
| CNAME | systemeio2._domainkey | key2.systeme.io |
| TXT | _dmarc | v=DMARC1; p=none; rua=mailto:you@yourdomain.com |
2. Open your DNS Zone in Hostinger
- Log in to Hostinger.
- In the left menu, click Domains
- Select your domain (example:
yourdomain.com) - Click the Manage DNS button. This is where you will add the records.
Important: Do NOT delete your MX records. These control your domain email. Systeme.io does not require any MX changes.
3. Add the 3 CNAME records (one by one)
You will now copy each CNAME from Systeme.io into Hostinger.
CRITICAL BEGINNER RULE
In Hostinger, the “Name” field should contain ONLY the part before your domain.
Hostinger automatically adds .yourdomain.com behind the scenes.
- If Systeme.io shows:
sii234567.yourdomain.com - In Hostinger, you ONLY enter:
sii234567
CNAME #1 — Ownership verification
- Type: Select CNAME
- Name: Delete the “@” — then copy & paste the first part from Systeme.io (e.g.,
sii234567) - Target: Copy & Paste the value from Systeme.io (e.g.,
inbound.systeme.io) - TTL: Leave as default (Hostinger uses 14400 by default — no need to change it)
- Click Add Record.
CNAME #2 — DKIM key 1
- Type: Select CNAME again
- Name: Delete the “@” — then copy & paste the first part from Systeme.io (e.g.,
systemeio1._domainkey) - Target: Copy & Paste the value from Systeme.io (e.g.,
key1.systeme.io) - TTL: Leave as default (Hostinger uses 14400 by default — no need to change it)
- Click Add Record.
CNAME #3 — DKIM key 2
- Type: Select CNAME again
- Name: Delete the “@” — then copy & paste the first part from Systeme.io (e.g.,
systemeio2._domainkey) - Target: Copy & Paste the value from Systeme.io (e.g.,
key2.systeme.io) - TTL: Leave as default (Hostinger uses 14400 by default — no need to change it)
- Click Add Record.
4. Add or update your DMARC TXT record
Systeme.io gives you a TXT (DMARC) value.
- Type: Select TXT
- Name: Delete the “@” — then copy & paste the first part from Systeme.io (
_dmarc) - TXT Value: Copy & Paste the value provided in Systeme.io (e.g.,
v=DMARC1; p=none; rua=mailto:you@yourdomain.com) - TTL: Leave as default (Hostinger uses 14400 by default — no need to change it)
- Click Add Record.
Important:
If a _dmarc record already exists, edit it instead of adding a new one.
It is completely normal if this contains your Gmail address — it’s only for technical reports.
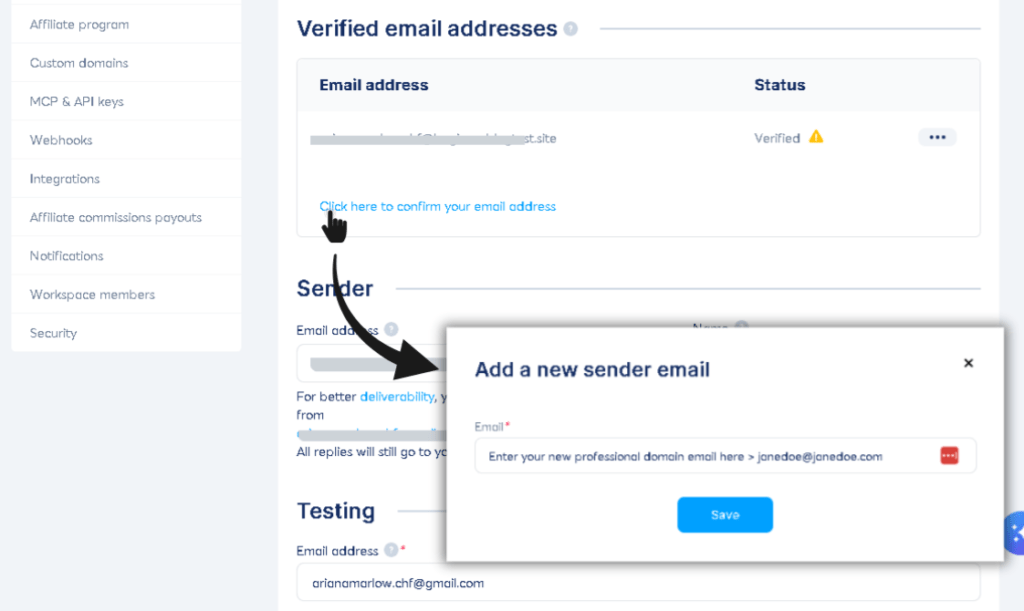
5. Verify your sender email inside Systeme.io
- Go back to Systeme.io > Settings > Emails.
- Under “Verified email addresses,” click Click here to confirm your email address.
- Enter your professional domain email (e.g.,
hello@yourdomain.com) and click Save.
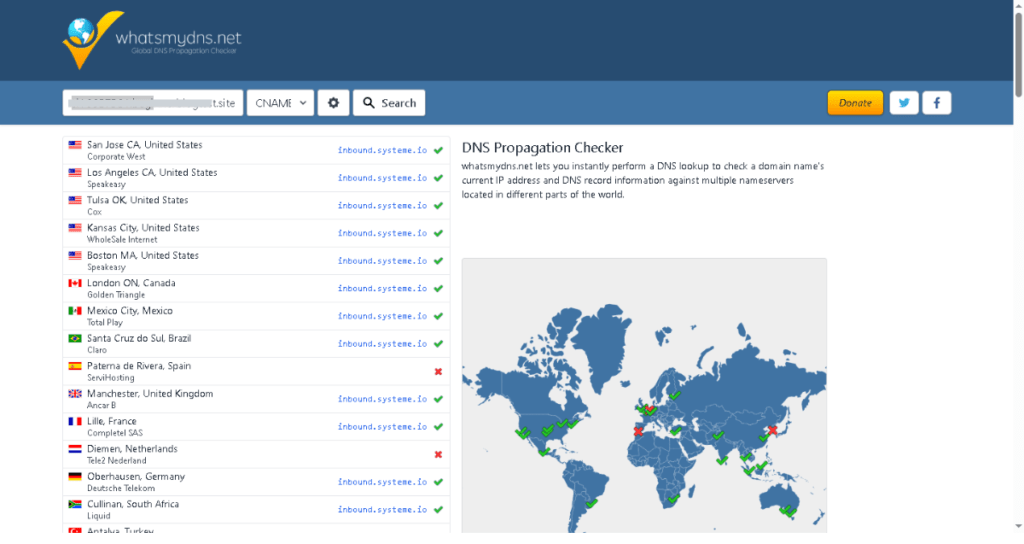
6. Check if your DNS records have propagated
DNS changes take time to spread across the internet. To check your progress:
- Go to whatsmydns.net.
- Search each record individually by typing in the full name (e.g.,
si1234567.yourdomain.com) and selecting the correct type (CNAME or TXT) from the dropdown. - You want to see green checkmarks. If you see some red, it is still propagating. Propagation usually takes between 5 minutes and 2 hours (but can take up to 24 hours).
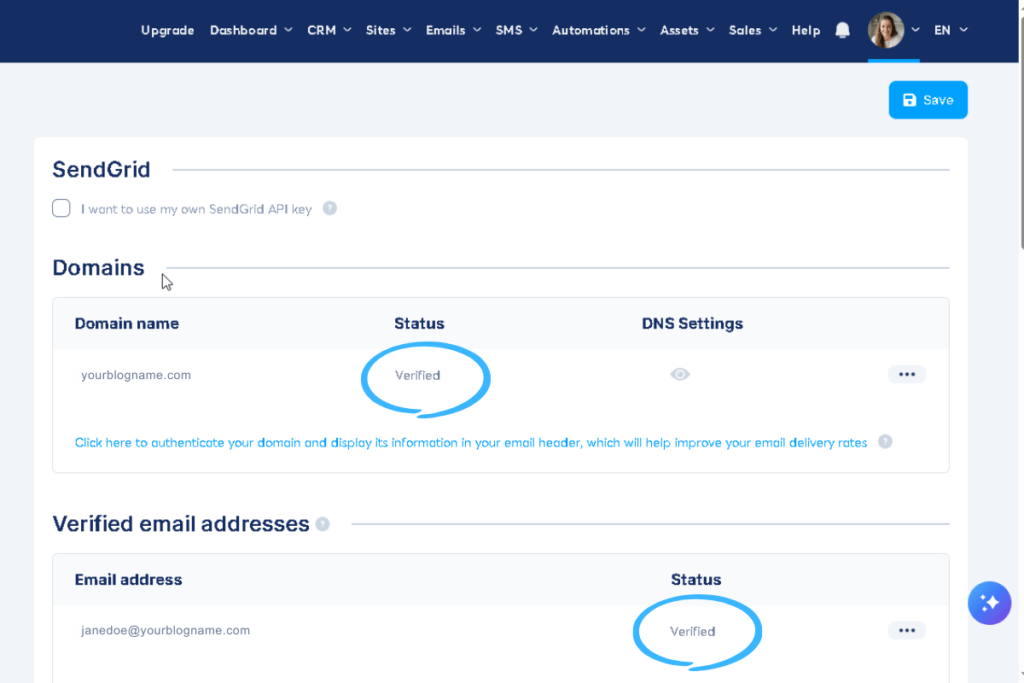
7. Wait for Systeme.io to verify your domain
Systeme.io checks your DNS records automatically.
There’s nothing else you need to click or configure.
Just keep an eye on:
Settings → Emails → Domains
Your domain status will change from:
Pending → VerifiedOnce it says Verified, your authentication is complete and your emails will send with proper deliverability.
Common beginner mistakes to avoid
- ❌ Entering the full domain in the Name field: (Wrong:
si1234.yourdomain.com| Right:si1234) - ❌ Using the wrong record type: Ensure CNAMEs are saved as CNAMEs, and the DMARC is saved as a TXT.
- ❌ Deleting MX records: This will break your domain email! Leave them alone.
- ❌ Expecting instant verification: Be patient, DNS propagation takes time. Only contact support if it has been more than 72 hours and your status is still Pending.
Step 3: Create your tag
In Systeme.io, you don’t use “lists”—you use Tags to organize subscribers.
- Hover over CRM in the top menu and click Tags from the dropdown list.
- Click the + Create button on the right side of the screen.
- Name it specifically for your freebie (e.g.,
Meal Prep Checklist Subscriber). Click Save.

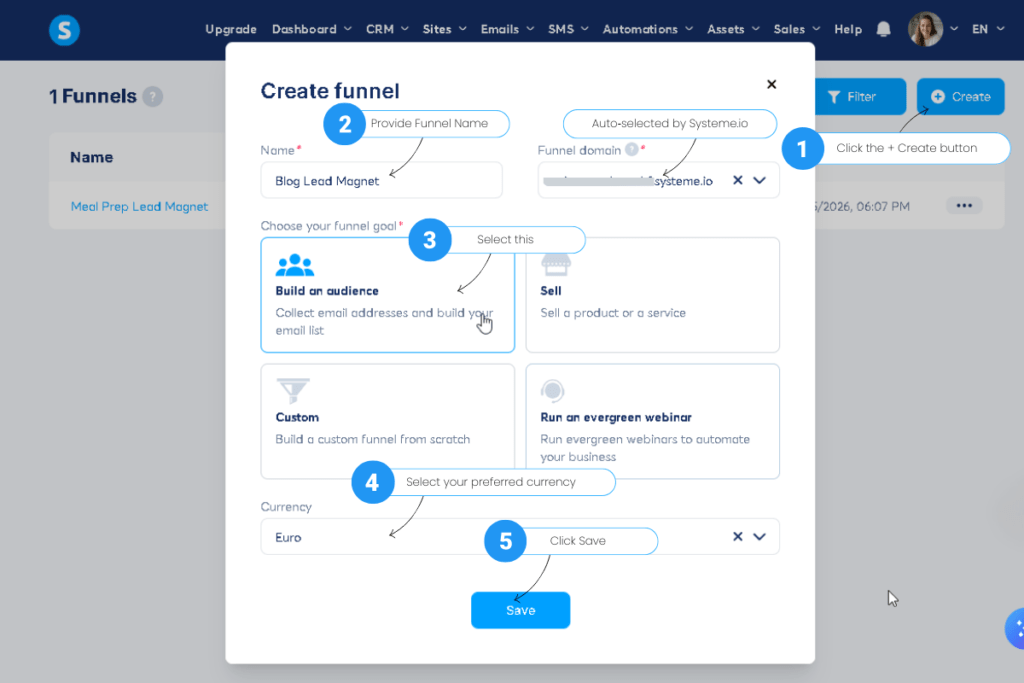
Step 4: Create your funnel
Now we create the container for your form.
- Hover over Sites in the top menu and click Sales Funnels from the dropdown list.
- Click the + Create button on the right side of the screen.
- Name: example –
Meal Prep Lead Magnet - Choose your funnel goal: Select Build an audience.
- Currency: Select your preferred currency (e.g., Euro). Click Save.
Phase 2: Designing the Pinterest-optimized inline form
Since over 80% of Pinterest traffic is on mobile, your form must be simple and use “Save for Later” psychology.
Step 1: Add the inline form step
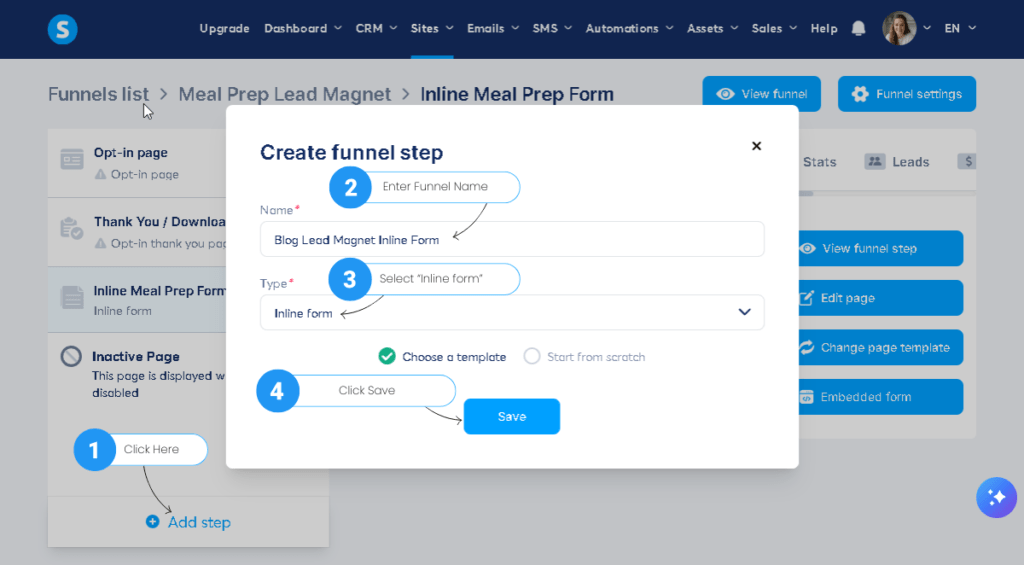
- Click on your new Blog Lead Magnet Inline Form funnel to open it.
- At the bottom of the left menu, click the + Add step button.
- A “Create funnel step” box will pop up. For the Name, enter
Inline Form, or choose any name that helps you stay organized. Good naming rules:- Keep it short and descriptive
- Make it clear what the step contains (e.g., “Inline Form,” “Sidebar Opt‑In,” “Meal Prep Form”)
- Avoid special characters or emojis
- The name is just for your internal organization — it won’t be visible to your subscribers.
- For the Type, choose Inline form from the dropdown (this is critical for getting the embed code for your blog).
- Make sure “Choose a template” is checked, then click Save.
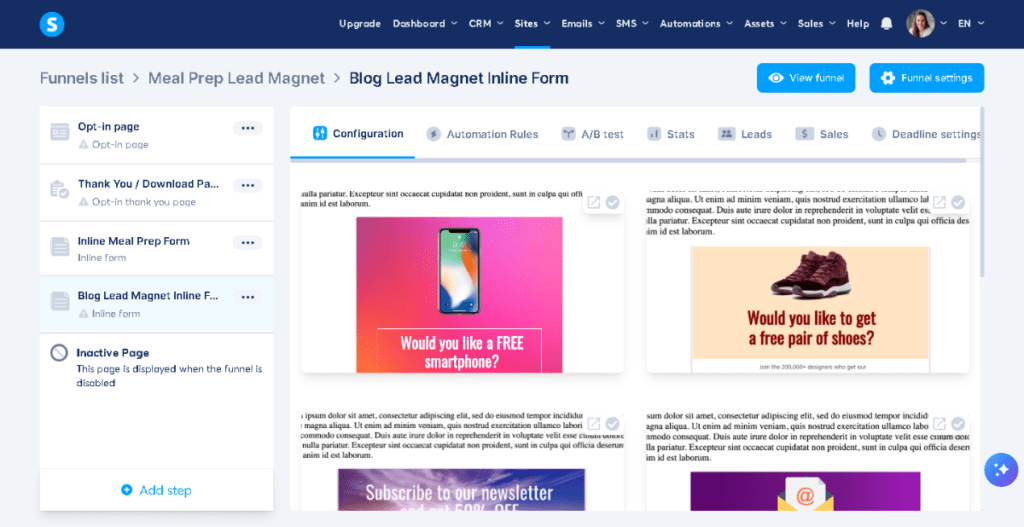
- You will then be shown a gallery of options. Choose the simplest template available and click Select.
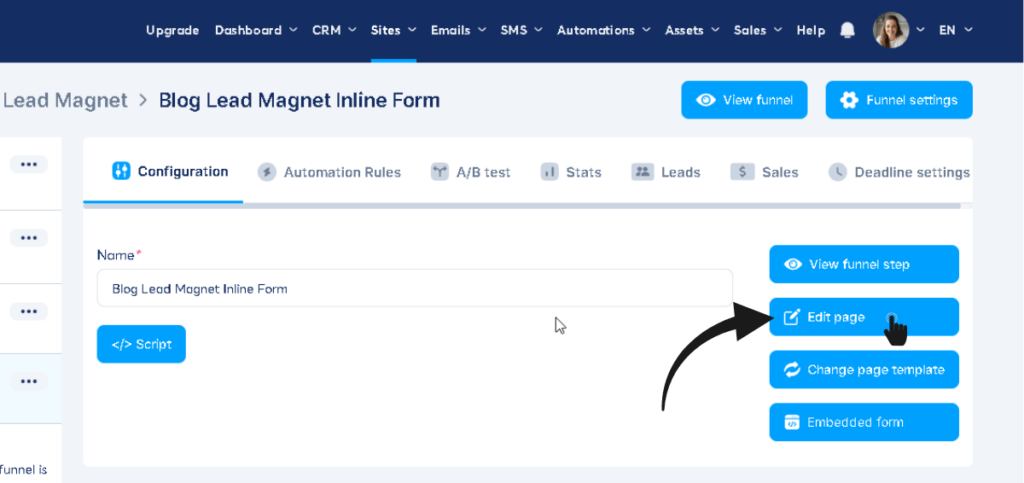
Step 2: Customize the design for high conversion
Click the Edit page icon (the magic wand) on the right side of your Inline Form step to open the drag-and-drop editor.
Since you started with a template, you can now modify the existing elements to match your own brand and lead magnet.
The screenshot below shows a completed example for a Budget Meal Prep freebie. Here is how to customize your form using that high-converting layout as a guide:
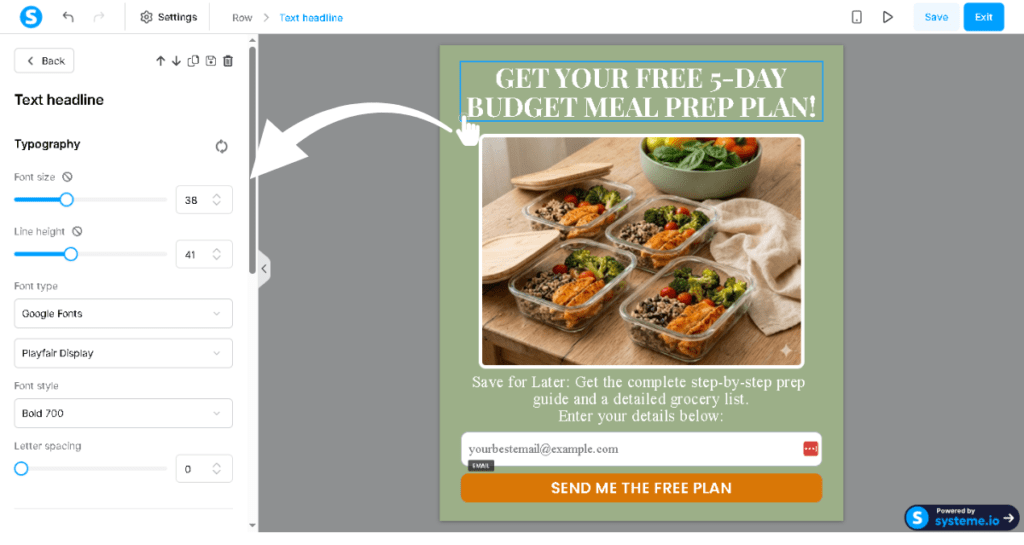
- Background Color: Click on the main form background section. In the settings pane on the left, change the Background color to fit your brand’s aesthetic (like the earthy green shown in our example).
- Headline: Click the top text block and update it to clearly state what your reader is getting. Make it bold and highly legible (e.g.,
GET YOUR FREE 5-DAY BUDGET MEAL PREP PLAN!). - Visual Proof: Showing people what they get drastically increases conversion. Drag an Image element from the left menu (or click the existing template image) and upload a high-quality photo or mockup of your specific freebie.
- Subheadline: Add a regular text block below the image to use the Pinterest psychology hook:
Save for Later: Get the complete step-by-step prep guide... Enter your details below:. Customize this text to describe exactly what your specific checklist or guide includes. - Input Fields: To reduce friction, delete any extra fields (like First Name) so you only ask for their Email. Click the email field and change the placeholder text on the left to something encouraging, like
yourbestemail@example.com. - The Button: Click the form button. In the left settings panel, make sure the Action is set to
Submit form. Change the background to a contrasting brand color that pops (like the bright orange in our example), make it full-width, and change the text to a clear, exciting call-to-action (e.g.,SEND ME THE FREE PLAN).
Click Save changes at the top right, then click the Exit icon to leave the editor.
🤖 AI Assistance: Designing your custom opt-in form
If you aren’t a designer and staring at a blank template feels overwhelming, you can use AI to do the heavy lifting. You can ask an AI like Google Gemini or Microsoft Copilot to act as your Conversion Rate Optimization (CRO) expert.
To get the best results, the AI needs to know your niche, what your freebie is, and your brand vibe.
Copy and paste this prompt into your favorite AI tool:
“I am building an inline opt-in form in Systeme.io for my [Insert Your Niche] blog. My primary traffic comes from mobile Pinterest users, so it needs to be highly legible and optimized for small screens.
My lead magnet is a [Insert Freebie Title, e.g., 5-Day Budget Meal Prep Plan]. My brand colors are [Insert Colors, e.g., earthy greens and warm neutrals].
Please act as a conversion rate optimization expert and provide the following:
- A catchy, bold, benefit-driven Headline.
- A ‘Save for Later’ sub-headline that targets the Pinterest planner mindset.
- A high-converting, action-oriented Call-to-Action button text.
- A detailed visual description (and generate a visual mockup image if you have image generation capabilities) of what the final form should look like, including exactly where to place elements like the headline, the image of my freebie, the sub-headline, the email input, and the button for the best flow.
- Specific design recommendations that I can apply directly in the Systeme.io settings panel (as seen in image_9.png). Please provide suggestions for:
- Canvas/Block Settings: Canvas background color, corner radius size, and block margin/padding.
- Typography Settings: Font size, line height, font color, font weight, letter spacing, and alignment.”
Once the AI generates the visual and the specific settings blueprint, you can simply open the left settings panel in the Systeme.io editor (as shown in image above) and apply those values!
Phase 3: The automation (delivering your freebie)
The form is designed, but right now it doesn’t do anything.
Now we’ll tell Systeme.io to tag the subscriber and send your lead magnet email automatically.
1. Open the Automation Rules tab
While still on your Inline Meal Prep Form step, click the Automation Rules tab at the top.
You will see one default trigger:
- Funnel step form subscribed
2. Click the rule
Click the rule Funnel step form subscribed to open its configuration panel.
This is where you add the actions.
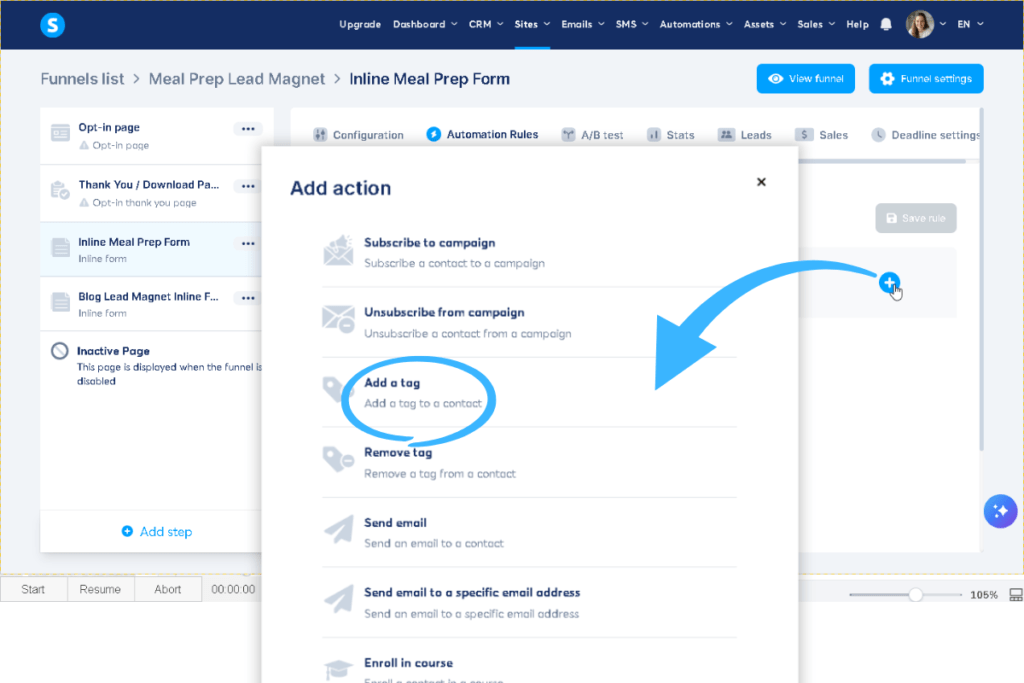
3. Add Action #1 — Add a Tag
Inside the rule:
- Click + Add action
- Select Add a tag
- Choose your tag: Meal Prep Checklist Subscriber (If you’re following this guide step‑by‑step, this is the tag you created earlier.)
4. Add Action #2 — Send an Email
Still inside the same rule:
- Click + Add action again
- Select Send email
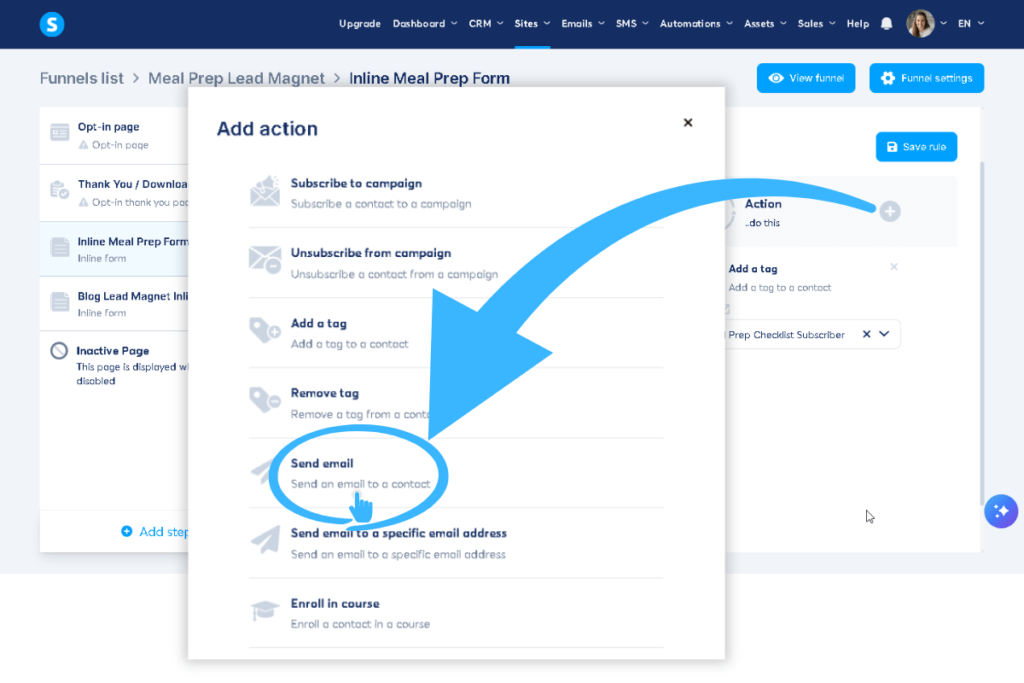
- You will now see an empty email field with an Email + button
- Hover over the + icon — it will turn blue
- Click it to create your email
5. Create the Email
A “Create email message” window will open.
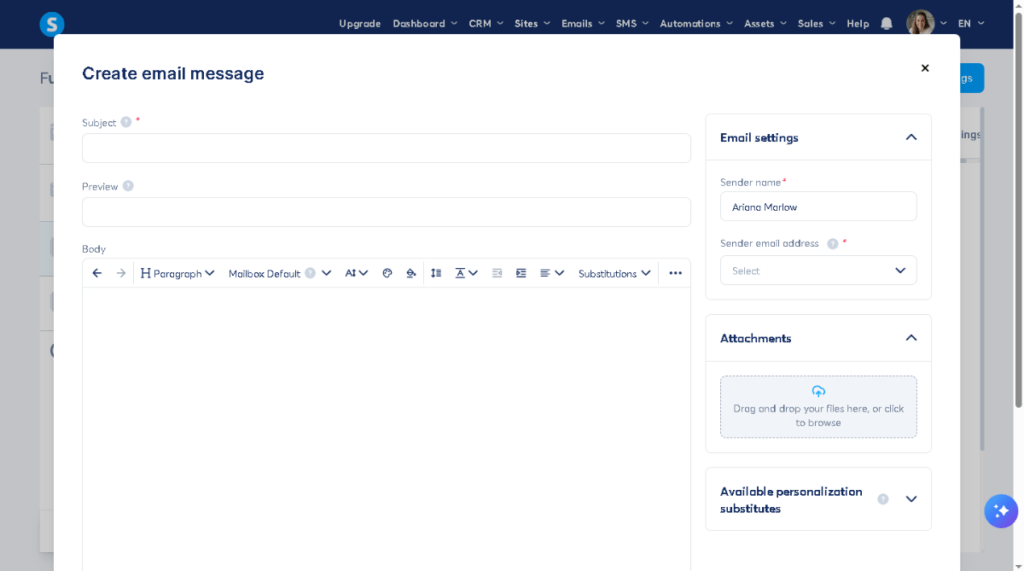
Fill it out:
Sender
- Sender name: Systeme.io usually auto‑fills this. If it’s not auto‑filled, type in your name manually.
- Sender email: Click the dropdown and choose your verified domain email.
Subject Line
Write something clear and direct, such as:
- [Download] Your 5‑Day Budget Meal Prep Plan!
Preview Text (optional)
A short friendly line that appears in inbox previews.
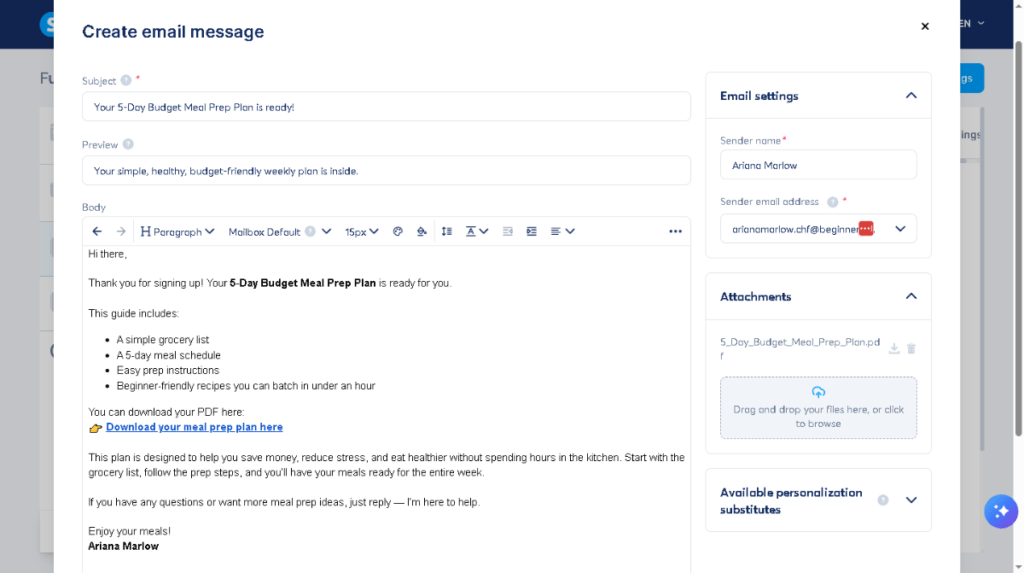
Email Body
Write a short welcome message and include:
- A direct link to your PDF
OR - Upload the PDF using the Attachments section
🤖 AI Assistance: Writing your automated welcome email (Subject + Preview + Body)
If writing emails feels intimidating or you’re staring at a blank editor wondering what to say, let AI handle the heavy lifting for you. Tools like Google Gemini Advanced or Microsoft Copilot can generate a polished, friendly, high‑converting email in seconds.
To get the best results, the AI needs to know your niche, your freebie, and the tone you want.
Copy and paste this prompt into your favorite AI tool:
“I am creating an automated welcome email inside Systeme.io for my [Insert Your Niche] blog.
This email will deliver a free PDF called [Insert Freebie Title, e.g., 5‑Day Budget Meal Prep Plan].
My tone should be warm, simple, beginner‑friendly, and supportive.Please act as an email marketing expert and generate the following:
1. Three subject line options
(Short, clear, non‑spammy, and beginner‑friendly.)2. Three preview text options
(8–12 words each, warm and inviting.)3. One complete welcome email body
Include:
– A friendly thank‑you message
– A short intro
– A placeholder for the download link
– A simple, encouraging tone suitable for beginners
– A clean, easy‑to-read structureOutput format:
– Section 1: Subject Line Options
– Section 2: Preview Text Options
– Section 3: Email Body (with a clear placeholder for the download link)
”
Once the AI generates your subject lines, preview text, and email body, simply paste them into the Systeme.io email editor — and you’re done.
6. Save the Rule
Click Save rule at the bottom.
Your automation is now active.
Every new subscriber will:
- Be tagged
- Receive your lead magnet email instantly
Phase 4: Embedding the Form on Your WordPress Blog (Accurate Workflow)
Your lead generation system is now fully active inside Systeme.io. The final step is to embed your inline form directly inside your WordPress blog post. This method is lightweight, fast, and avoids unnecessary plugins that slow down your site.
1. Stay inside your Inline Form step
You are already inside this step from Phase 3 (where you set up your Automation Rules).
At the top of the page, click the Configuration tab.
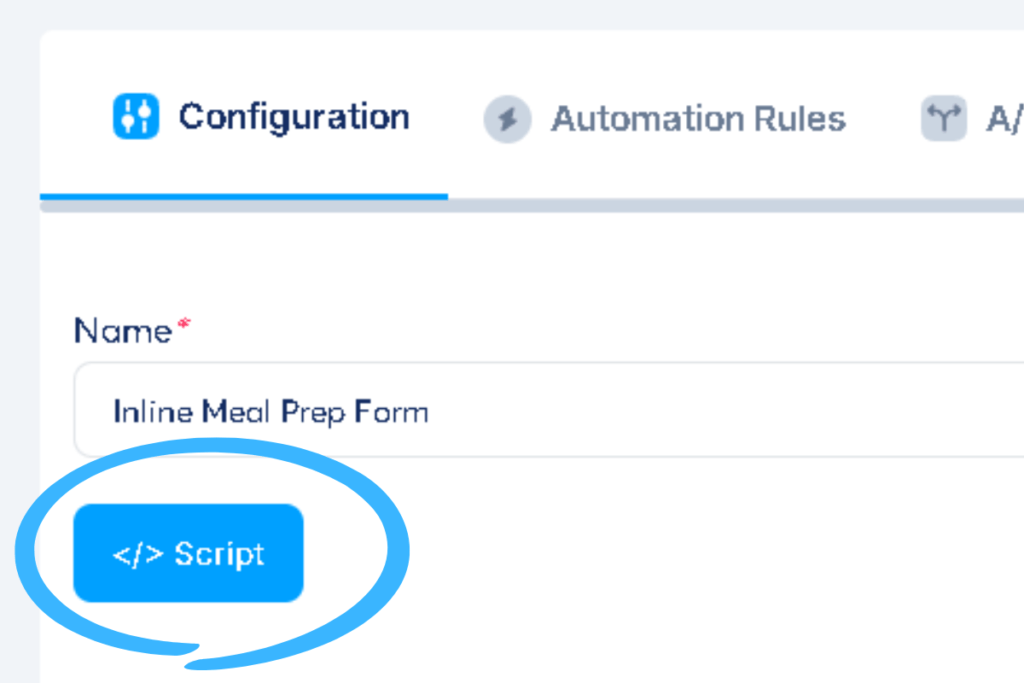
2. Click the Script button
Inside the Configuration tab, click the blue </> Script button.
This is where Systeme.io stores the embed code for your inline form.
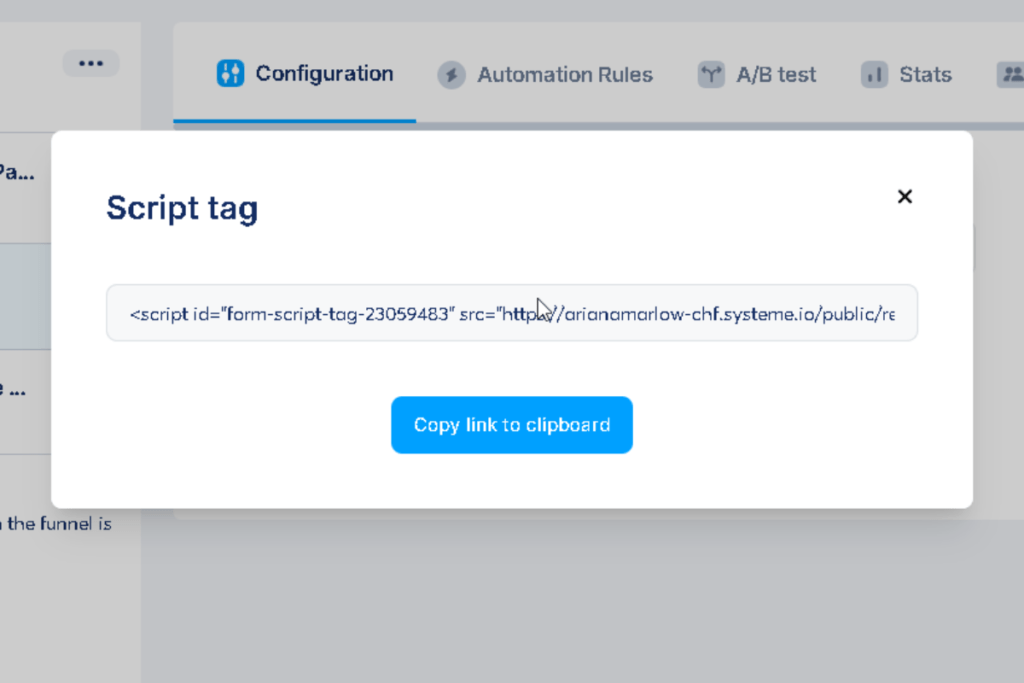
3. Copy your embed code
A popup will appear showing your script tag.
Click Copy link to clipboard.
4. Open your WordPress post
Go to your WordPress dashboard and open the blog post where you want the form to appear.
5. Choose the ideal placement
For Pinterest traffic, placing the form about 30% into the post consistently converts best.
A simple landmark:
Place it right after your first H2 section.
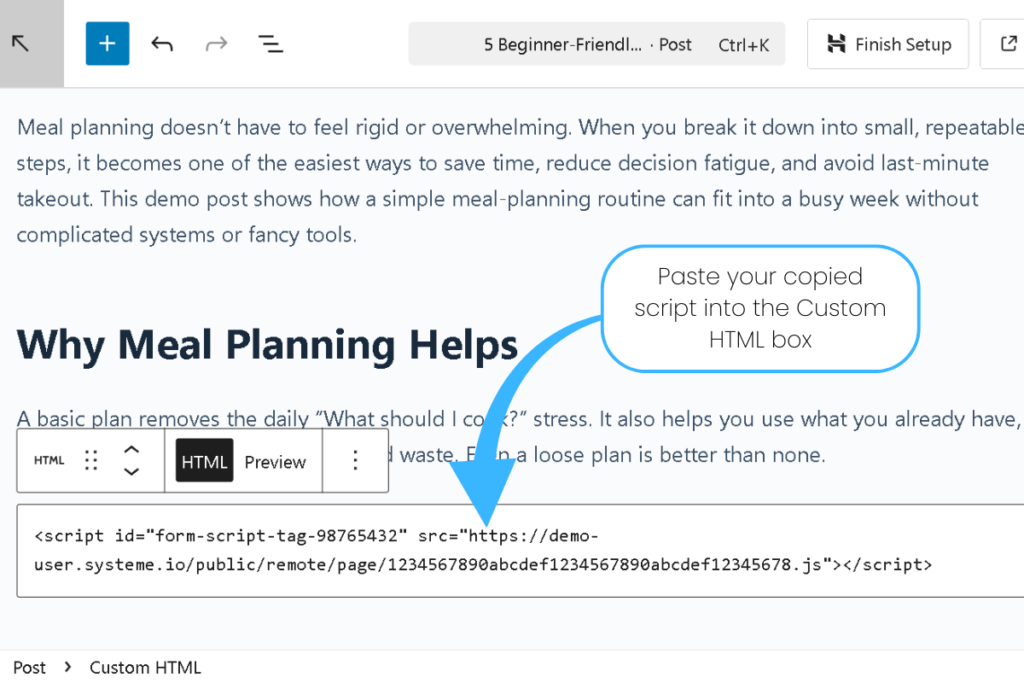
6. Add the form
- Add a new block
- Search for Custom HTML
- Paste your Systeme.io script
- Click Update to save your post
Your optimized, high‑converting inline form is now live!
Every new subscriber will be tagged, organized, and automatically receive your meal prep plan.
🤖 AI Assistance: Brainstorming Your First 5 Email Ideas
If you’re staring at a blank screen wondering what to send your new subscribers, let AI help you generate your first batch of ideas.
Copy‑Paste Prompt for Microsoft Copilot or Google Gemini
“I am a new blogger in the [Niche] space. I just set up my email list with Systeme.io. My target reader is [Target Audience].
Suggest 5 specific email ideas for my first automated Welcome Sequence that will build trust and encourage them to return to my blog.
For each email, provide:
– A catchy subject line
– A 2‑sentence summary of what the email should cover.”
Copy‑Paste Prompt for Perplexity (Research‑Backed)
“Research the top‑performing email subject lines for [Niche] bloggers in [Current Year] .
What keywords or emotional triggers are currently generating the highest open rates for welcome emails?”
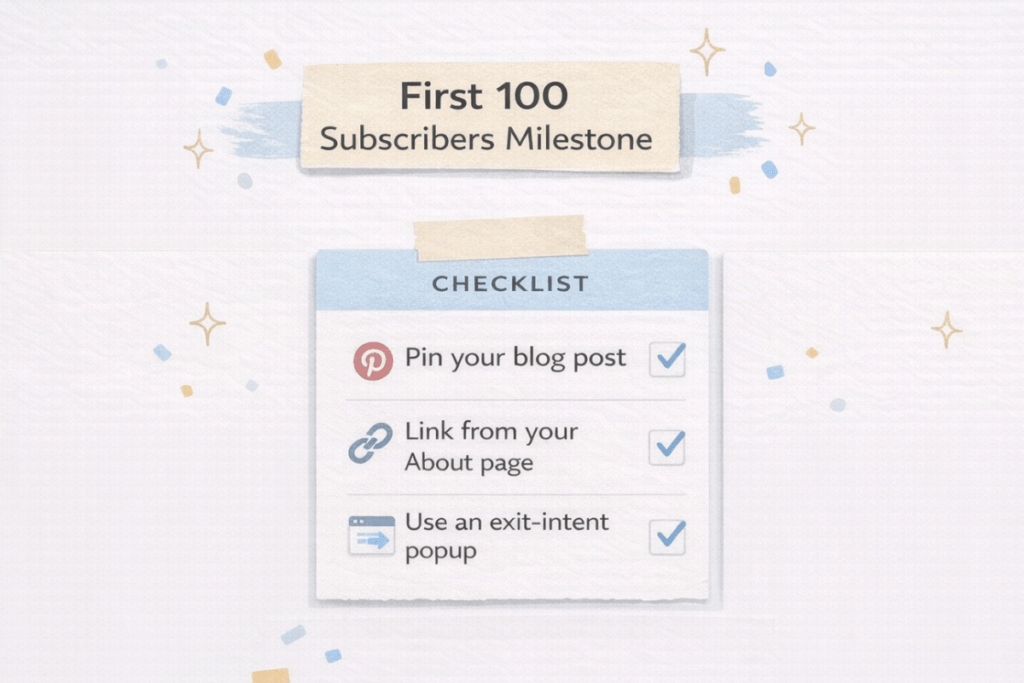
Next Steps: Getting Your First 100 Subscribers
Setting up the tech is only half the journey. The next step is getting people to actually see your form.
Here are the fastest beginner‑friendly ways to get your first 100 subscribers:
1. Pin your blog post
Create 3 Pinterest pins that link directly to the blog post where your inline form is embedded.
2. Add a link to your About page
Readers who check your About page are already curious — they convert extremely well.
3. Use an Exit‑Intent popup
Inside Systeme.io, you can trigger a popup only when a reader is about to leave your site.
You’ve officially built the most important asset in your business — your email list.
What’s Next?
You’ve just built a real email system — one that captures readers automatically while you focus on creating content. Now it’s time to turn on the traffic tap.
In the next guide, we’ll walk through how to set up your Pinterest Business account so you can start sending steady, high‑intent readers straight to your blog posts (and your new inline form). This is where your list growth really begins.
If you want to go deeper into Pinterest SEO, Anastasia Blogger’s Pinterest SEO Course is one of the clearest, beginner‑friendly breakdowns of what actually works for bloggers today.
Click the link here to learn more.