
Affiliate Disclaimer: This post may contain affiliate links. As an affiliate, I may earn a commission if you purchase through my links, at no extra cost to you. Please read our full disclosure for more info.
Now that you’ve written your warm, welcoming Contact page content in What to Write on Your Blog’s Contact Page So People Actually Reach Out, there’s one piece still missing — the actual form that lets people reach you.
If the thought of adding a contact form to WordPress feels technical, take a breath. You don’t need to write a single line of code. WPForms Lite is a free plugin that gives you a drag-and-drop form builder, built-in spam protection, and a ready-made contact form template — all set up in about five minutes.
By the end of this guide, you’ll have a fully working, spam-protected contact form live on your blog. When a Pinterest visitor taps through from one of your pins and wants to connect, they’ll have a clean, simple way to do it.
What you’ll learn in this guide
By the end of this post, you’ll know how to:
- Install and activate WPForms Lite (the free version) on your WordPress site
- Create a simple contact form using the built-in template
- Customize form fields and email notification settings
- Enable spam protection so bots can’t flood your inbox
- Embed the form on the Contact page you already created
- Test your form to confirm submissions reach your inbox
This guide is Phase 3, Step 18 of our Start Here: How to Start a Blog for Beginners (Step-by-Step Roadmap).
Let’s get your mailbox slot installed.
Why WPForms Lite is the best free form plugin for beginners
There are dozens of WordPress contact form plugins. Two dominate the free space: WPForms Lite and Contact Form 7. Here’s why WPForms Lite is the better choice for someone just starting out.
It uses a visual drag-and-drop builder
WPForms gives you a live preview of your form as you build it. You drag fields in, rearrange them, and see exactly what your readers will see — no switching between tabs, no guessing. Contact Form 7, by comparison, uses a text-based editor where you type code-like tags into a box. If you’ve never worked with HTML, that learning curve is unnecessary friction when all you need is a simple contact form.
It includes ready-made templates
WPForms Lite comes with a Simple Contact Form template that pre-builds a form with Name, Email, and Message fields — exactly what a beginner blog needs. Select it, click save, and your form is ready. Contact Form 7 gives you one default template that still requires manual adjustments.
Spam protection is built in
WPForms includes a modern anti-spam honeypot that runs invisibly in the background. It adds hidden fields that real visitors never see — but bots automatically fill them out, triggering an instant block. You also have the option to add Google reCAPTCHA, hCaptcha, or Cloudflare Turnstile for extra layers of protection.
| Feature | WPForms Lite | Contact Form 7 |
|---|---|---|
| Form builder | Visual drag-and-drop | Text-based (code tags) |
| Templates | Simple Contact Form + others | 1 default template |
| Live preview | Yes | No |
| Spam protection | Built-in honeypot + CAPTCHA options | Requires separate plugin |
| Embedding | Block, shortcode, or auto-embed | Shortcode only |
| Best for | Beginners (no code required) | Developers comfortable with HTML |
How many form fields should you use?
Keep it to three: Name, Email, and Message. Research backs this up. HubSpot’s analysis of 40,000 forms found that reducing fields from four to three increased conversions by almost 50%. A separate Formstack analysis of millions of submissions found that forms with four or fewer fields see conversion increases of up to 160%. And making a phone number field mandatory — a common beginner mistake — increases form abandonment from 4% to 39%.
Three fields. That’s all you need.
Step 1: Install and activate WPForms Lite
- Log in to your WordPress dashboard.
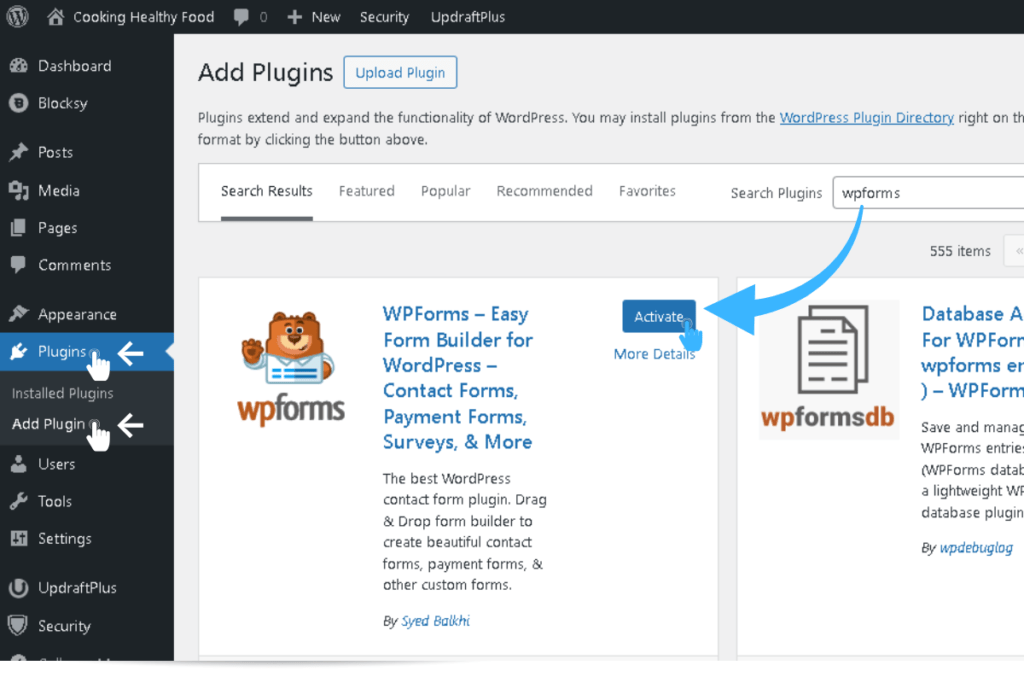
- In the left sidebar, go to Plugins → Add New.
- In the search box, type WPForms.
- Find the plugin called WPForms – Easy Form Builder for WordPress (look for the orange shield icon and 6,000,000+ active installations).
- Click Install Now.
- Once installed, click Activate.
That’s it. WPForms is now active on your site. You’ll see a new WPForms menu item in your left sidebar.
If you followed Must-Have WordPress Plugins for New Bloggers, you may already have WPForms Lite installed. If so, skip ahead to Step 2.
Step 2: Create your first contact form
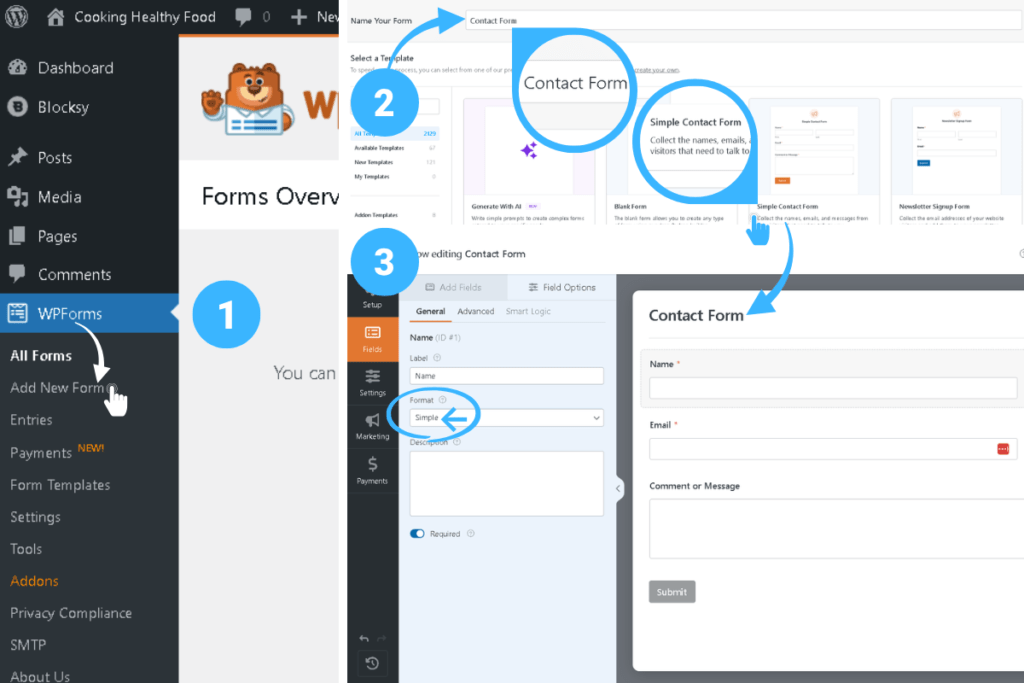
- In your WordPress sidebar, click WPForms → Add New.
- Name your form something simple — like Contact Form.
- From the template list, select Simple Contact Form.
- WPForms automatically creates a form with three fields: Name, Email, and Comment or Message.
Your form is already functional at this point. Here’s what you can customize if you want to:
- Click any field to edit its label, placeholder text, or required status.
- Drag fields up or down to reorder them.
- Remove a field by clicking on it, then clicking the red trash icon.
- Add a field by dragging one from the left panel into the form.
For a beginner contact form, the default three fields are perfect. Resist the urge to add extra fields — every additional field reduces completions.
Click Save at the top of the builder when you’re done.
Step 3: Configure notifications and confirmations
Notification settings (where submissions go)
By default, WPForms emails every submission to your WordPress admin email address. To verify or change this:
- In the form builder, click the Settings tab on the left.
- Click Notifications.
- Check the Send To Email Address field. It should show
{admin_email}— this sends submissions to whatever email you set as your WordPress admin email. - If you want submissions to go to a different address, replace
{admin_email}with your preferred email. - Customize the Email Subject Line to something recognizable — like “New Contact Form Message” — so you can spot it in your inbox.
Leave everything else at default. It works perfectly for beginners.
Confirmation settings (what visitors see after submitting)
The confirmation message appears after someone submits your form. By default it reads: “Thanks for contacting us! We will be in touch with you shortly.”
To customize it:
- In the form builder, go to Settings → Confirmations.
- You’ll see three confirmation types:
- Message (default) — shows a text message on the same page
- Show Page — redirects to a specific thank-you page
- Go to URL — redirects to any URL
- Keep the Message type and edit the text to match your voice.
A good example: “Thank you for reaching out! I read every message and will get back to you within 48 hours.”
This matches the response time you set on your Contact page — consistency between the two builds reader trust.
Click Save.
Step 4: Enable spam protection
WPForms includes multiple layers of spam defense. Here’s how to make sure they’re working.
Built-in anti-spam protection (enabled by default)
- In the form builder, go to Settings → Spam Protection and Security.
- Confirm the Enable modern anti-spam protection toggle is turned ON. This activates the invisible honeypot that blocks basic bots without affecting real visitors.
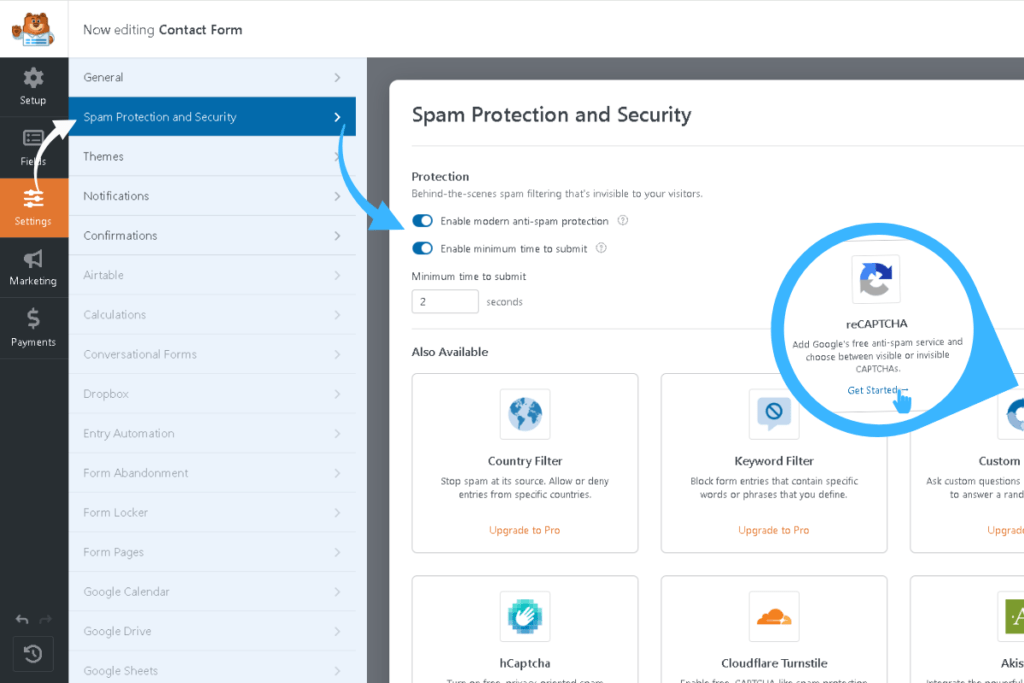
Optional: Add Google reCAPTCHA for extra protection
If you want a second layer of security, the v2 Invisible reCAPTCHA option is recommended. It runs silently for most visitors and only shows a challenge when it detects suspicious behavior.
To set it up:
- Go to Google reCAPTCHA Admin Console and register your site.
- Choose reCAPTCHA v2 → Invisible reCAPTCHA badge.
- Add your blog’s domain name and click Submit.
- Copy your Site Key and Secret Key.
- In WordPress, go to WPForms → Settings → CAPTCHA.
- Select reCAPTCHA, choose Invisible reCAPTCHA v2, and paste both keys.
- Click Save Settings.
- Open your contact form in the builder, go to Settings → Spam Protection and Security, and toggle on Enable Google Invisible v2 reCAPTCHA.
Between the honeypot and reCAPTCHA, your contact form is well protected. If you also set up Antispam Bee earlier in Must-Have WordPress Plugins for New Bloggers, your comment sections are covered too — your entire blog stays spam-free without stacking overlapping plugins.
Step 5: Embed the form on your Contact page
You already created your Contact page content in the previous guide. Now it’s time to drop the form into that page.
Method 1: Using the WPForms block (recommended)
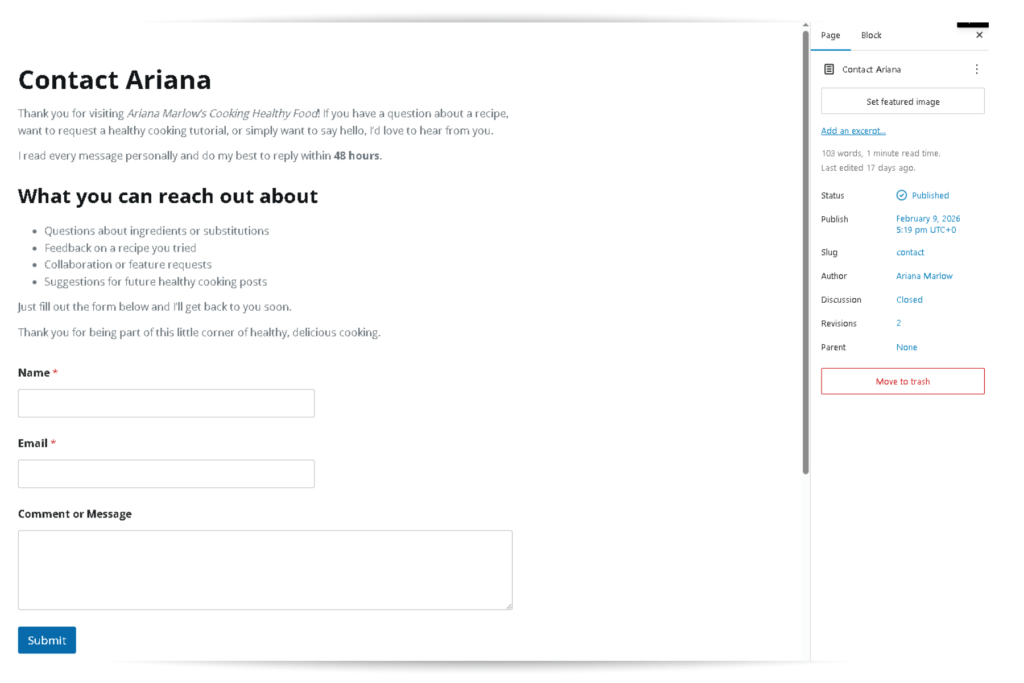
- Go to Pages → All Pages in your WordPress dashboard.
- Find your Contact page and click Edit.
- Place your cursor where you want the form to appear — below your welcome intro text.
- Click the + (block inserter) button.
- Search for WPForms and click the WPForms block.
- From the dropdown, select your Contact Form.
- The form appears in your page editor.
- Click Update to save.
Method 2: Using a shortcode
If your theme doesn’t support the block editor well:
- In the WPForms form builder, click Embed at the top.
- WPForms shows your shortcode (it looks like
). - Copy the shortcode.
- Go to Pages → All Pages → Contact → Edit.
- Add a Shortcode block or paste directly into the editor.
- Paste the shortcode where you want the form.
- Click Update to save.
Either method works. The block method gives you a visual preview in the editor, which is easier for most beginners.
Step 6: Test your contact form
Before you call this done, send a test submission:
- Open your Contact page in a new browser tab (visit your site as a reader would).
- Fill in the Name, Email, and Message fields with test information.
- Click Submit.
- Confirm the confirmation message appears on screen.
- Check your email inbox (including spam and junk folders) for the submission notification.
If the email arrives — your form is working. You’re done.
If it doesn’t arrive:
- Double-check the notification email address in WPForms → Your Form → Settings → Notifications.
- Check your spam and junk folders — WordPress emails sometimes get filtered.
- If emails consistently don’t arrive, your hosting provider may need an SMTP plugin (like WP Mail SMTP) to fix email delivery. This is a common WordPress hosting issue, not a WPForms problem.
AI assistance: Troubleshoot your contact form setup
If something isn’t working and you’re stuck, AI can help you diagnose the problem quickly.
Use Google Gemini for step-by-step troubleshooting
Copy-paste this prompt into Google Gemini:
I just set up WPForms Lite on my WordPress blog. I created a Simple Contact Form and embedded it on my Contact page using the [block/shortcode] method. When I submit a test message, [describe what happens — e.g., “the confirmation shows but I never receive the email” or “I get an error message that says…”]. My hosting is with [your hosting provider]. Walk me through how to fix this step by step.
For more accurate guidance, take a screenshot of your WPForms notification settings and paste it into the Gemini chat window. This lets Gemini see your exact configuration and give targeted advice instead of generic troubleshooting.
Use Perplexity for research-backed solutions
If you want verified, source-backed troubleshooting, paste this into Perplexity:
My WordPress contact form (WPForms Lite) isn’t sending email notifications. I’m on [hosting provider] shared hosting. What are the most common causes and verified fixes? Include steps for checking SMTP settings, testing email delivery, and any known issues with [hosting provider] email.
Perplexity pulls from technical documentation and verified sources — so you’ll get answers backed by real evidence, not forum opinions.
Quick checklist before you move on
Run through this list to confirm everything is solid:
- WPForms Lite installed and activated
- Contact form created using the Simple Contact Form template
- Form uses three fields only: Name, Email, Message
- Anti-spam protection enabled (honeypot toggle ON)
- reCAPTCHA connected (optional but recommended)
- Notification email address confirmed
- Confirmation message customized to match your voice
- Form embedded on your Contact page
- Contact page linked in your footer menu (from 7 Pages Every Blog Needs Before You Launch)
- Test submission sent and email received successfully
If every item checks out, your Contact page is fully functional — warm intro text, working form, spam protection, and a confirmation message that matches your brand voice.
FAQ: Adding a contact form to WordPress
Q: Is WPForms Lite really free forever?
Yes. WPForms Lite is 100% free with no time limit. You can create unlimited forms and receive unlimited submissions. The paid Pro version ($49.50/year) adds advanced features like payment forms, conditional logic, and email marketing integrations — but for a simple contact form, the free version is everything you need.
Q: Can I change my form fields later?
Absolutely. Open your form in the WPForms builder anytime to add, remove, or reorder fields. Your existing submissions are saved and won’t be affected by changes.
Q: Will WPForms slow down my site?
No. WPForms Lite is lightweight and only loads its scripts on pages where your form appears. Pages without a form are completely unaffected.
Q: What if I want multiple forms later — like a feedback form or collaboration form?
WPForms Lite lets you create unlimited forms. You can build separate forms for different purposes and embed each one on different pages.
Q: Should I use reCAPTCHA or the built-in honeypot?
Use both. The honeypot catches basic bots invisibly. reCAPTCHA adds a second layer for more sophisticated spam. Together, they block virtually all automated submissions without annoying real readers.
Q: Do I need a separate spam plugin for my contact form?
No. WPForms handles contact form spam internally. Antispam Bee (set up in Must-Have WordPress Plugins for New Bloggers) handles comment spam — they cover different areas, so together they protect your entire blog without overlap.
What’s next?
Your Contact page is now fully equipped — warm intro text from the previous guide, a working form with spam protection, and a confirmation message that matches your voice. That’s one more essential page checked off your blog foundation.
Next, you’ll learn how to track who’s visiting your blog and where they’re coming from (hint: Pinterest will likely be your biggest source), in How to Track Your Blog Traffic: Google Analytics Setup for Beginners.
Ready to get eyes on your new blog? Anastasia Blogger’s Pinterest SEO Traffic Secrets walks you through the exact strategy to turn this setup into consistent traffic.