
Affiliate Disclaimer: This post may contain affiliate links. As an affiliate, I may earn a commission if you purchase through my links, at no extra cost to you. Please read our full disclosure for more info.
Now that you’ve set up your Terms & Conditions page, you’re one step away from completing your blog’s legal foundation. This post tackles the one legal page most beginner bloggers skip until it’s too late: your Affiliate Disclosure.
If you’ve already completed your Privacy Policy, you know the drill — legal pages don’t need to be scary. And your Affiliate Disclosure is actually the simplest one to set up.
If you plan to earn money through affiliate links — and most bloggers eventually do — the Federal Trade Commission (FTC) requires you to clearly disclose when you may earn a commission from the links on your site. This isn’t optional. Failing to disclose can lead to fines, loss of trust, and even removal from affiliate programs.
The good news? Your affiliate disclosure doesn’t need to be complicated. You just need to know what to include, where to place it, and how to write it in plain, honest language that your readers actually understand.
By the end of this guide, you’ll have a ready-to-use affiliate disclosure template you can customize and publish today — plus you’ll know exactly where and how to display it across your blog.
What You’ll Learn
- The “Honesty First” Rule: Why the FTC cares about your affiliate links and how a clear disclosure actually increases your conversion rates.
- Mandatory Placement: Where your disclosure must appear (hint: it’s not just the footer) to stay compliant and avoid “Legal Shadowing.”
- The Copy-Paste Template: A 100% compliant, beginner-friendly disclosure you can use for any niche (Food, Wellness, Finance, Parenting).
- The “Clear & Conspicuous” Standard: Using design and placement to ensure your readers (and the FTC) can see your disclosure without a magnifying glass.
- AI-Powered Verification: How to use Perplexity to audit your disclosure’s wording for current legal standards.
This guide is Phase 3, Step 16 of our Start Here: How to Start a Blog for Beginners (Step-by-Step Roadmap).
Why your blog needs an affiliate disclosure
The FTC’s Endorsement Guides require anyone who earns a commission, free product, or other benefit from recommending something to clearly disclose that relationship to their audience.
The principle is straightforward: if you stand to benefit financially from a recommendation, your readers deserve to know before they click.
This applies to every platform — blogs, social media, email newsletters, and videos. Whether you’re recommending a kitchen gadget on your food blog or a budgeting app on your finance site, the rule is the same.
Here’s what makes this especially important for beginners: many affiliate programs now require an active disclosure page before they’ll approve your application.
Programs like Amazon Associates explicitly state you must display a specific disclosure statement on your site. Without it, you might not even get accepted.
What happens without one
The FTC takes disclosure requirements seriously. Under the FTC Act, violations can result in civil penalties of up to $50,120 per violation as of 2025, along with federal injunctions and mandatory corrective actions.
In October 2021, the FTC sent warning letters to over 700 companies and influencers — including major brands and household names — putting them on notice that failure to disclose material connections could trigger these penalties.
Even individual bloggers and small-scale affiliates have received FTC warning letters. The agency has stated publicly that enforcement against individual endorsers is “appropriate in certain circumstances — for example, if the endorser hasn’t made required disclosures despite warnings.”
Beyond legal consequences, missing disclosures erode reader trust. When someone discovers you earned money from a recommendation you didn’t disclose, it feels dishonest — even if the recommendation was genuinely helpful. That broken trust is harder to rebuild than any legal page.
What the FTC actually requires
The FTC doesn’t prescribe exact wording. Instead, they require your disclosure to meet three standards:
- Clear: Written in plain language that any reader can understand immediately. No legal jargon, no buried fine print.
- Conspicuous: Placed where readers will actually see it — not hidden in a footer or buried after 2,000 words of content.
- Close to affiliate links: Positioned near the endorsement or recommendation, not on a separate page that readers need to hunt for.
The FTC specifically warns against relying on a single disclosure page alone. While having a dedicated Affiliate Disclosure page is a strong practice, you also need a short disclosure statement near the top of every individual post that contains affiliate links.
Think of it as two layers:
- Short in-post disclosure — A 2-3 sentence statement placed immediately after your featured image at the top of each post containing affiliate links.
- Full disclosure page — A dedicated page linked in your footer and main menu that explains your affiliate relationships in more detail.
Both layers working together is what keeps you compliant.
Your copy-paste affiliate disclosure templates
Below are two templates you can customize for your own blog. Replace the placeholder text in brackets with your actual blog name and details.
Short in-post disclosure (top of every post with affiliate links)
This post may contain affiliate links. If you make a purchase through my links, I may earn a small commission at no extra cost to you. I only recommend products I genuinely believe will help you. Read my full disclosure [here].
This goes immediately after your featured image, before any content begins. Keep it short, warm, and honest. Your readers should feel informed, not warned.
Full affiliate disclosure page
Affiliate Disclosure
Some of the links on [Your Blog Name] are affiliate links. This means that if you click on a link and purchase a product, I may receive a small commission at no extra cost to you.
This helps support the blog and allows me to continue creating free content for you.
I only recommend products, tools, and services that I have personally used, tested, or genuinely believe will be helpful for my readers. My opinions are always my own, and I will never recommend something just for a commission.
Using my affiliate links does not change the price you pay — the cost is the same whether you use my link or go directly to the website.
Thank you for supporting [Your Blog Name] and the work I do here.
Customize the tone to match your voice. If you run a wellness blog, it might sound warmer and more personal. If you run a finance blog, it might be slightly more direct. The key elements that must stay: you earn a commission, there’s no extra cost to the reader, and you only recommend things you believe in.
Niche-specific examples
Here’s how the short disclosure might sound for different blog types:
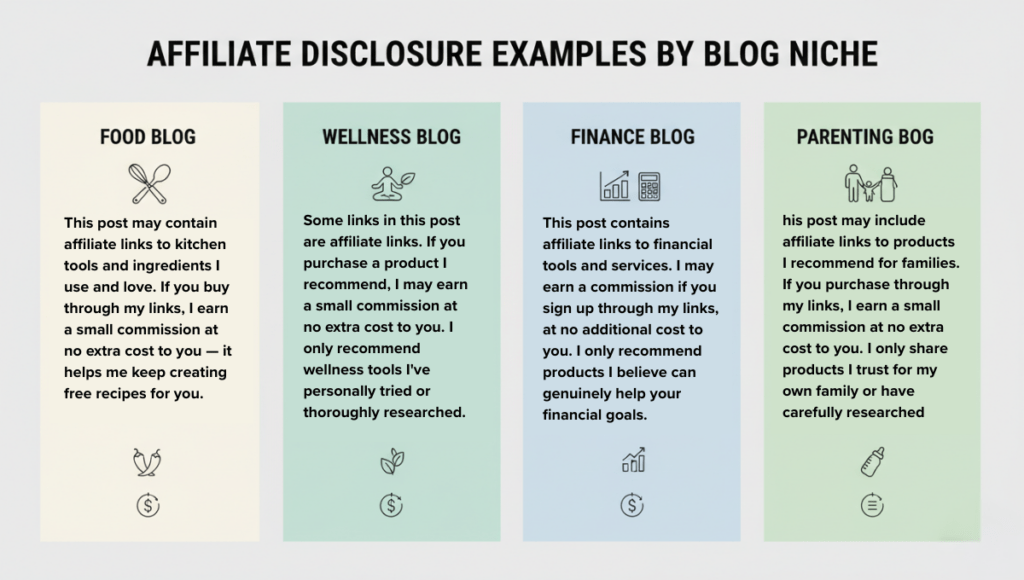
Food blog: This post may contain affiliate links to kitchen tools and ingredients I use and love. If you buy through my links, I earn a small commission at no extra cost to you — it helps me keep creating free recipes for you.
Wellness blog: Some links in this post are affiliate links. If you purchase a product I recommend, I may earn a small commission at no extra cost to you. I only recommend wellness tools I’ve personally tried or thoroughly researched.
Finance blog: This post contains affiliate links to financial tools and services. I may earn a commission if you sign up through my links, at no additional cost to you. I only recommend products I believe can genuinely help your financial goals.
Parenting blog: This post may include affiliate links to products I recommend for families. If you purchase through my links, I earn a small commission at no extra cost to you. I only share products I trust for my own family or have carefully researched.
Notice the pattern: each one mentions the commission, reassures there’s no extra cost, and emphasizes genuine belief in the product. That’s the formula.
Where to place your affiliate disclosure
Placement matters as much as the wording itself. The FTC evaluates what your audience actually sees — not just what exists somewhere on your site.
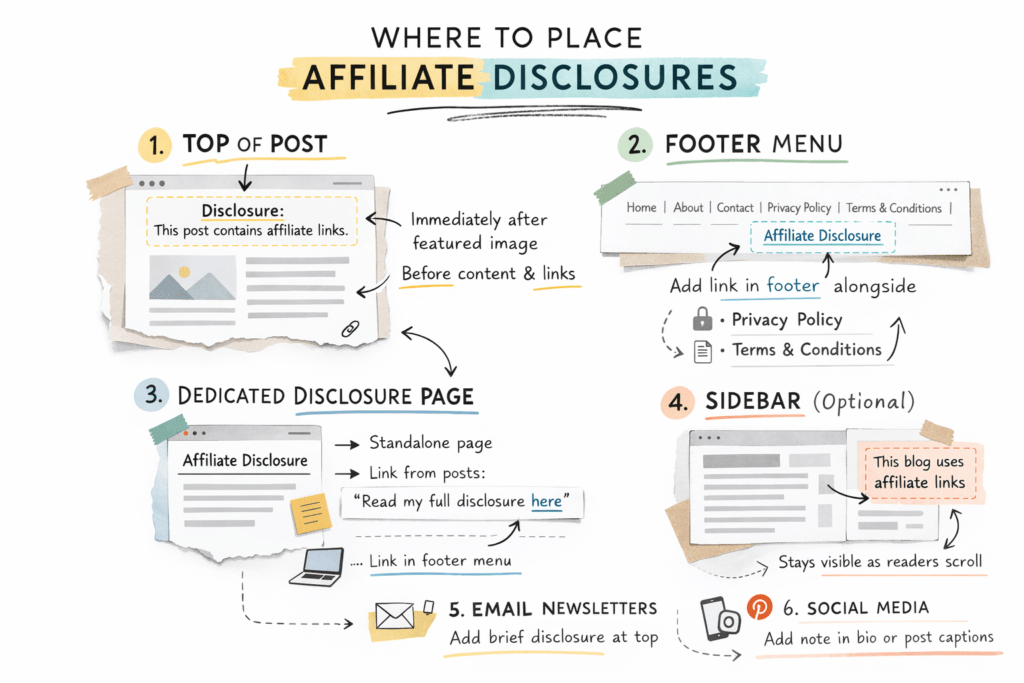
Required placements
- Top of every blog post with affiliate links — Immediately after your featured image, before any content or affiliate links appear. This is your primary, non-negotiable placement.
- Dedicated Affiliate Disclosure page — A standalone page accessible from your footer menu. Link to it from your short in-post disclosures using “Read my full disclosure here.”
- Footer menu — Add your Affiliate Disclosure page alongside your Privacy Policy and Terms & Conditions.
Optional (but smart) additional placements
- Sidebar widget — A small, persistent “This blog uses affiliate links” notice that stays visible as readers scroll. Particularly useful for long posts.
- Email newsletters — If you include affiliate links in emails, add a brief disclosure near the top.
- Social media bios — If you share affiliate links on Pinterest or other platforms, consider adding a note in your profile or individual post captions.
Common placement mistakes
Mistake 1: Footer-only placement. Putting your disclosure only in the footer doesn’t meet FTC standards. Most readers never scroll to the footer, and the FTC requires disclosures to be seen before the affiliate link — not after all the content.
Mistake 2: Burying it mid-post. Some bloggers place their disclosure several paragraphs into the post, below the first affiliate link. By then, readers may have already clicked. Always place it above the first affiliate link.
Mistake 3: Making it invisible. Using gray text on a light background, tiny fonts, or collapsed accordions defeats the purpose. Your disclosure should be clearly readable without effort.
How to create your affiliate disclosure page in WordPress
Setting up your dedicated Affiliate Disclosure page takes less than 10 minutes. Here’s how:
Step 1: Create a new page
Log into your WordPress dashboard. Go to Pages > Add New Page. Title it “Affiliate Disclosure.”
Step 2: Add your full disclosure text
Paste your customized version of the full disclosure template from earlier in this post. Format it with a clear heading and short paragraphs. Avoid walls of text — break it into readable chunks.
Step 3: Publish and add to your footer menu
Click Publish. Then go to Appearance > Menus, select your footer menu, and add the Affiliate Disclosure page. Save the menu.
If you already set up your footer during your navigation menu setup, this step should feel familiar — just add one more link to the existing footer menu.
Step 4: Add the short disclosure to your blog posts
For every blog post that contains affiliate links, paste the short in-post disclosure template immediately after your featured image. Many bloggers create this as a WordPress Reusable Block so they can insert it with one click on every new post.
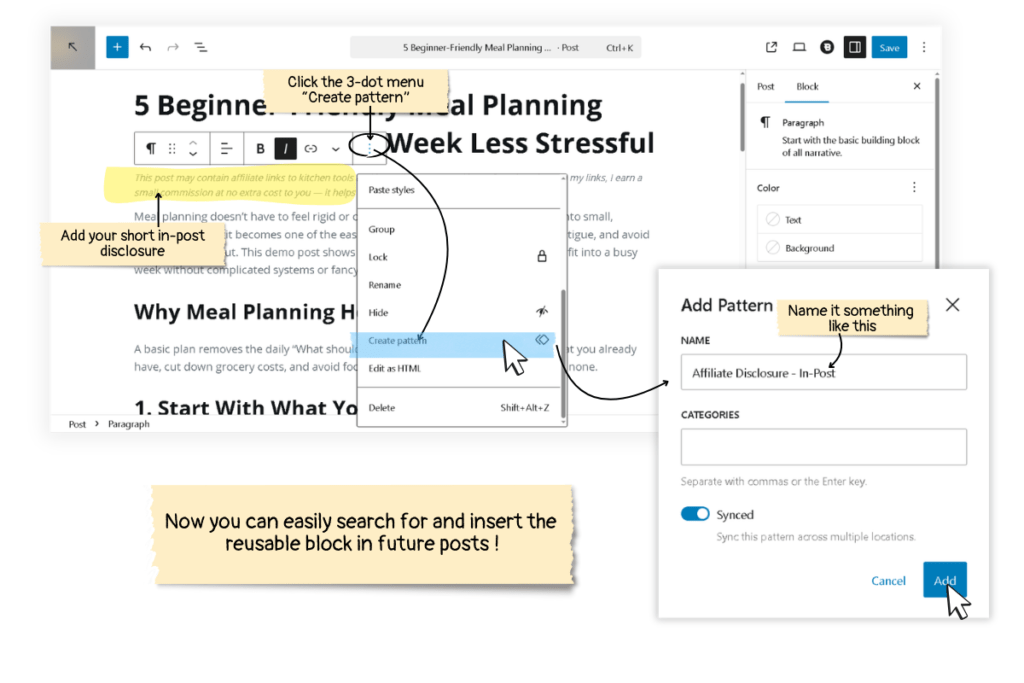
To create a Reusable Block:
- Open any post in the WordPress editor.
- Add a new Paragraph block and paste your short disclosure.
- Click the three-dot menu on the block and select Create pattern (or “Add to Reusable Blocks” in older WordPress versions).
- Name it something like “Affiliate Disclosure — In-Post.”
- Now you can search for it by name and insert it instantly in any future post.
If you join Amazon Associates
Amazon has an additional disclosure requirement beyond the standard FTC guidelines. Section 5 of the Amazon Associates Program Operating Agreement states that you must “clearly and prominently” display this specific statement on your site:
“As an Amazon Associate I earn from qualifying purchases.”
This exact wording (or a substantially similar statement) is mandatory for all Amazon Associates participants. Add it to your full Affiliate Disclosure page alongside your general disclosure. Failure to display it can result in removal from the program.
Source: Amazon Associates Program Operating Agreement, Section 5 — “Identifying Yourself as an Associate.”
DIY vs. lawyer-drafted templates
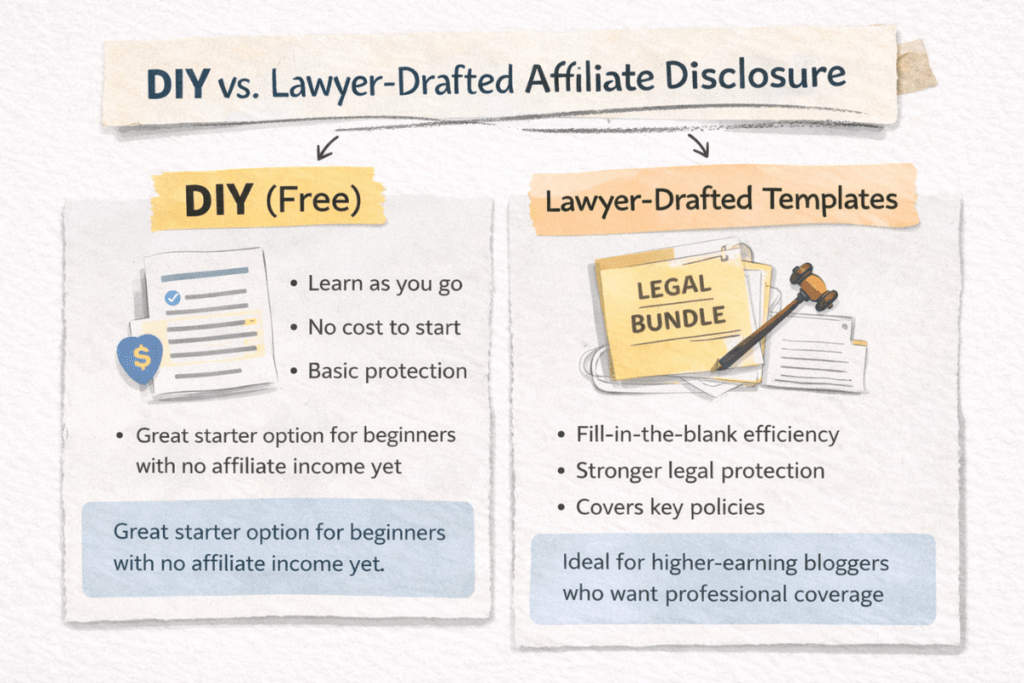
You have two paths for creating your affiliate disclosure:
Path 1: DIY (free). Use the templates in this post as your starting point. Customize them with AI assistance (see the next section), proofread carefully, and publish. This is a perfectly valid approach for beginners who are just starting out and don’t have affiliate income yet.
Path 2: Lawyer-drafted templates. If you want stronger legal protection — especially once you start earning affiliate income — consider investing in professionally written templates. ASelfGuru’s Legal Bundle includes affiliate disclosure and disclaimer language written by a practicing lawyer who understands blogging. The templates are fill-in-the-blank style, so you can personalize them in about 15 minutes without needing to understand legal jargon.
The bundle also covers your Privacy Policy and Terms & Conditions, so if you haven’t created those pages yet using the guides earlier in this series — How to Create a Privacy Policy for Your Blog and Terms & Conditions for Bloggers — you can handle all three legal pages in one purchase.
Which should you choose? Start with the free DIY approach today. You need something published on your site before applying to affiliate programs. Then, once your blog starts generating income, upgrading to lawyer-drafted templates gives you an extra layer of protection that’s worth the investment.
AI assistance: Draft and review your affiliate disclosure
Use AI to speed up your customization process and catch anything you might miss.
Step 1: Draft with Google Gemini
Copy-paste this prompt into Google Gemini:
I’m a beginner blogger running a [YOUR NICHE] blog called [YOUR BLOG NAME]. I plan to use affiliate links to recommend tools, products, or services I trust.
Write:
- A 2-3 sentence short affiliate disclosure for the TOP of my blog posts
- A longer Affiliate Disclosure page (3-5 short paragraphs)
Requirements:
- Plain, friendly language
- Make it clear I may earn a commission at no extra cost to readers
- Emphasize that I only recommend products I genuinely believe in
- Add a thank-you sentence for supporting the blog
Edit the result so it sounds like you — your readers should recognize your voice, not a template.
Step 2: Review with Perplexity
Once you have your draft, copy-paste this prompt into Perplexity:
Review this Affiliate Disclosure for a beginner blogger. Check if it:
- Clearly states that I may earn a commission from affiliate links
- Explains that there is no extra cost to the reader
- Emphasizes honesty and integrity in my recommendations
- Is easy to understand (no legal jargon)
- Is suitable for both a short in-post disclosure and a full disclosure page
- Aligns with current FTC guidance for online affiliate disclosures
Here is my Affiliate Disclosure: [PASTE YOUR DISCLOSURE]
Suggest specific edits to improve clarity, transparency, and compliance, while keeping a warm, beginner-friendly tone.
This two-step process — draft first, then review — ensures you end up with a disclosure that’s both personal and compliant.
Quick-launch checklist
Before moving on, make sure you’ve completed these items:
- Full Affiliate Disclosure page created and published in WordPress
- Affiliate Disclosure page added to your footer menu (alongside your Privacy Policy and Terms & Conditions)
- Short in-post disclosure template saved as a Reusable Block
- Short disclosure placed at the top of every existing post with affiliate links
- “Read my full disclosure here” link in your short disclosure points to the correct page
- Disclosure text is readable — no tiny fonts, no hidden colors, no collapsed sections
FAQ: Affiliate disclosure for bloggers
Q: Do I need an affiliate disclosure even if I haven’t earned any money yet?
Yes. The FTC requires disclosure whenever a material relationship exists — meaning you’ve signed up for an affiliate program and stand to earn a commission, regardless of whether you’ve made a sale yet. Set up your disclosure page now, so you’re covered from day one.
Q: Can I use the exact same disclosure on every post?
Yes, and you should. Consistency is key. Create your short in-post disclosure as a Reusable Block and use it on every post that contains affiliate links. If a post doesn’t have affiliate links, you can skip it for that post.
Q: Is a dedicated page enough, or do I need in-post disclosures too?
You need both. The FTC requires disclosures to be close to the affiliate links — a dedicated page alone doesn’t satisfy this requirement. The dedicated page provides comprehensive detail, while the in-post disclosure catches readers before they encounter any links.
Q: What if I join the Amazon Associates program?
Amazon requires you to include this specific statement on your site: “As an Amazon Associate I earn from qualifying purchases.” This is stated in Section 5 of their Operating Agreement. Add it to your full Affiliate Disclosure page alongside your general disclosure.
Q: How often should I update my disclosure?
Review it whenever you join a new affiliate program, change how you monetize, or at minimum once a year. If you add new types of partnerships (like sponsored posts or brand deals), update your disclosure to cover those relationships too.
Q: Does my affiliate disclosure replace a Disclaimer?
No. A Disclaimer limits your liability (for example, stating that your content is informational and not professional advice). An Affiliate Disclosure specifically addresses your financial relationships with companies whose products you recommend. They serve different purposes and are separate documents.
What’s next?
You’ve now completed the core legal pages every blog needs — Privacy Policy, Terms & Conditions, and Affiliate Disclosure. That’s a huge step that most beginner bloggers skip or delay, and you’ve done it right.
Next up: we’ll walk through What to Write on Your Blog’s Contact Page So People Actually Reach Out — because a working contact page isn’t just polite, it’s how brands, readers, and future collaborators find you.
Ready to get eyes on your new blog? Anastasia Blogger’s Pinterest SEO Traffic Secrets walks you through the exact strategy to turn this setup into consistent traffic.