Affiliate Disclaimer: This post may contain affiliate links. As an affiliate, I may earn a commission if you purchase through my links, at no extra cost to you. Please read our full disclosure for more info.
Now that you’ve installed WordPress on your hosting (from the previous guide), the next critical step is choosing and setting up your theme. Your WordPress theme controls how your blog looks, how fast it loads, and how easily visitors can navigate your content.
The bad news? There are thousands of themes to choose from. The good news? You don’t need to overthink this. In this guide, I’ll walk you through the exact process I use to set up a WordPress theme that looks professional, loads fast, and doesn’t overwhelm you with unnecessary features.
By the end of this tutorial, you’ll have a fully configured WordPress theme ready for your first blog posts.
What You’ll Learn in This Guide
- The “Core Web Vitals” Factor: Why your theme choice is the #1 factor in site speed and how to pick a “Lightweight” foundation like Blocksy, Kadence, or Astra.
- The 2-Minute Installation: A step-by-step walkthrough of finding, installing, and activating your theme within the WordPress dashboard.
- Visual Branding Basics: How to use the WordPress Customizer to set your brand colors, fonts, and logo so your blog looks professional from day one.
- Mobile-First Design: Why 70%+ of Pinterest traffic is on mobile and how to ensure your theme looks perfect on every screen size.
- Starter Templates: How to use “Ready-Made” site designs to skip the hours of manual layout building and launch a beautiful blog in minutes.
This guide is Phase 2, Step 7 of our Start Here: How to Start a Blog for Beginners (Step-by-Step Roadmap).
Why Your Theme Choice Matters More than You Think
Before installing anything, let’s be honest about what beginners usually do wrong: they choose a theme based on how beautiful the demo looks.
Here’s the reality: Your blog won’t look like the demo. Demos use professional photography, placeholder text, and months of design refinement. Your actual blog will have your real content, different text lengths, and your own images.
The second mistake? Choosing themes packed with unnecessary features. Themes that include sliders, animations, built-in contact forms, and everything-but-the-kitchen-sink usually load slower and frustrate you with customization options you’ll never use.
What actually matters:
- Speed — Your theme should load in under 2 seconds. Slow themes lose readers.
- Customization without complexity — You need to change colors and fonts without feeling lost.
- Mobile responsiveness — 70% of Pinterest traffic comes from mobile. Your theme must look good on phones.
- Active support and updates — An abandoned theme with no updates is a security risk.
Choosing Your WordPress Theme: Blocksy vs. Astra vs. Kadence
You have infinite theme options, but as a beginner blogger, I recommend one of these three tested, lightweight themes:
Blocksy (My Recommended Choice)
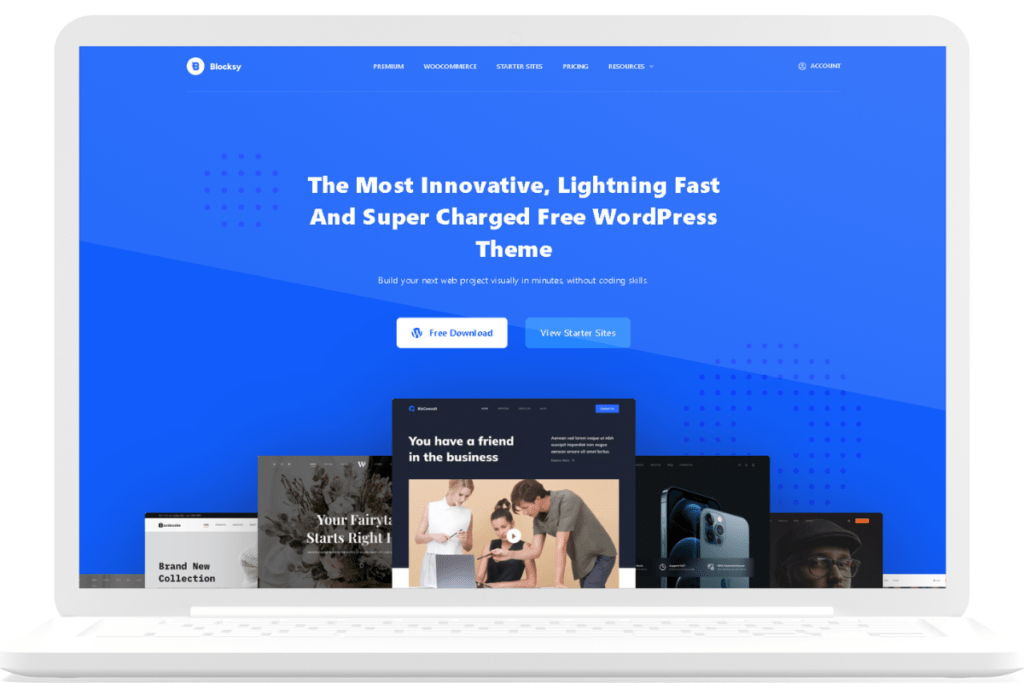
Why Blocksy?
- Speed champion: Blocksy loads 20% faster than Astra due to cleaner code and modern JavaScript practices
- Better free version: The free tier includes features you’d pay for in Astra or Kadence Pro
- Gutenberg-friendly: If you’re creating blog posts with WordPress’s block editor, Blocksy integrates beautifully (saves 3-4 minutes per post)
- Mobile-ready: Doesn’t require extra optimization to look good on phones
- Customizer that makes sense: The interface is intuitive, not overwhelming
Pricing (as of writing):
Blocksy’s free version is already powerful enough for a brand‑new blogger. You can build your entire site with it before spending anything.
If you ever want extra features, Blocksy Pro comes in three tiers:
| Plan | Yearly Price | Lifetime Price | Sites Allowed |
|---|---|---|---|
| Personal | $69/year | $199 one‑time | 1 site |
| Business | $99/year | $299 one‑time | Up to 10 sites |
| Agency | $149/year | $499 one‑time | Unlimited sites |
(Prices may change, so check the Blocksy website for the latest updates.)
What beginners actually need
If you’re just starting your first blog, you only need the Personal plan — and only if you decide to upgrade later. One site is all you’ll be running.
When you’re ready, the Personal plan is all you need for one blog. You can choose yearly or lifetime — whichever fits your budget.
If you ever feel ready for the extra features, you can upgrade to Blocksy Pro with the Personal plan — it’s the only one you’ll need for a single blog.
Annual vs. Lifetime
If you choose to upgrade, the Personal plan can be purchased:
- Annually (cheaper upfront)
- Lifetime (one‑time payment, no renewals)
Both give you the same features; the difference is simply how you prefer to pay.
My beginner‑safe recommendation
Start with the free version.
Use it for a few days.
If you like how it feels and want the extra Pro features, then upgrade.
No pressure, no rush — the free version is genuinely strong enough to get your blog live.
ASTRA (Great Alternative)
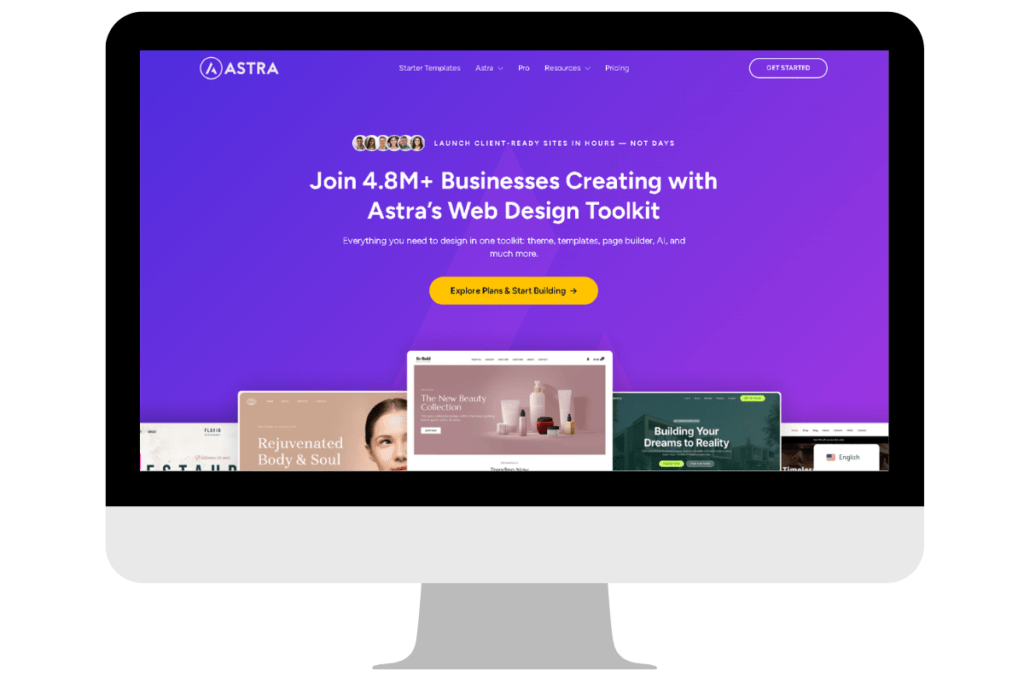
Why Astra?
- Massive template library: 280+ pre‑built starter sites help you launch faster
- Lightweight: Uses less than 50KB of resources
- Consistent performance: Works well across different hosting environments
- Great documentation: Tons of tutorials available
Downside: The free version is more limited. You’ll likely upgrade to Pro for header/footer customization.
Pricing (as of writing):
Astra Pro starts at $69/year for the basic tier.
(Prices may change, so always check Astra’s site for the latest updates.)
If you want to explore Astra Pro, you can check it out here:
View Astra Pro
KADENCE (Best Customization)
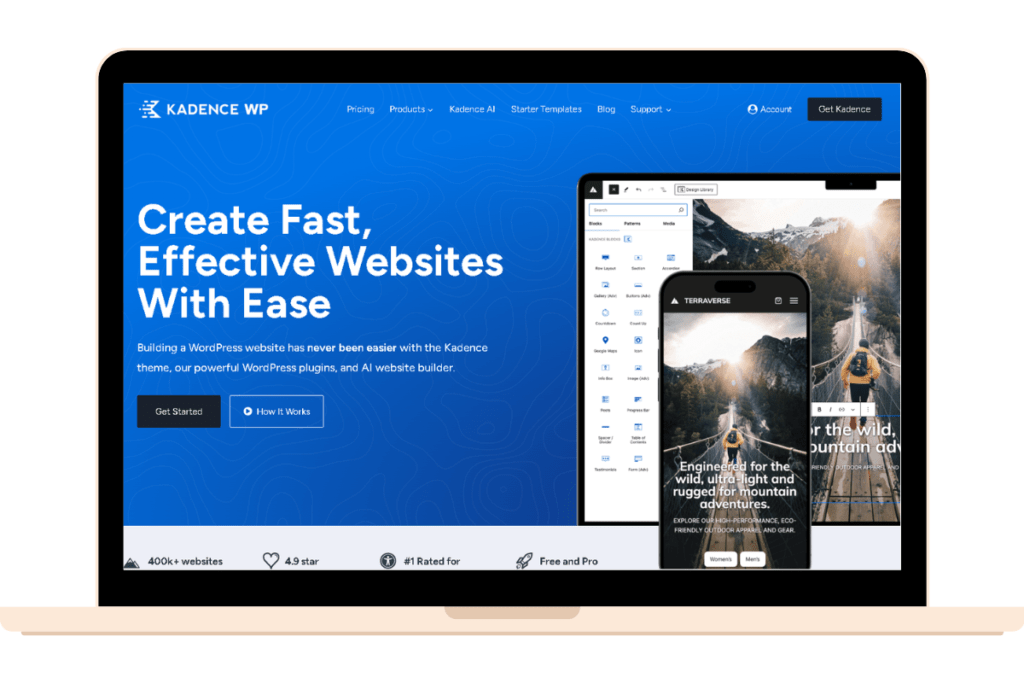
Why Kadence?
- Generous free version: Includes Kadence Blocks (normally a paid plugin) for free
- Modern templates: Designs feel fresher and more up‑to‑date than Astra
- AI credits included: Kadence Blocks come with 250 AI credits for content generation
Downside: Smaller community and fewer third‑party tutorials compared to Astra.
Pricing (as of writing):
Kadence’s paid plans start at $69/year for the Express Plan.
(Prices may change, so always check Kadence’s site for the latest updates.)
If you want to explore Kadence Pro and its customization features, you can check it out here:
View Kadence Pro
Verdict for This Tutorial
We’ll use Blocksy because it offers the best balance for beginners: free, fast, feature-rich, and intuitive to customize. However, the installation process is identical for all three themes.
Step 1: Installing Your WordPress Theme
WordPress makes theme installation incredibly simple. You have two main methods:
Method 1: Install from the WordPress Theme Directory (Easiest)
This method works for free themes like Blocksy, Astra, and Kadence.
Steps:
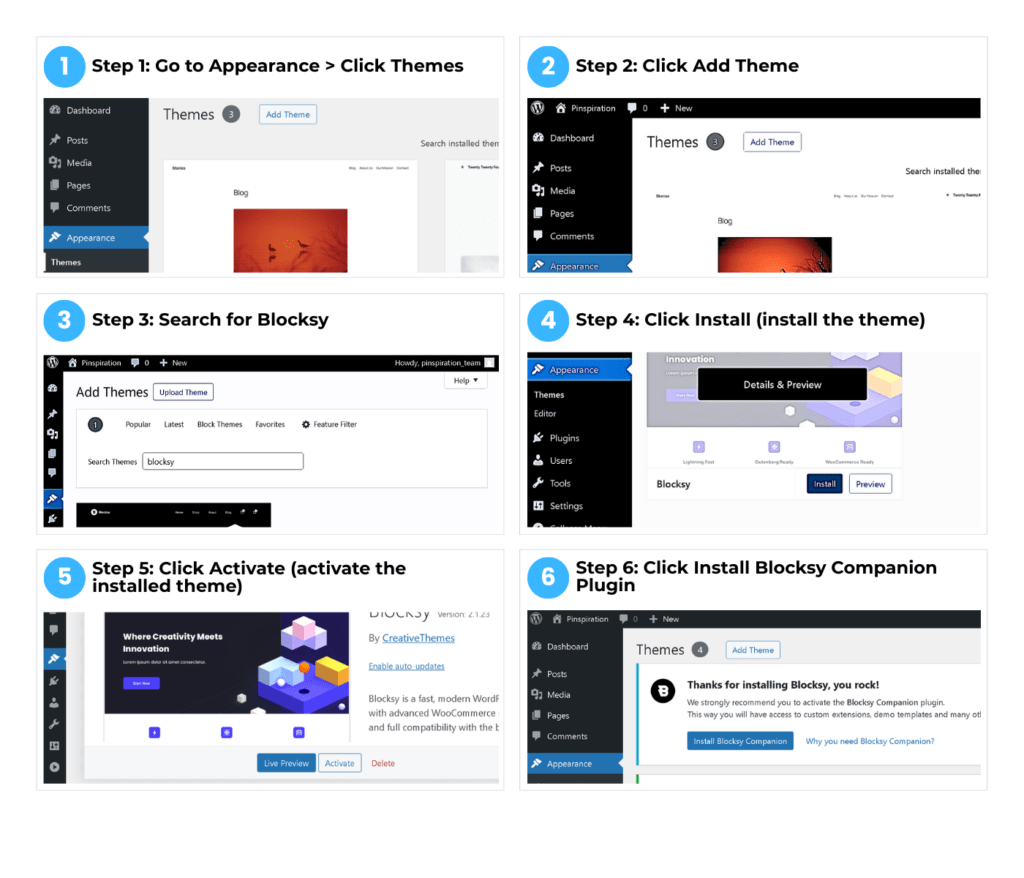
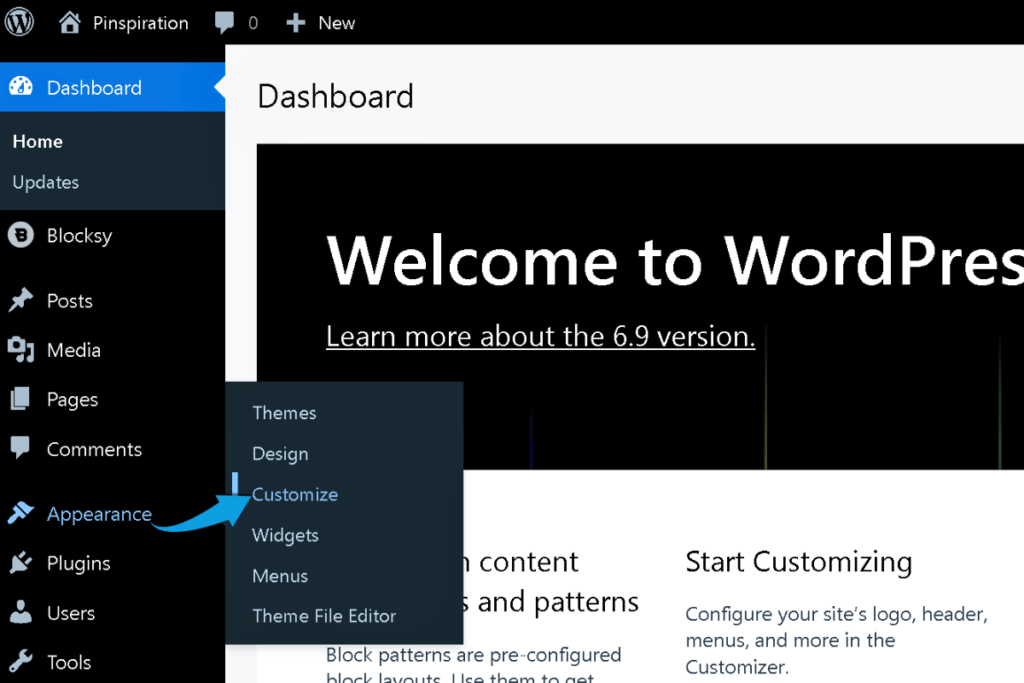
- Log in to your WordPress dashboard
- Go to Appearance → Themes (left sidebar)
- Click Add New Theme button at the top
- In the search bar, type “Blocksy” (or your chosen theme)
- When the theme appears, hover over it and click Install
- WordPress downloads and installs the theme automatically (takes 5-10 seconds)
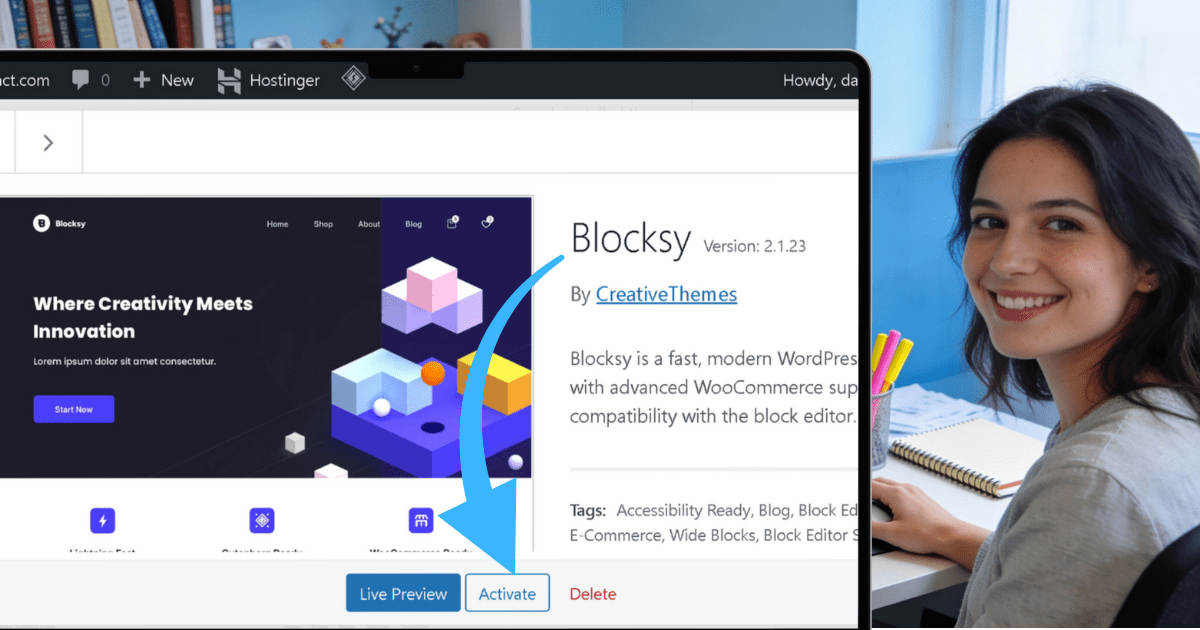
- After installation, you’ll see an Activate button
- Click Activate to make the theme live on your site
That’s it. Your WordPress theme is now active and running.
Method 2: Upload a Premium Theme (If You Purchased)
If you bought a theme from a marketplace like Themeforest or the theme developer directly, you’ll get a ZIP file.
Steps:
- Log in to WordPress dashboard
- Go to Appearance → Themes
- Click Add New Theme
- Click Upload Theme button (top right)
- Click Choose File and select the theme’s ZIP file from your computer
- Click Install Now
- Once installed, click Activate
Important: Don’t unzip the file. WordPress needs the ZIP file format to install correctly.
What to Expect After Activating Your Theme
After activating your theme, don’t panic if your site looks broken or weird. Your old theme’s settings don’t automatically transfer. This is normal. Your site will look fine once you configure the new theme (next steps).
Step 1.5: Install the Blocksy Companion Plugin
Right after activating Blocksy, you’ll see a notification: “Thanks for installing Blocksy, you rock!”
The notification recommends installing the Blocksy Companion plugin. This plugin unlocks extra features and starter templates that make customization easier.
Steps to install Blocksy Companion:
- Look for the blue button: “Install Blocksy Companion”
- Click it
- WordPress installs the plugin automatically (takes 5-10 seconds)
- Once installed, click “Activate” (if prompted)
- Done—Blocksy Companion is now active
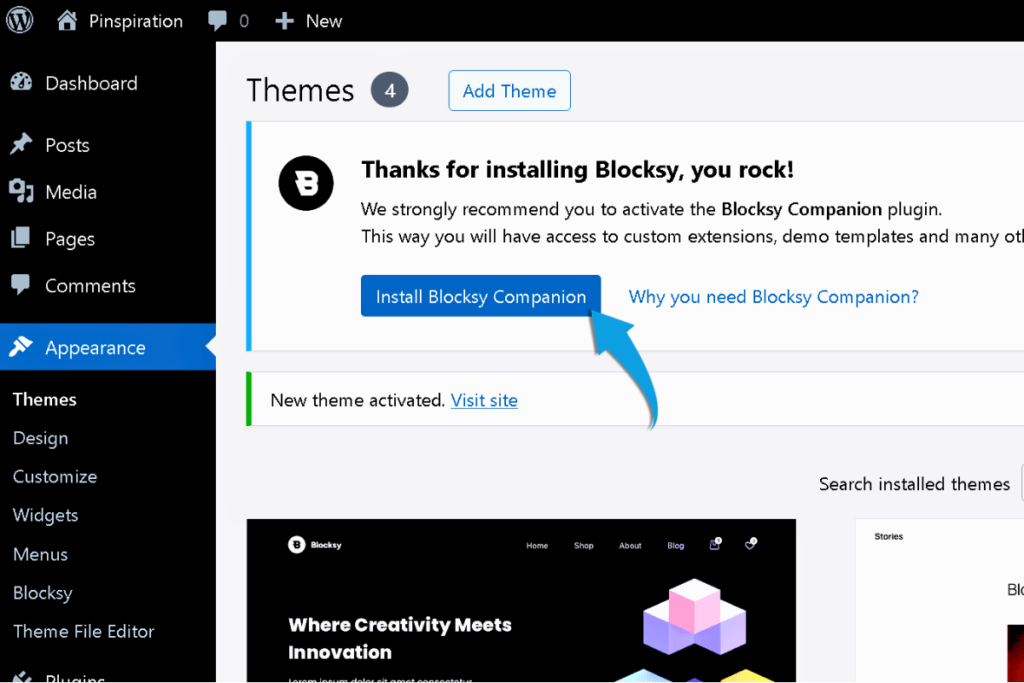
Why install it? The Companion plugin gives you access to pre-built demo templates, additional customization options, and extended functionality. It’s completely free and takes 30 seconds to install. Skip it if you prefer a minimal setup, but for beginners, it makes customization much easier.
Pro Tip: You can always install Blocksy Companion later from Plugins → Add New if you skip it now.
Step 2: Configure Basic Theme Settings
Now that your theme is active, let’s configure the foundational settings. You don’t need to customize everything — just the essentials.
Access Theme Customization
- Go to Appearance → Customize (in WordPress dashboard)
- This opens the Theme Customizer, which shows you a live preview of your site on the right while you edit on the left
The Theme Customizer is your friend. Real-time preview means you see changes as you make them.
Essential Settings to Configure (In This Order)
1. Site Identity (Your Blog’s Basic Info)
In the Customizer left panel, scroll down to the Core section and click Site Identity:
Site Title
Your site title is your blog’s name. It appears in three places: your browser tab, Pinterest when your pins are shared, and sometimes in your header. Choose something clear that describes your niche.
Examples that work:
- “Homemade Wellness Recipes”
- “Money Hacks for Beginners”
- “Simple Parenting Solutions”
Examples that don’t work:
- “My Blog” (too generic)
- “Welcome to My Creative Space” (vague)
- “Blog 2025” (not descriptive)
Keep it 2-4 words. Shorter is better for search results.
Tagline
Your tagline is a one-sentence description of what your blog does. It appears in browser metadata and helps Pinterest understand what your site is about.
Examples:
- “Simple, healthy recipes for busy moms”
- “Budget-friendly finance tips for beginners”
- “Stress-free parenting strategies that actually work”
Your tagline should answer: What problem does my blog solve? Who is it for?
Pro Tip: Your site title and tagline work together when Pinterest shares your content. Readers see both. Make them clear, keyword-relevant, but natural—not stuffed with keywords.
Site Icon (Favicon)
Your site icon is the tiny image that appears in browser tabs next to your site title. It’s also called a favicon.
Requirements:
- Size: 512 × 512 pixels minimum (WordPress auto-scales it down)
- Format: PNG or JPG
- Content: Your logo, blog initials, or simplified icon
How to upload:
- Click Select Site Icon
- Upload your 512×512 image from your computer
- WordPress shows you a preview
- Click Crop if needed (WordPress lets you adjust the crop area)
- Click Select
The favicon appears in browser tabs and bookmarks. Keep it simple and recognizable, even at tiny sizes.

Important Blocksy note: In Blocksy, the site icon is separate from your header logo. The site icon only appears in the browser tab. Your actual blog logo (the one visitors see in your header) gets uploaded in Header → Elements → Logo (we’ll do that in the next subsection).
Creating your site icon with Canva
If you don’t have a logo yet, you can create a simple site icon using Canva (free version available). Your site icon should be simple and recognizable at tiny sizes.
Quick setup in Canva:
- Go to canva.com
- Search for “logo” or “favicon templates”
- Pick a simple design
- Edit the text to your blog initials or name (2-3 characters max)
- Make sure the design is square 1:1 ratio
- Download as PNG, 512×512 pixels
If you need help designing your icon or want AI to create one for you:
Copy and paste this prompt into Google Gemini (free with a Google account):
I’m creating a simple site icon (favicon) for my blog called [Your Blog Name]. The blog focuses on [your niche: food/wellness/finance/parenting]. I want a favicon that’s simple, professional, and represents [describe your brand style: minimal, colorful, playful, elegant, etc.]. Can you create a visual example I can use?
Note: You’ll need to sign in to your Google account for Gemini to generate visual examples. Once generated, download the image and upload it as your site icon in WordPress.
If Gemini isn’t available in your region or you prefer not to sign in, stick with Canva’s free templates—they work perfectly for beginners.
2. Site Colors & Typography
Most beginner bloggers skip this because they’re intimidated by it. Don’t. Your site’s colors and fonts shape how readers feel about your blog. Clean, readable design builds trust and keeps visitors on your pages longer.
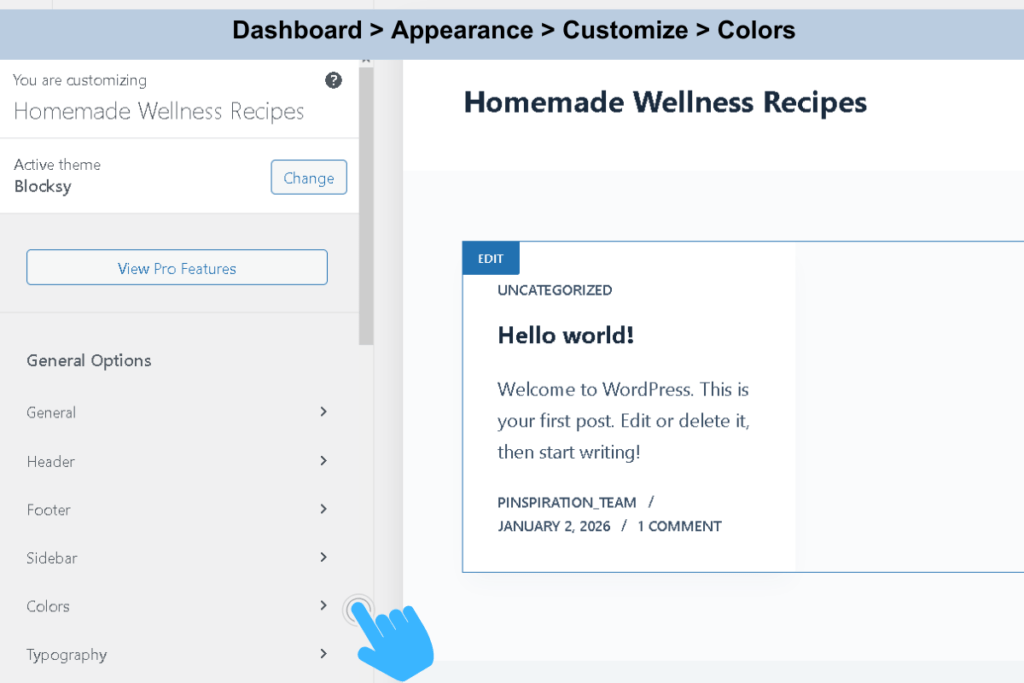
In the Customizer left panel (under General Options), click Colors.
Blocksy makes color management incredibly simple. Instead of changing colors in 20 different places, you set up a Global Color Palette once, and Blocksy automatically applies those colors across your entire site—buttons, links, headings, highlights, everything.
How it works:
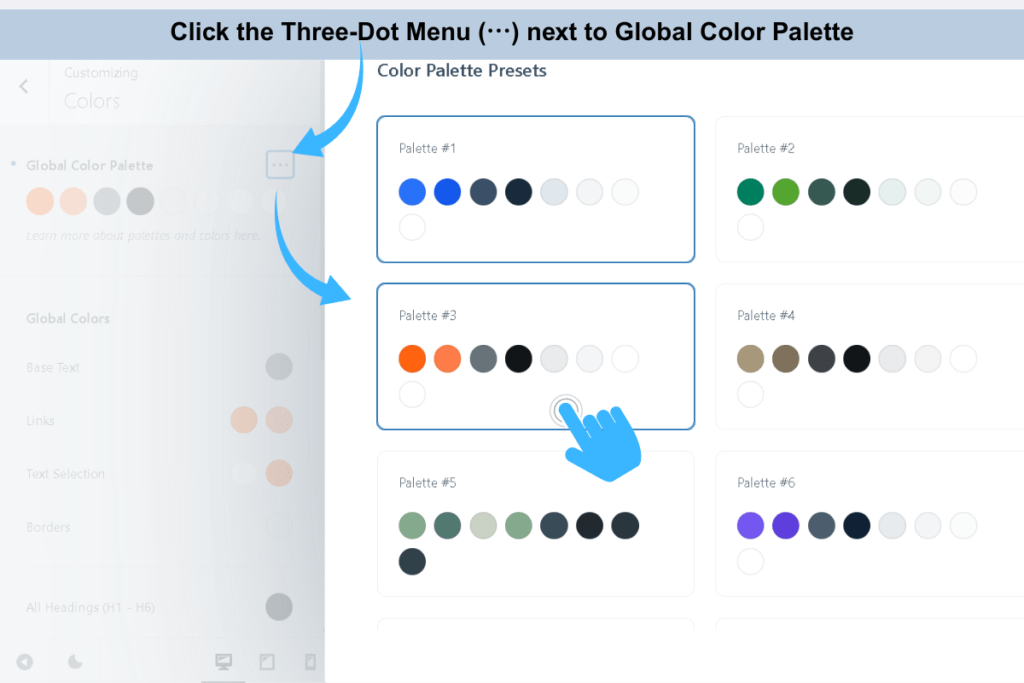
- You’ll see Global Color Palette at the top of the Colors panel
- Blocksy shows 8 default colors (the standard palette includes colors like blue, coral, gray, and black)
- All the color settings below (Base Text, Links, Headings, etc.) automatically use these palette colors
- You only need to change the palette—the rest adjusts automatically
To choose a new color palette:
- Click the three-dot menu (⋯) next to Global Color Palette
- Click Color Palettes
- Blocksy shows 12 pre-made palettes under the Predefined tab (blues, greens, oranges, browns, purples, teals, reds, yellows, and more)
- Click the palette that matches your niche
- Done—your entire site updates instantly. Don’t forget to hit the blue “Publish” button.
Choosing the right color palette for your blog
Your color choice isn’t just aesthetic—it affects Pinterest performance and reader trust. Pinterest users respond to specific color psychology.
Use AI to research your ideal color palette:
Copy and paste this prompt into Perplexity or Google Gemini (both free):
I’m setting up a [your niche: food/wellness/finance/parenting] blog. I want to choose a color palette that appeals to Pinterest users, builds trust, and performs well for [describe your audience: busy moms, budget-conscious millennials, health-focused readers, etc.]. What color palettes work best for my niche based on Pinterest psychology and user behavior research? Please provide 2-3 specific palette recommendations with hex codes.
AI will research color psychology for your niche and provide evidence-backed palette suggestions you can immediately apply in Blocksy.
Pro Tip: Choose one accent color and stick with it. That color will appear in buttons, links, and Pinterest pins. Consistent branding makes your pins instantly recognizable in feeds, which increases Saves.
Don’t choose more than 3-4 main colors total. More colors = slower site and visually chaotic pins.
Using Canva to test your color palette
Before committing to a palette in WordPress, test how it looks in Pinterest pins.
Quick Canva color test:
- Go to canva.com
- Create a new Pinterest pin (1000 × 1500 px)
- Add a simple text box with your blog name
- Apply the colors from your chosen Blocksy palette (or the AI-suggested hex codes)
- Does it feel right? Does it stand out in Pinterest feeds?
If the colors feel wrong, try a different Blocksy palette or ask AI to refine your palette.
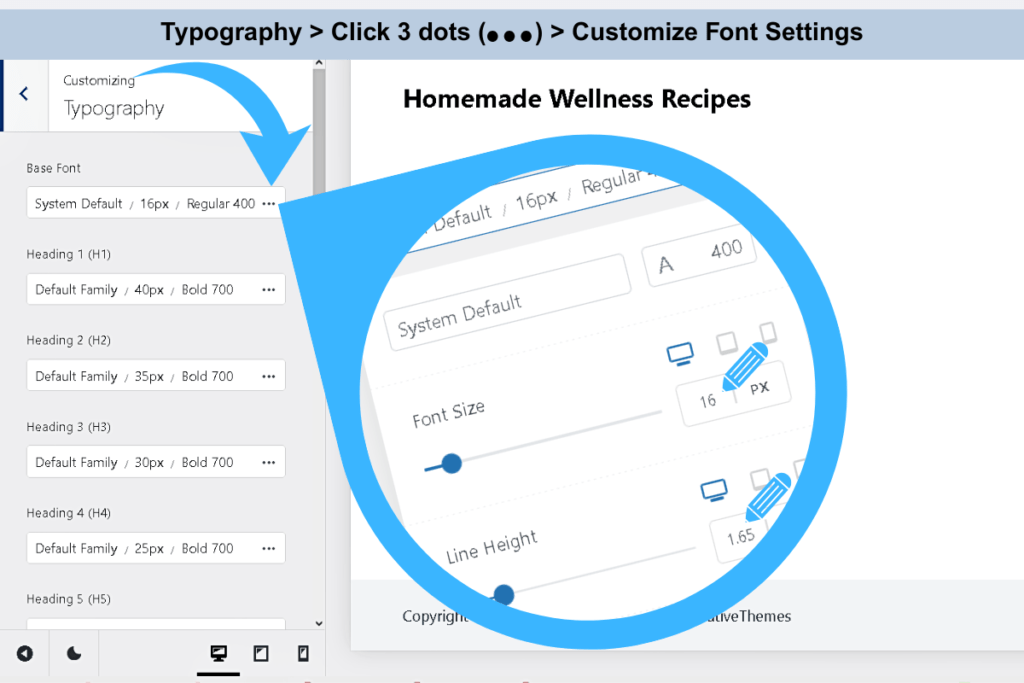
Typography (fonts)
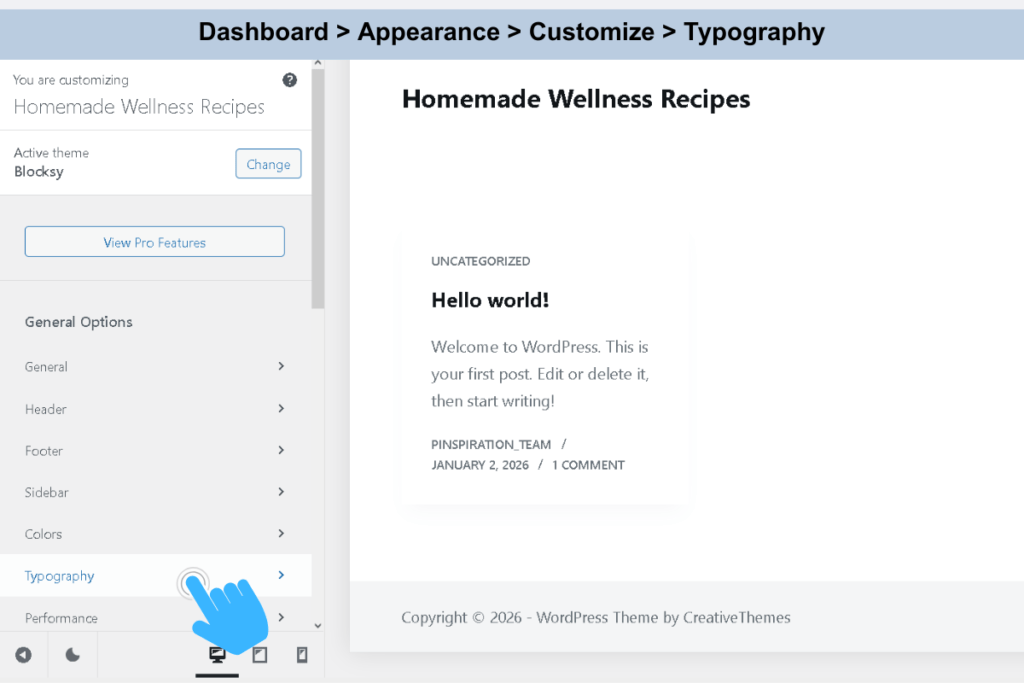
In the Customizer left panel (under General Options), click Typography.
Blocksy shows you every text element on your site:
- Base Font (body text)—controls the main font used across your entire site
- Heading 1 (H1) through Heading 6 (H6)—separate controls for each heading level
- Buttons, Blockquote, Preformatted—additional typography options
For beginners, here’s what to do:
Option 1: Leave everything at Blocksy’s default.
Blocksy uses System Default fonts (fonts already installed on your visitor’s device). These fonts load instantly, are privacy-friendly, and look professional on all devices—including mobile, where 70% of Pinterest traffic comes from.
Option 2: Choose a Google Font.
Blocksy includes the entire Google Fonts library—over 1,500 fonts—available in the font dropdown menu.. To change your Base Font:
- Click the three-dot menu (⋯) next to Base Font
- Scroll through the font list (System fonts are marked with S, Google Fonts with G)
- Search for a font name (e.g., “Roboto” or “Open Sans”)
- Click to apply
Font size and readability tips:
- Body text: Desktop: 17-18px. Mobile: 16-17px minimum. Smaller text frustrates mobile readers.
- Headings: Desktop H2: 26-28px. Mobile H2: 22-24px. Too large = overwhelming on small screens.
- Font families: Stick with 1-2 fonts total. More fonts = slower page load.
- Use device-specific controls: Click the desktop/tablet/mobile icons at bottom-right to adjust each device separately.
Responsive font sizes for desktop, tablet, and mobile
One of Blocksy’s most powerful features: device-specific typography. You can set different font sizes for desktop, tablet, and mobile—ensuring your text looks perfect on every screen.
How to access device-specific font controls:
Look at the bottom-right corner of your Customizer preview window. You’ll see three icons:
- Desktop icon (computer screen)
- Tablet icon (tablet screen)
- Mobile icon (smartphone screen)
How to set different font sizes per device:
- In Customizer → Typography → Base Font, you’ll see the current font size (e.g., 17px)
- Click the tablet icon at the bottom-right
- Adjust the font size specifically for tablets (e.g., 16px)
- Click the mobile icon at the bottom-right
- Adjust the font size specifically for mobile devices (e.g., 15px)
This applies to every typography setting—Base Font, Headings 1-6, Buttons, Blockquote, etc. You can customize each one separately for desktop, tablet, and mobile.
Why this matters:
70% of Pinterest traffic comes from mobile. If your desktop font size is 18px, that might be too large on a smartphone screen. Setting mobile-specific font sizes (e.g., 16px) ensures your blog is readable and doesn’t overwhelm mobile users.
Tip: Don’t go below 16px for body text on mobile—smaller text frustrates readers and increases bounce rates.
If you need help choosing fonts
Copy and paste this prompt into Google Gemini (free with a Google account):
I’m setting up a [your niche: food/wellness/finance/parenting] blog using the Blocksy WordPress theme. I want my blog to look professional, readable on mobile, and trustworthy for Pinterest users. What font pairings (one for body text, one for headings) would work best? Please suggest fonts available in Google Fonts. Also, recommend specific font sizes for desktop (17-18px body text) and mobile (16-17px body text) to ensure readability on Pinterest where 70% of traffic comes from mobile devices.
Gemini will suggest font combinations you can immediately apply in Blocksy’s Typography panel.
Why this matters for Pinterest
Pinterest users scan pins in under 1 second. Your blog’s colors and fonts need to be:
- Instantly recognizable—consistent branding across pins
- Easy to read on phones—70% of Pinterest traffic is mobile
- Trustworthy—clean design signals professionalism
Chaotic colors or unreadable fonts = fewer clicks, fewer Saves.
Once you’ve set your Global Color Palette and confirmed your fonts, click Publish (top right, blue button inside the Customizer Panel) to save your changes. If you don’t click Publish, your changes won’t be saved.
3. Header settings
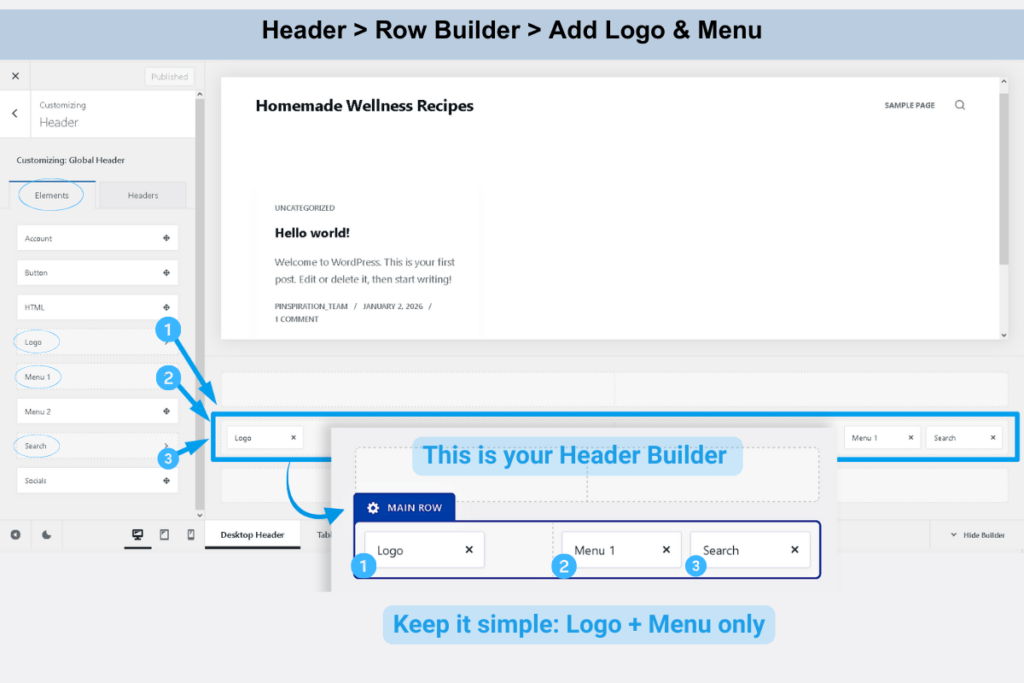
Your header is the first thing visitors see. It should be clean, easy to navigate, and not overwhelming. Blocksy’s Header Builder makes this simple—no coding required.
In the Customizer left panel (under General Options), click Header.
Understanding the Blocksy header builder
Look at the bottom of your browser window—you’ll see Blocksy’s visual header builder with three horizontal rows:
- Top Row (optional—usually for announcements)
- Main Row (your primary header—where Logo and Menu live)
- Bottom Row (optional—for additional navigation)
By default, Blocksy already places three elements in the Main Row:
- Logo (left side)
- Menu 1 (center-right)
- Search (right side)
The Main Row is divided into 2 sections (left and right). This is all you need as a beginner—don’t overthink it.
On the left sidebar, you’ll see an Elements tab with draggable elements (Button, HTML, Socials, etc.). For beginners, ignore these—the default Logo + Menu setup works perfectly.
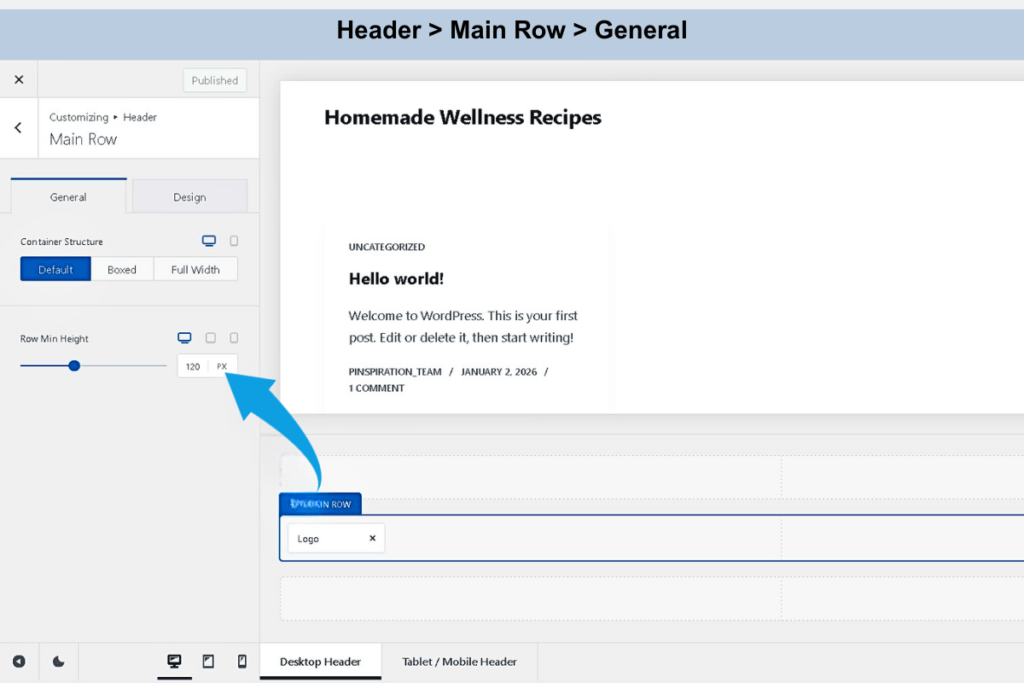
Customizing the Main Row
To adjust settings for the entire Main Row (height, background color, spacing):
- Hover over the blue “Main Row” tab at the bottom of your browser
- A small blue tab will pop up
- Click it
- The left panel now shows Main Row settings (Container Structure, Row Min Height, Design options)
For beginners: Leave everything at default. Blocksy’s defaults are mobile-optimized and fast-loading.
Customizing your logo
To change your logo or adjust its size:
- Look at the Main Row at the bottom of your browser
- Click on the “Logo” block inside the Main Row (left side)
- The left panel switches to Logo settings
You’ll see two tabs: General and Design.
Under General:
- Logo: Click Select logo and upload your logo file (PNG or SVG recommended)
- Logo Height: Drag the slider to adjust size (default 50px works for most blogs)
- Site Title: Toggle this ON if you don’t have a logo—your blog name displays as text instead
- Site Title Link: Leave this ON so your logo/title links back to your homepage
If you don’t have a logo yet:
Toggle Site Title ON and skip the logo upload. You can customize the font, size, and color under the Design tab.
Don’t Have a Logo? Create One in Canva
No logo yet? Create a simple one in Canva in 15 minutes:
Quick 5-Step Process:
✅ Step 1: Go to Canva.com → Sign up (free)
✅ Step 2: Search “Logo” → Pick a template
✅ Step 3: Resize to 250 × 100 pixels
✅ Step 4: Change text, colors, and icons to match your brand
✅ Step 5: Download as PNG → Upload to WordPress
Cost: $0 | Time: 15-30 minutes | Experience Needed: None
→ Full tutorial: See our complete logo creation guide
Customizing your navigation menu
By default, Blocksy places Menu 1 in your Main Row. To connect it to your WordPress menu:
Click on the “Menu 1” block inside the Main Row (center-right area)
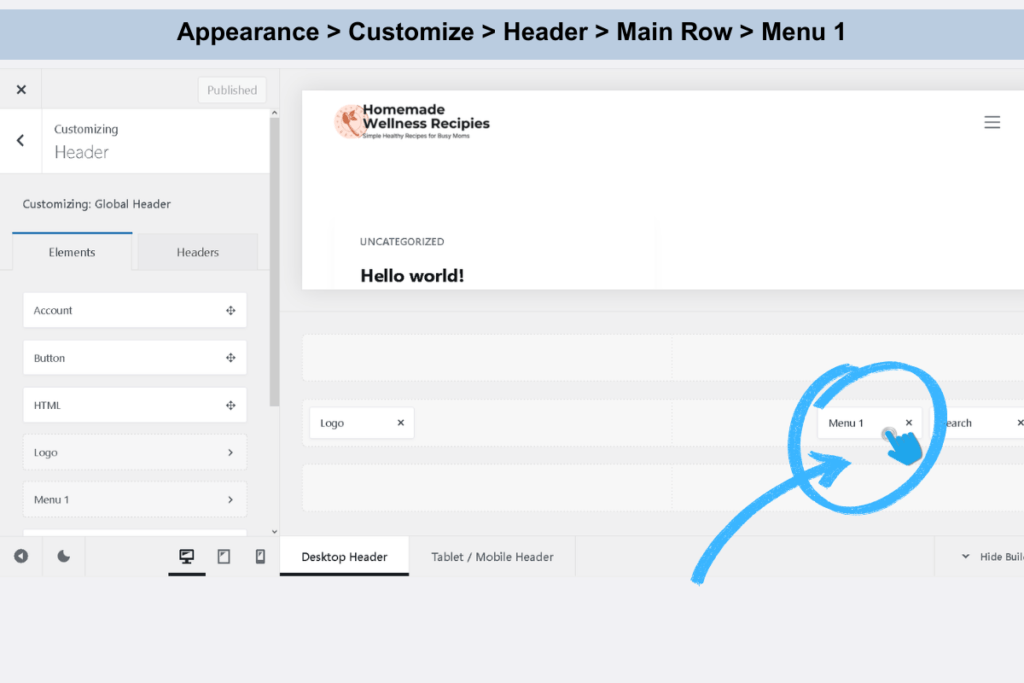
The left panel switches to Menu settings
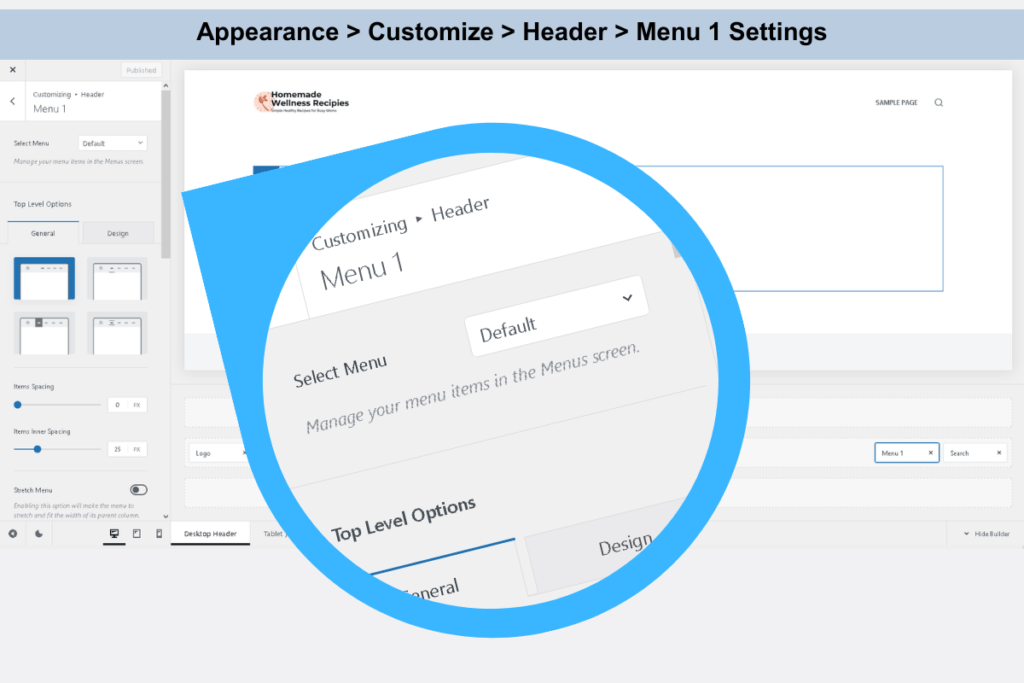
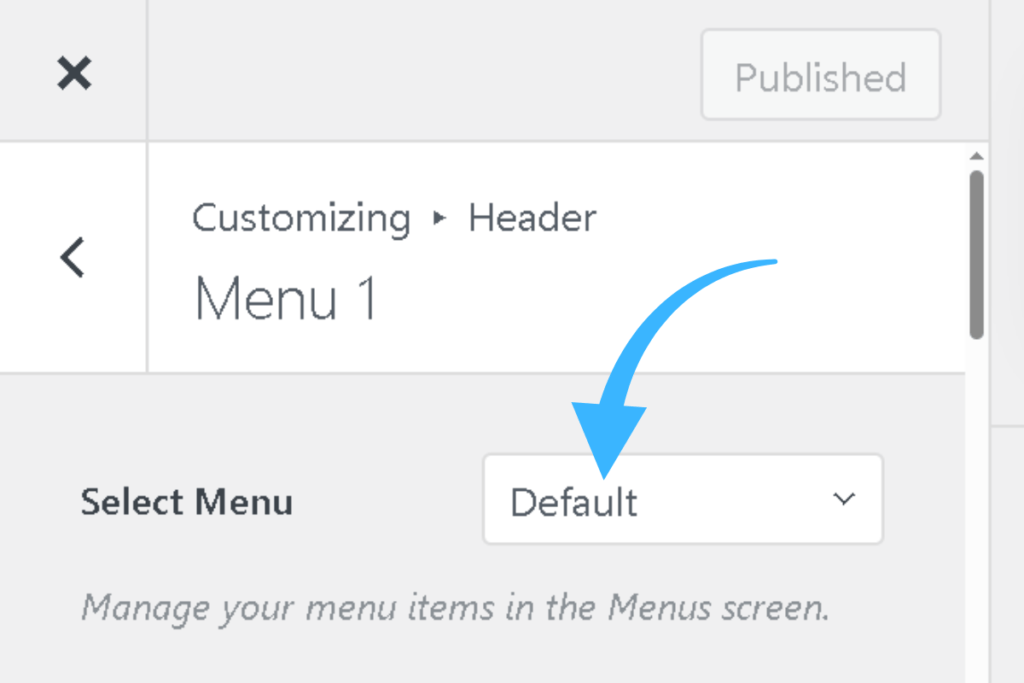
Under Select Menu, choose the WordPress menu you created earlier. (If you haven’t created a menu yet, don’t worry—we’ll cover that in the next guide on creating WordPress navigation menus. Once you’ve created your menu, come back here and select it from the dropdown.)
Leave the dropdown at “Default” for now. This tells Blocksy to use whichever menu you assign later.
If you’ve already created a WordPress menu and selected it here, your navigation menu is now live and will display in your header.
What about the Search element?
By default, Blocksy includes a Search element in the Main Row (right side). For beginners, you can leave it or remove it.
To remove Search:
- Click the X icon on the Search block inside the Main Row at the bottom of your browser
- Done—Search is removed
Most beginner blogs don’t need search until they have 20+ posts. Remove it to keep your header clean.

Mobile header settings
Blocksy automatically creates a mobile-friendly version of your header. To preview it:
- At the bottom of the Customizer (next to Desktop Header / Tablet / Mobile Header tabs), click Tablet / Mobile Header
- Your header preview updates to show how it looks on mobile devices
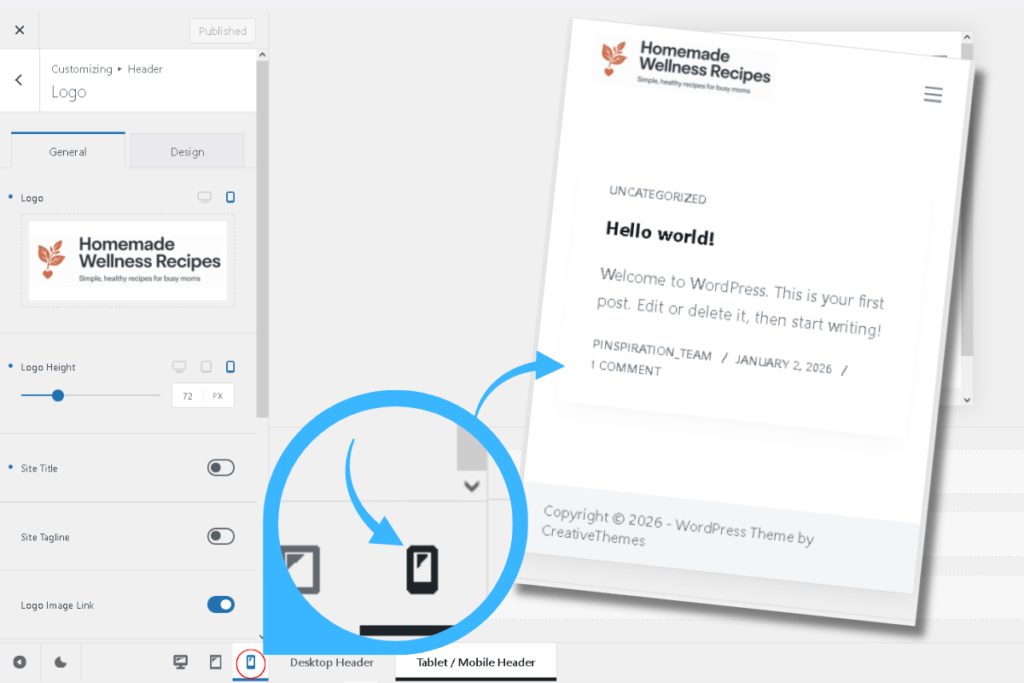
Blocksy converts your desktop menu into a hamburger icon (☰) on mobile automatically. No extra setup needed.
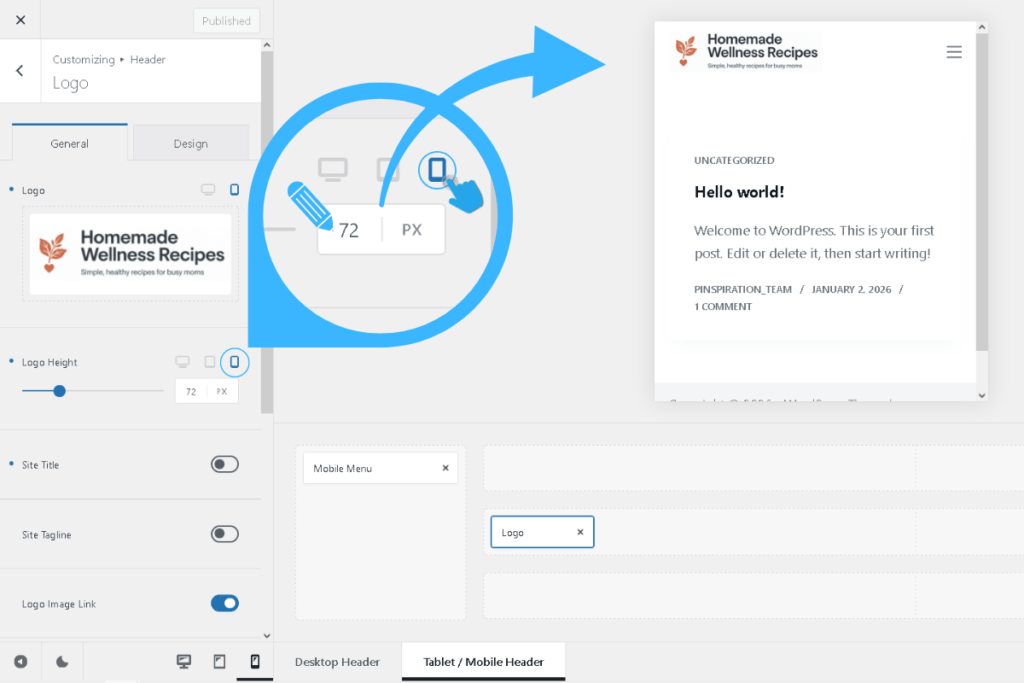
Adjusting logo size for mobile:
Your desktop logo might look too large on mobile screens. To adjust it:
- While viewing the Mobile Header preview (make sure you’re on the Tablet / Mobile Header tab at the bottom)
- Click on the “Logo” block inside the Main Row
- The left panel shows Logo settings
- Under Logo Height, you’ll see three device icons (desktop, tablet, mobile)—click the mobile icon (smartphone)
- Drag the Logo Height slider to reduce the size (try 35-40px for mobile—smaller than your desktop size)
- The preview updates in real-time
Why this matters: 70% of Pinterest traffic comes from mobile. A logo that’s 60px on desktop might overwhelm a small phone screen. Reducing it to 35-40px on mobile keeps your header clean and fast-loading.
Using AI to plan your header layout
If you’re unsure what elements to include in your header, ask AI for guidance:
Copy and paste this prompt into Google Gemini (free with a Google account):
I’m setting up a [your niche: food/wellness/finance/parenting] blog header using the Blocksy WordPress theme. What header elements should I include for a beginner blog that prioritizes simplicity, fast loading, and Pinterest traffic? Should I include search, social icons, or should I keep it minimal with just logo and menu?
Gemini will analyze your niche and recommend the simplest, most effective header layout for beginners.
Once you’ve customized your Logo and Menu (and removed Search if needed), click Publish (top right, blue button inside the Customizer Panel) to save your header.
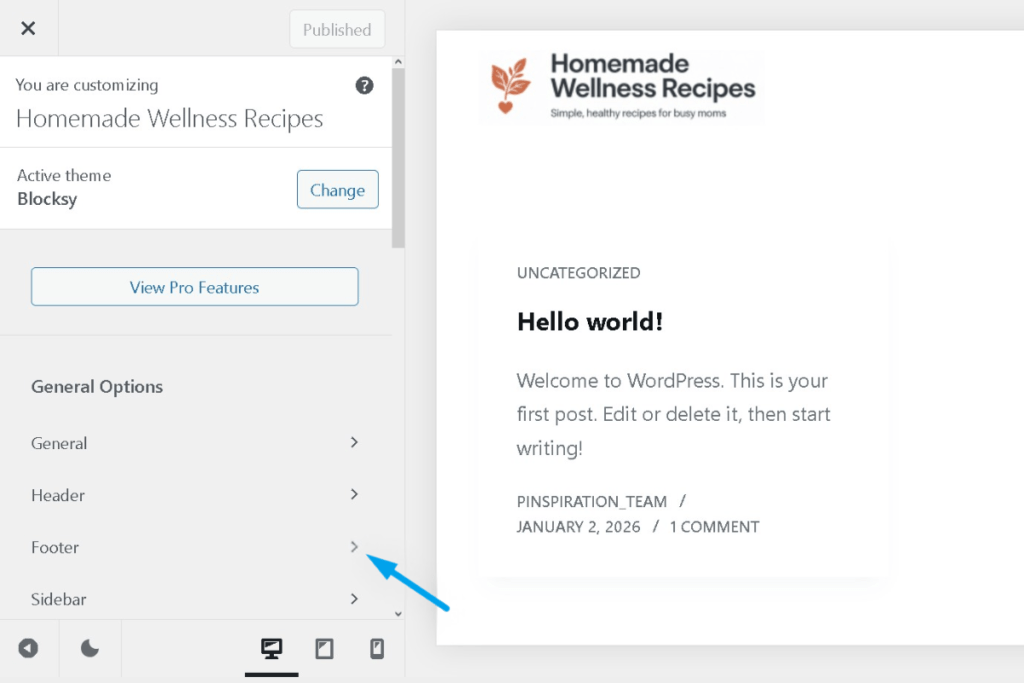
4. Footer settings
Your footer appears at the bottom of every page on your blog. For beginners and affiliate blogs, the best footer is simple, minimal, and focused on legal compliance—not cluttered with widgets or unnecessary links.
In the Customizer left panel (under General Options), click Footer..
What to include in your footer (and what to skip)
For affiliate blogs focused on Pinterest traffic, less is more. Here’s what you actually need:
Essential footer elements (MUST-HAVE):
- Legal page links:
- Privacy Policy (legally required for analytics, cookies, forms, comments)
- Terms & Conditions (protects you from liability)
- Affiliate Disclosure (FTC requirement for monetized blogs)
- Copyright notice: Example: “© 2026 YourBlogName”
- Optional: “About” or “Our Story” link (if not already in your main menu)
What to SKIP (for now):
❌ Social media icons in footer (Blocksy lets you add social share buttons to individual posts instead—covered in a later guide)
❌ Newsletter signup forms (distracting in footer—put this in posts or sidebar instead)
❌ Multiple footer columns (complex, corporate-style—not beginner-friendly)
❌ Footer widgets (slow load times, unnecessary for new blogs)
❌ Sitemap links (overwhelming for visitors, unnecessary for small blogs)
Why minimal works: 70% of Pinterest traffic is mobile. A clean, fast-loading footer = better user experience and faster page speeds (which Pinterest’s algorithm rewards).
Note: We’ll cover how to create these legal pages in a separate guide. For now, you can skip adding them to your footer. Once you’ve created them, come back here and add the links.
In the Footer customizer panel, look for Copyright or Footer Bar. You’ll see a text box where you can customize your copyright message.
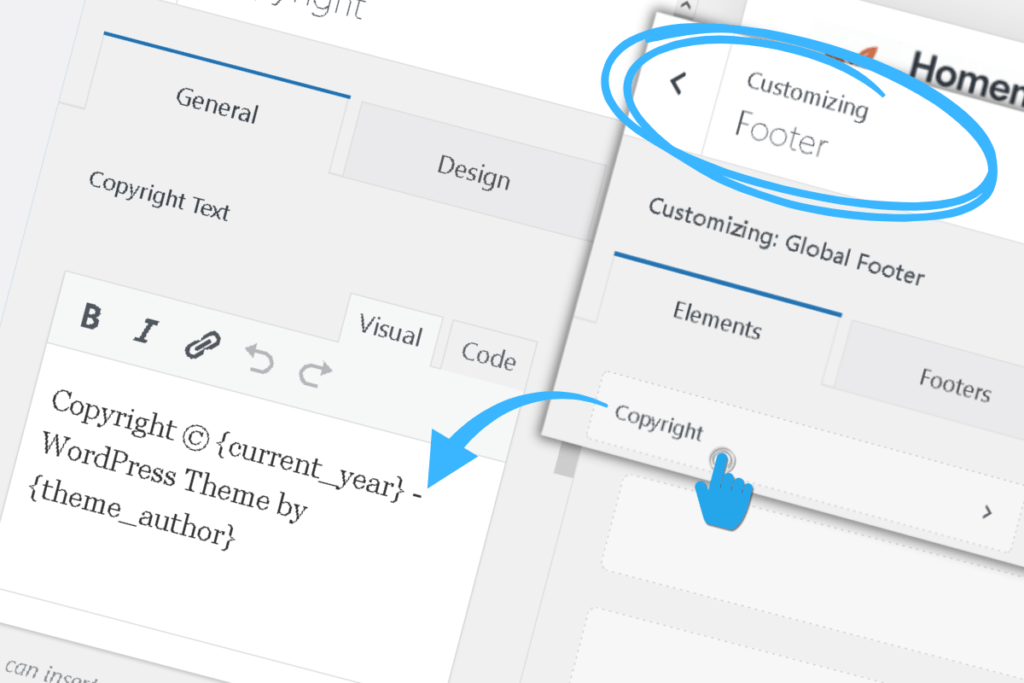
Default Blocksy text:
Copyright © {current_year} - WordPress Theme by {theme_author}What you need to change:
The {current_year} part updates automatically—you don’t need to touch it. You only need to replace this part: - WordPress Theme by {theme_author}
Option 1: Simple copyright (minimal)
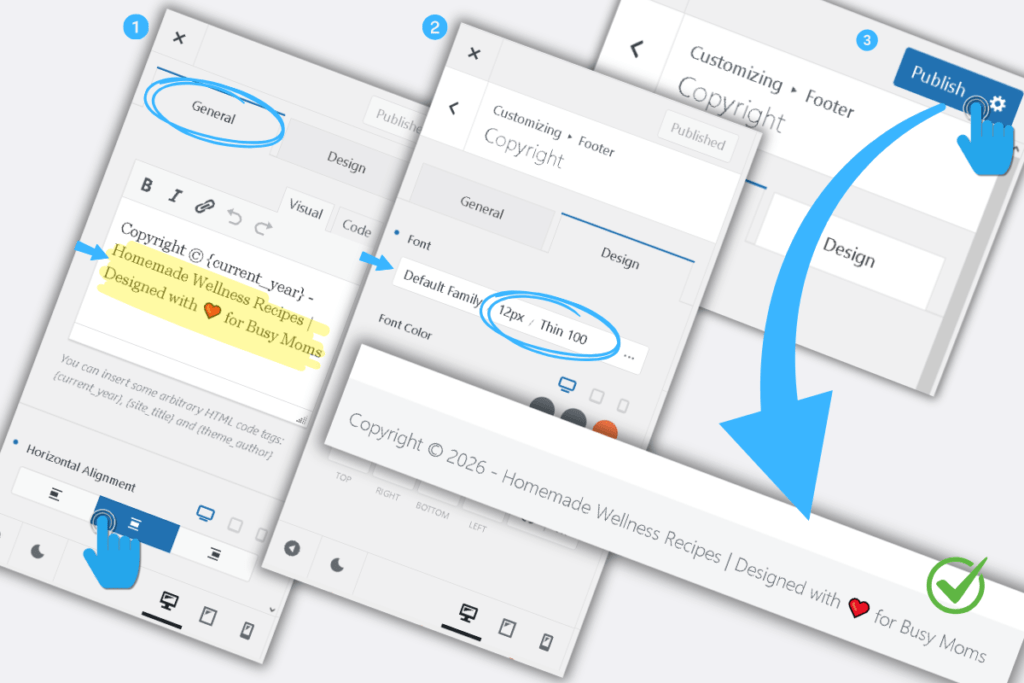
Copyright © {current_year} - YourBlogNameOption 2: Add personality
Copyright © {current_year} - YourBlogName | Designed with ❤️ for [your niche] loversReplace YourBlogName with your actual blog name and [your niche] with your topic (e.g., “budget travelers” or “beginner gardeners”).
Example result in the footer:
Copyright © 2026 - Budget Kitchen Blog | Designed with ❤️ for budget-conscious home cooks(The year 2026 appears automatically because of {current_year})
Recommended Copyright Text Settings:
After customizing your copyright message, optimize the appearance for a clean, professional footer:
Design Tab Settings:
- Font Size: 12px (minimum readable size, appropriate for footer text)
- Font Weight: Thin 100 (keeps footer text subtle and unobtrusive)
General Tab Settings:
- Horizontal Alignment: Center (creates balanced, symmetrical footer appearance)
Why these settings work for Pinterest-first blogs:
- 12px + Thin 100 = minimal visual weight, keeps focus on your content above
- Center alignment = professional, clean look that works on mobile (70% of Pinterest traffic)
- Footer stays legally compliant without being distracting
Once you’ve customized your copyright text, click Publish (blue button at the top right inside the Customizer Panel) to save your footer settings.
You’re Ready for the Next Steps
Congratulations—you’ve successfully installed and configured your WordPress theme! Your blog now has:
✅ A professionally configured theme optimized for speed and mobile
✅ Clear site identity (title, tagline, favicon)
✅ Cohesive colors and readable fonts
✅ A clean, functional header
✅ A minimal, compliant footer
What’s coming next:
In the next guide, we’ll tackle WordPress Settings to Change After Install—the critical configuration changes you need to make right after installing WordPress. These settings protect your blog and prepare it for monetization.
After that, we’ll install the essential plugins that improve your blog’s speed, security, and SEO without overwhelming your site.
Then we’ll set up your navigation menu—the backbone of your blog’s structure. You’ll learn how to create a simple menu that helps visitors find your content (and keeps Pinterest happy with your site structure).
Your WordPress journey is just getting started. You’ve built a solid foundation—now let’s make it visible and trustworthy to both readers and search engines.
Ready to Build Your Complete Blog?
Setting up your theme is one part of the puzzle. The real question is: Do you have a clear roadmap for the rest?
Most beginner bloggers get stuck after theme setup because they don’t know what comes next—which pages to build, how to structure their content, or how to turn traffic into income.
Sophia Lee’s Beginner Blogging Course gives you the complete blueprint. You’ll learn:
- Exactly which pages you need (and what to write on them)
- How to structure your blog for Pinterest traffic
- The step-by-step process to monetize your audience
- Real examples from bloggers earning income in their first year
Don’t guess. Follow a proven system that works.